Adding a New View in PPOME (Part 1)
Every consultant working with HCM functionality is familiar with the PPOME transaction. The number of users of this transaction is usually quite large on every project. Let's look at a situation where users have conflicting interests regarding the "appearance" of this transaction. One says they work only with positions and only need those displayed in the Object Manager. Another user claims they only need organizational units. A third user works with both but is, for example, completely uninterested in positions. Let's try to solve this problem.
There are several ways to approach it. One way — probably the simplest — is to adjust the existing (standard) Object Manager settings; another, more complex way — is to create your own "view" for the PPOME transaction.
The first method won't work for us because it would hide objects for all PPOME users, while using the second method allows us to create a separate transaction that processes the necessary view with the required set of objects. If necessary, you can create as many such views and corresponding transactions as needed and assign them to user roles. We will proceed with the second method.
Task
Create a new view in the PPOME transaction. In the Object Manager of the new view, we should leave only the "Organizational Unit" and "Position" objects. Also, create a transaction that will launch the required scenario, bypassing the standard PPOME transaction.
Reminder
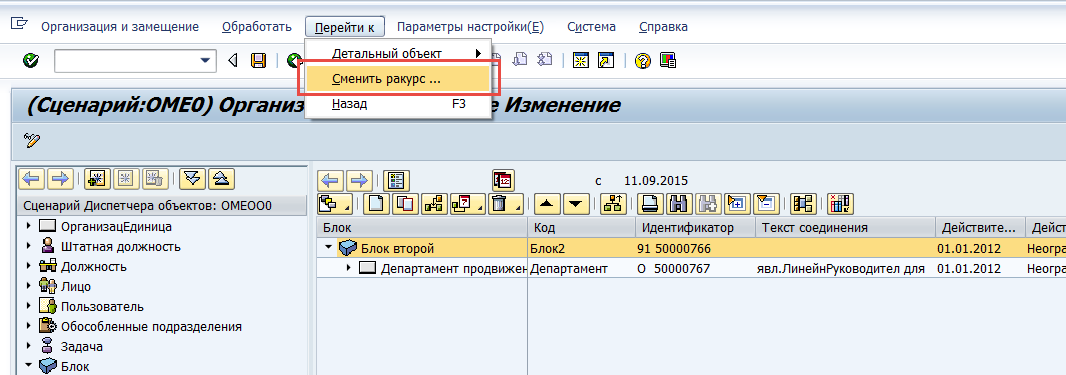
The process of changing existing views in PPOME: go into PPOME, select the menu: Navigate → Change View. In the window that opens, you will be prompted to select the desired view. By the end of this post, we should see our new view in this list. Below is a step-by-step description of how to create it.
1. Define a New Scenario
Go to the view cluster T77FRAMEWORK using transaction SM34 and click on New Entries.
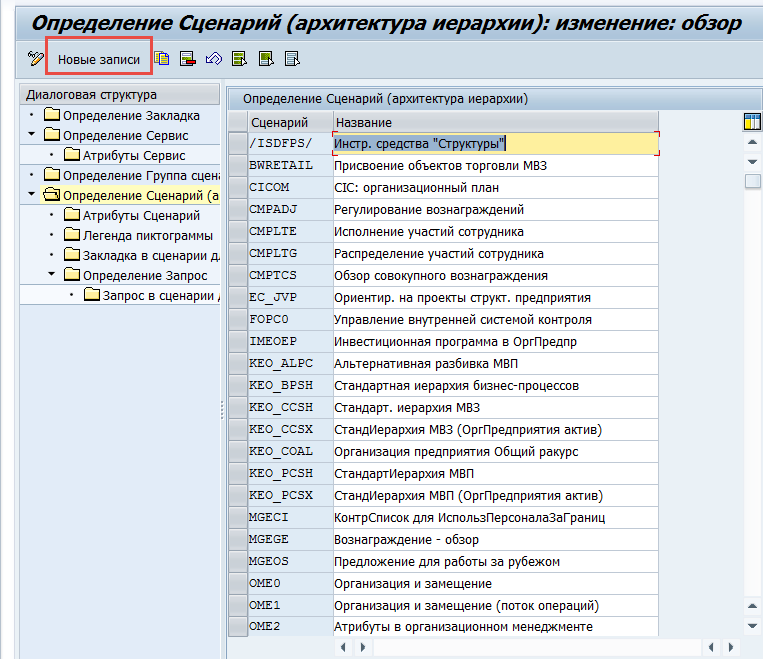
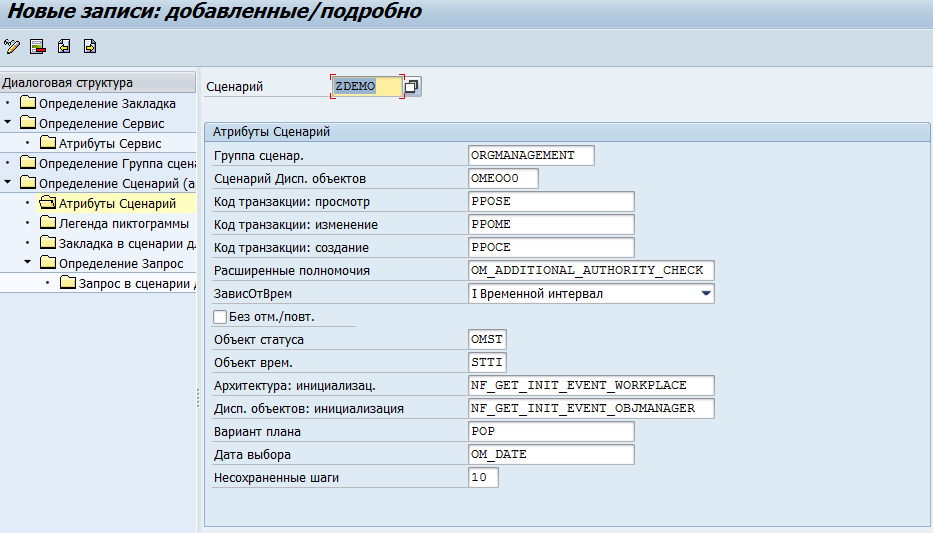
Define the scenario code and its name. Select the "Scenario Attributes" node and click New Entries.

At this step, you can use the contents of the default scenario OME0 (used in PPOME) as a basis but pay attention to these fields:
- Object Manager Scenario
- Transaction Code: Display
- Transaction Code: Change
- Transaction Code: Create
We will modify these fields later. For now, create a new entry based on the content of scenario OME0.
Save the entered data.
2. Define a New Object Manager Scenario
To define the list of objects we plan to work with, we need to create a new Object Manager scenario and link it to the scenario attributes (created in Step 1).
Navigate to: IMG → Personnel Management → Organizational Management → Hierarchy Framework → Object Manager → Define Own Scenario
Create a new entry, input an identifier for the scenario, and select the Multiple Selection property. In this example, the identifier ZDEMO is used.

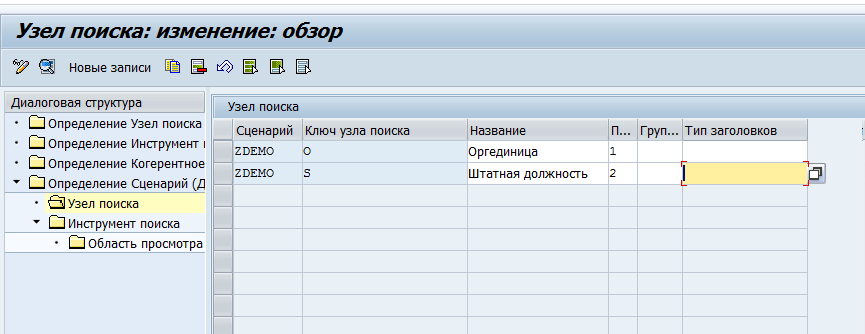
Move to the "Search Node" level and create a new record.For the Object Manager Scenario, select the created ZDEMO.For the Search Node Key, choose the objects needed in the new view. In our case, it’s:
- Organizational Unit (Object type O)
- Position (Object type S)
Define their sequence numbers:
- Organizational Unit (O) — No. 1
- Position (S) — No. 2
Save your entries.
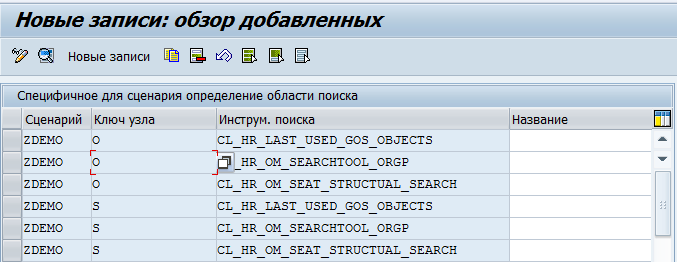
2.1 Define Search Tools for the Created Object Manager Scenario
Now, we need to define search tools for the objects included in the just-created Object Manager scenario. Since we use standard objects, we can base it on the settings of the standard scenario OMEOO0, copying them for our scenario ZDEMO. For this:
- Open table V77FSEAT using transaction SM30.
- Select the entries for scenario OMEOO0 and copy them to ZDEMO.

Once copying is complete, the configuration should look similar to the example shown in the original document.
Next, open SPRO: IMG → Personnel Management → Organizational Management → Hierarchy Framework → Object Manager → Define Own Scenario
Select scenario ZDEMO and open the "Search Tool" node.
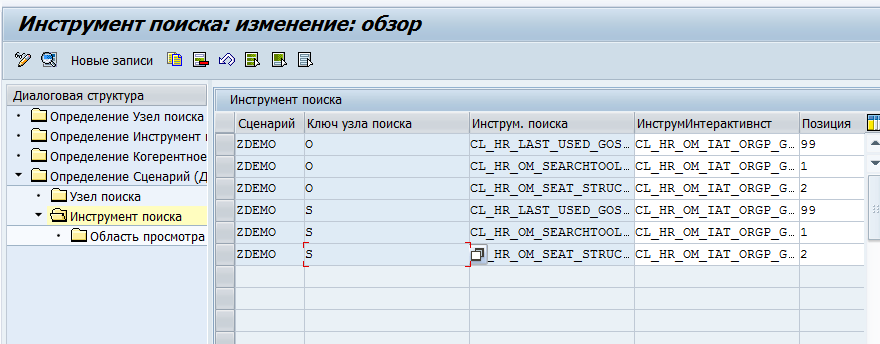
The copied records should appear in the configuration table.
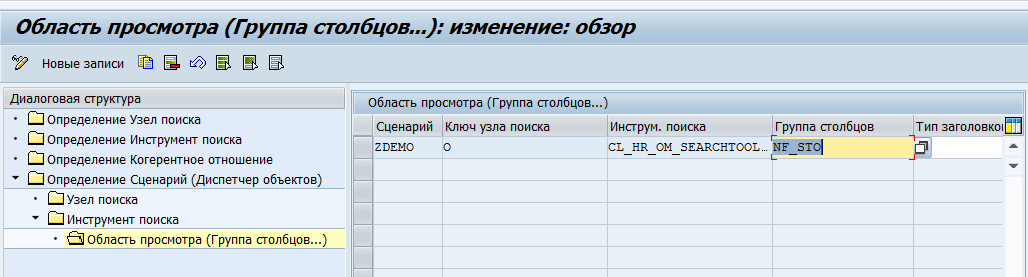
Note that for each search tool, the "View Area (Column Groups...)" node content was also copied.
3. Creating Transactions for Viewing/Editing/Creating the Structure
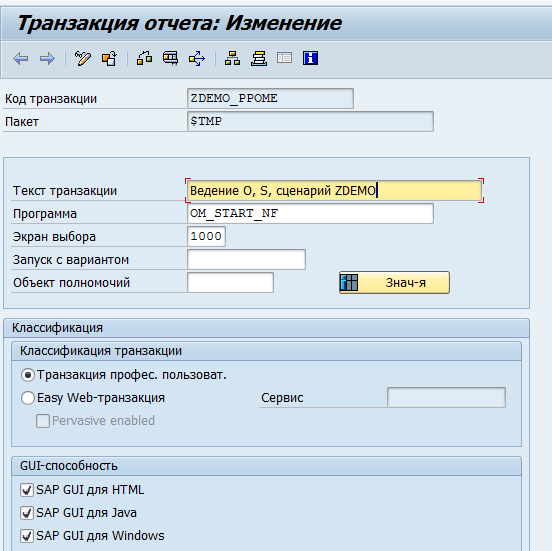
Create your own transactions that will allow you to view/create/edit the objects of the new view. To do this, copy the standard transactions PPOME, PPOSE, and PPOCE into Z* transactions using the transaction SE93.
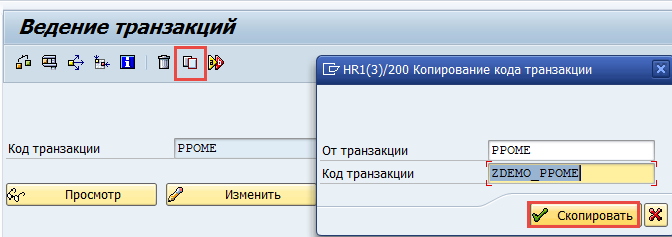
If needed, you can rename these transactions.
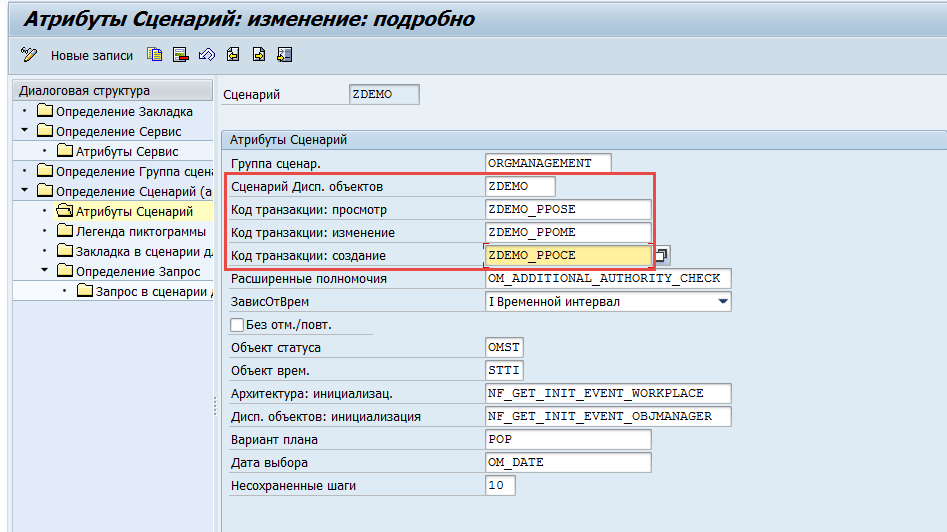
4. Making Adjustments to the Created Scenario
Go back to Step 1 (Defining a New Scenario) and adjust the attributes of the ZDEMO scenario copied from OME0, specifically:
- Object Manager Scenario (use the ID from Step 2)
- Transaction Codes (use the Z* transactions from Step 3)
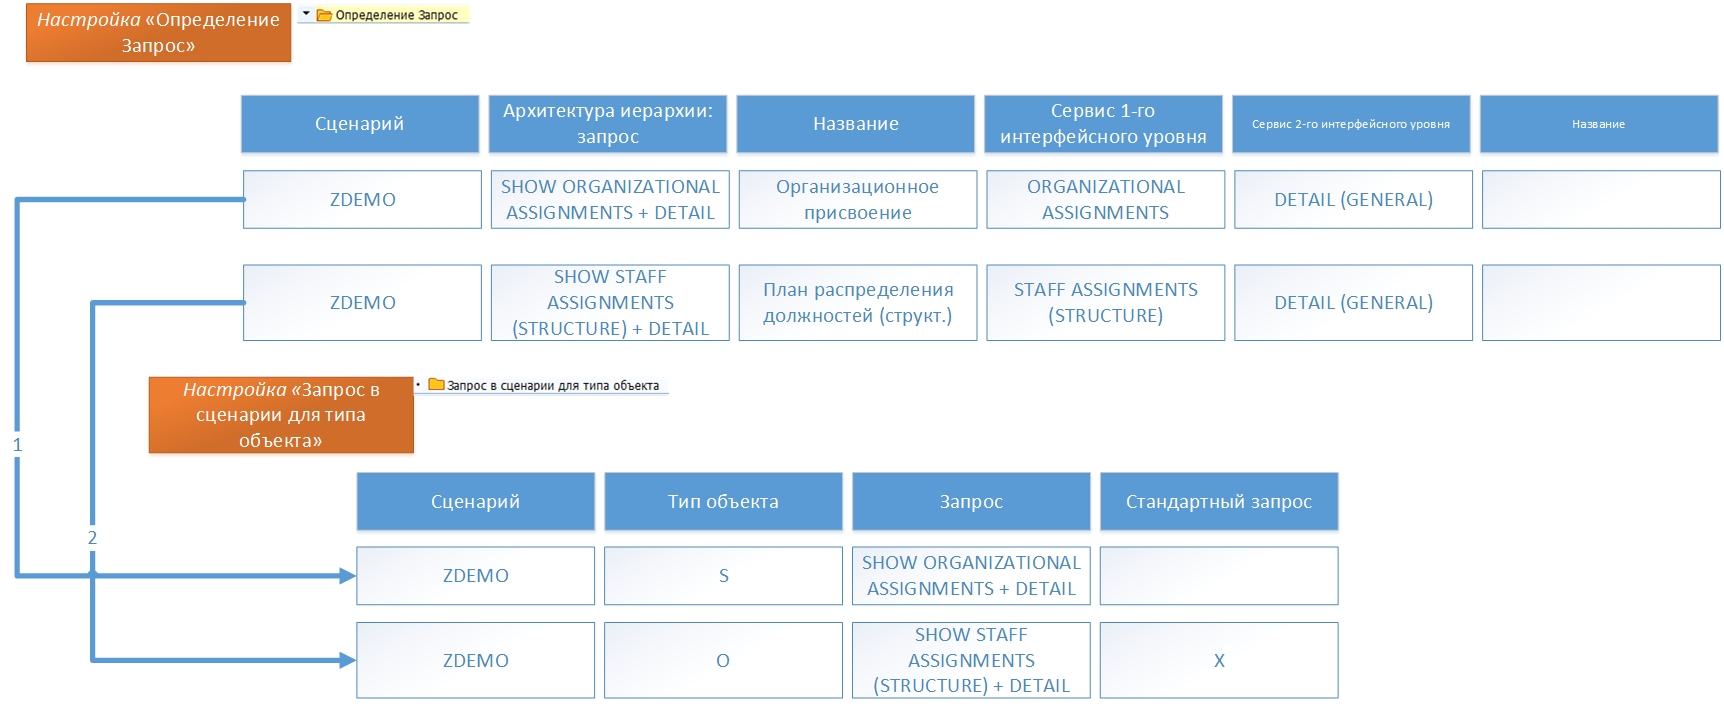
5. Defining Queries for the Scenario
A query will help display additional data about the object selected by the user in the Object Manager. In our example, standard objects "O" and "S" are used, so it’s enough to create a query by analogy with the OME0 scenario.
To do this:
- Go to SM34, view cluster T77FRAMEWORK.
- Select the ZDEMO scenario and open the "Define Query" node.
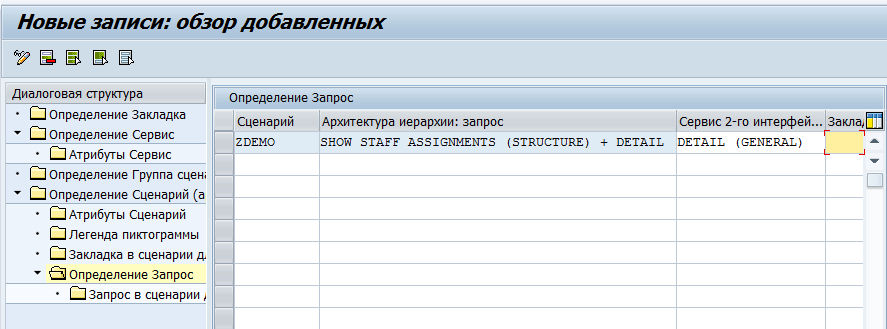
After defining the query, select the "Query in Scenario for Object Type" node and create new entries similar to the standard scenario.
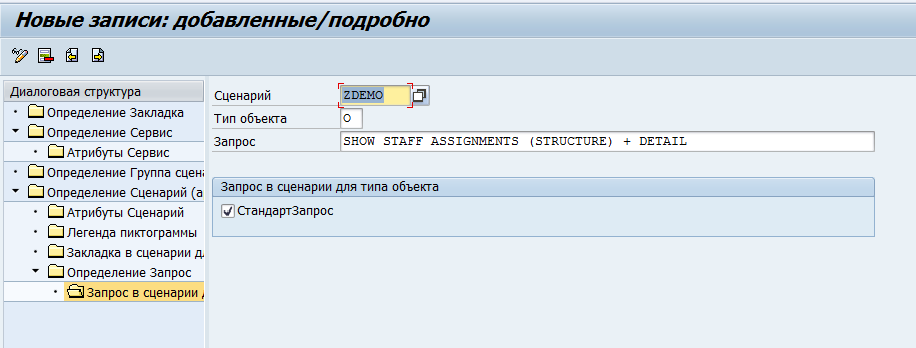
As a result, two entries should be created in the "Define Query" node.
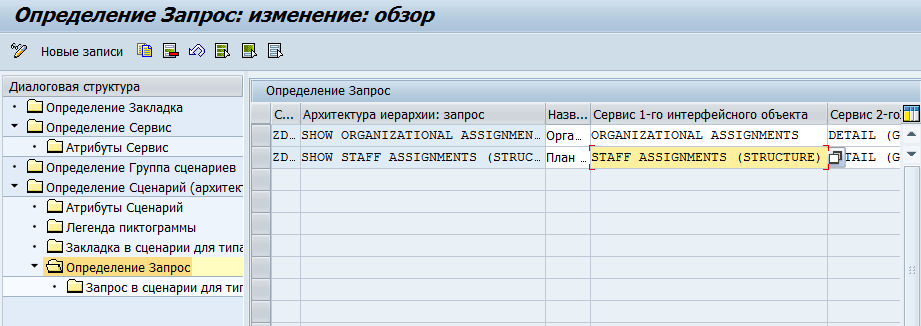
Below is the structure of the two configuration tables "Define Query" and "Query in Scenario for Object Type" according to the actions performed at this step.
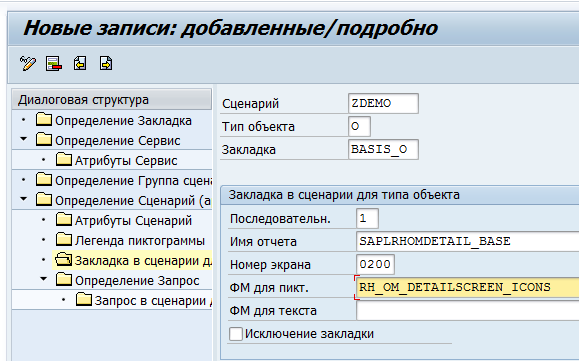
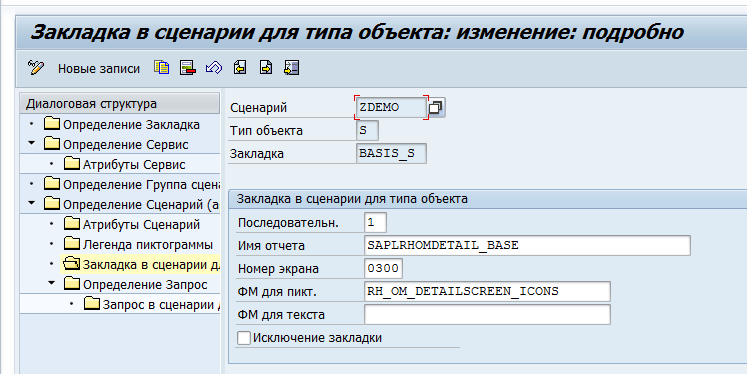
6. Tabs for Objects
To make the basic information about objects O and S available for viewing, define appropriate tabs. In the same T77FRAMEWORK view cluster, select the "Tab in Scenario for Object Type" node for scenario ZDEMO. For our example, create one tab per object, where the data from infotype 1000 will be displayed.
7. Running
It seems the basic configuration steps have been completed. Let’s test it:
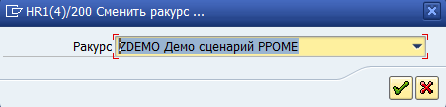
- Open PPOME, in the menu choose Navigate → Change View, and select view ZDEMO.
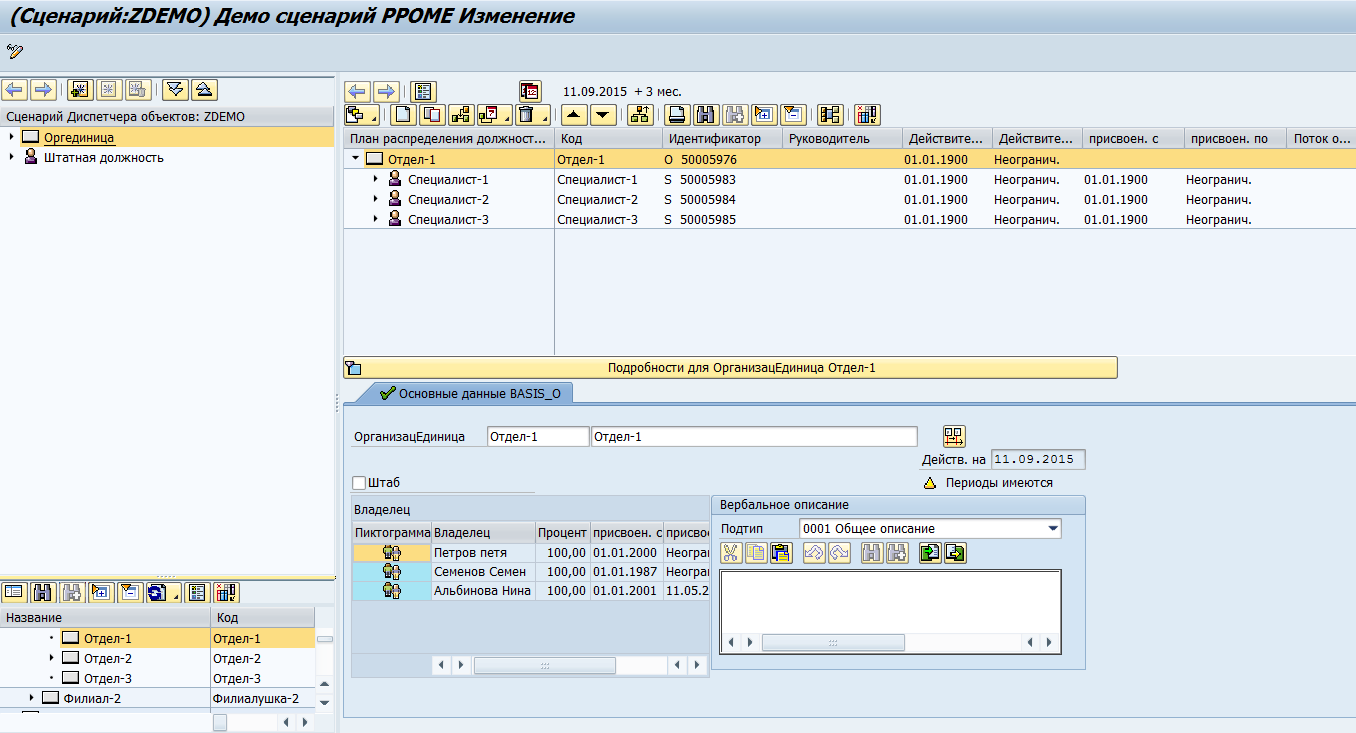
Also, try launching the view using the previously created transaction ZDEMO_PPOME. The result should match the one shown in the example.
Try launching the other two transactions as well and see the differences.
It looks like the task has been successfully completed!
In the near future, we will try to explore other use cases for these settings, such as:
- Adding a Z* object to the view
- Adding new queries
Some of these may be useful in real project experience.
P.S.
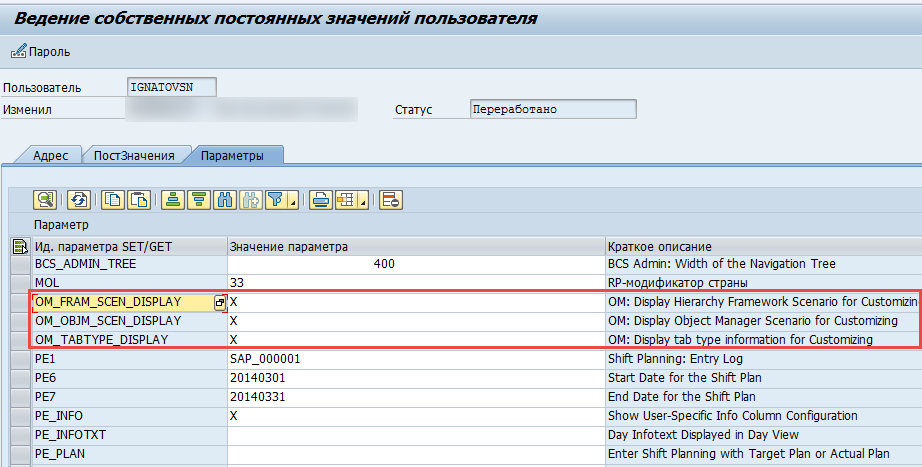
Don’t forget to add the following parameters with the value "X" to the user’s fixed values (transaction SU3) during configuration/testing related to PPOME:
- OM_FRAM_SCEN_DISPLAY
- OM_OBJM_SCEN_DISPLAY
- OM_TABTYPE_DISPLAY