Finding a Task Processor in a Workflow
Finding a Task Processor in a Workflow
When setting up extended functionality in projects, consultants often encounter workflows. It doesn’t matter whether you're working with candidate search requests (e-recruiting), leave requests, or individual employee development plans (performance management). The primary focus in workflow configuration is usually on approval paths. At the very start of the configuration phase, the consultant clarifies with business users how many approvers should participate in a given workflow and whether new participants can be added to the approval/viewing process, etc.
In this note, I want to explore and describe the task of finding a task processor in a workflow using the simplest example I could come up with.
As mentioned, I’ll approach the process of finding a task processor in a workflow without diving into overly complex topics. The explanation may seem a bit brief or lacking detail—but as they say, there’s no turning back once the sausage is made...
0. The Task
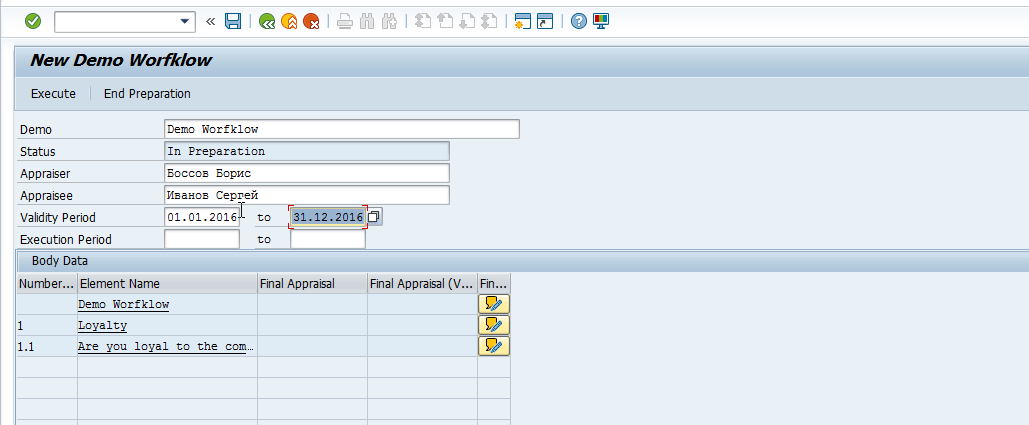
Create a new workflow for approving an appraisal document, based on a standard workflow. In this workflow, identify the task processor for reviewing the appraisal document using the following logic:
- Based on the organizational position of the appraisee, find the position linked to it via connection type Z01.
- Then, find the personnel number of the employee occupying that linked position.
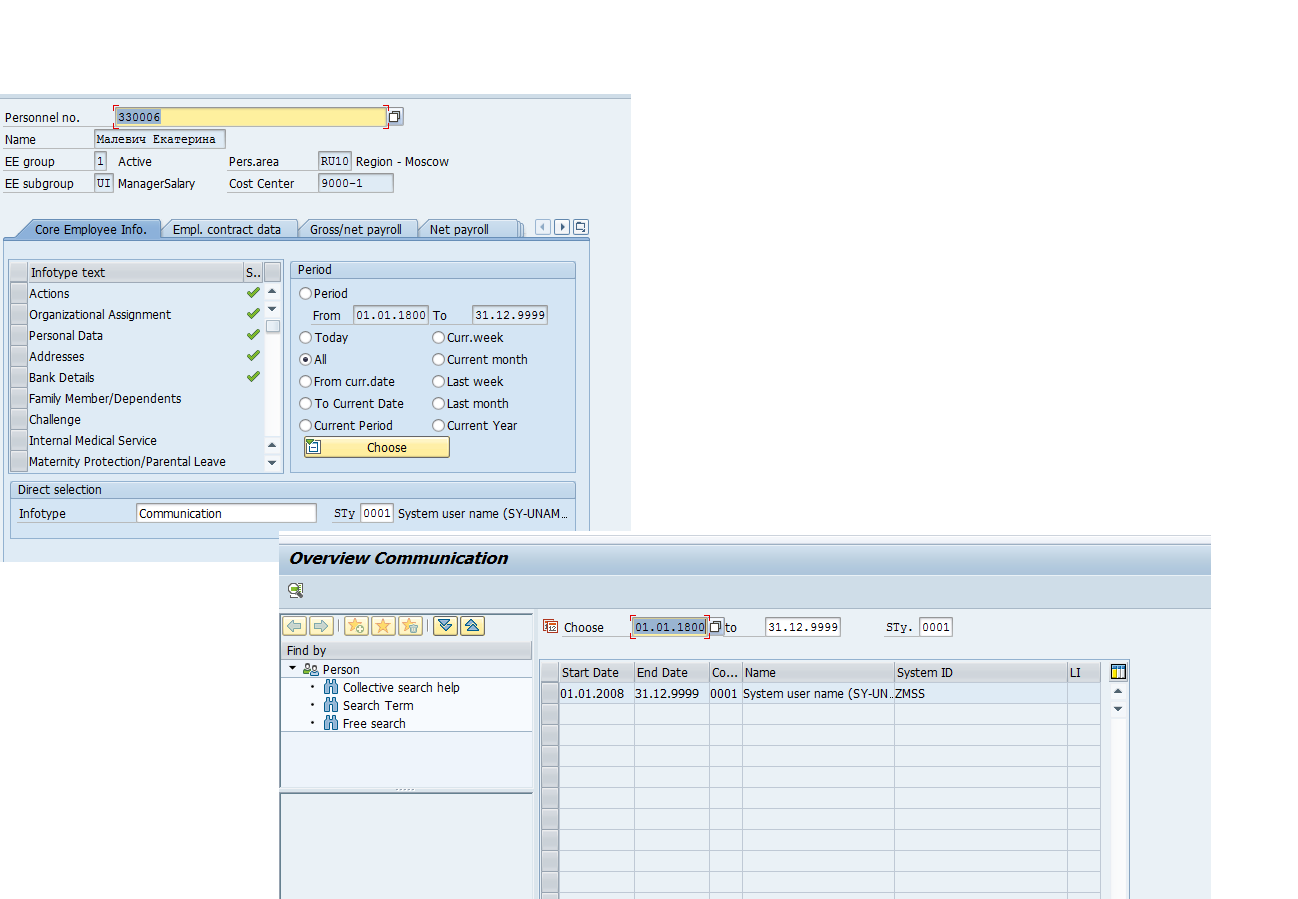
- From that employee's record, retrieve the user ID stored in infotype 0105 (“Communication”), subtype 0001 (“System user name”).
Note: From the architectural perspective of appraisal documents, this isn’t entirely accurate since the identified processor will not be directly tied to the appraisal document. The person found will be able to view the document, but not make any changes to it.
See the note Реакция документов оценки по отношению к пользователю
Ignore this detail for now while reading—but keep it in mind for future implementations. Regardless of whether we're working with workflows or not, the document can only be opened and edited by users directly involved in the appraisal: the appraiser, appraisee, or another participant (e.g., peer, manager, project lead, architect, etc.).
1. What Do We Have?
From the task requirements above, our inputs are:
- An appraisal document with data on both the appraiser and appraisee (i.e., their personnel numbers).
- A Z01-type link from the appraisee’s position to another position.
- A standard workflow to use as a template.
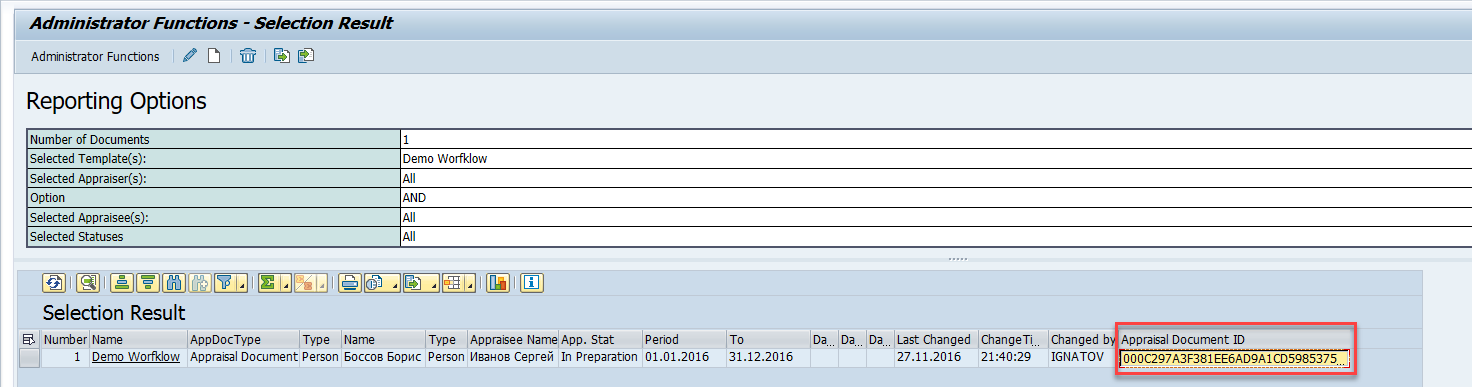
We’ll use a specific appraisal document, from which we’ll need the appraisal ID and the appraisee’s personnel number.
A Z01 link has already been created between the appraisee’s position and another position.
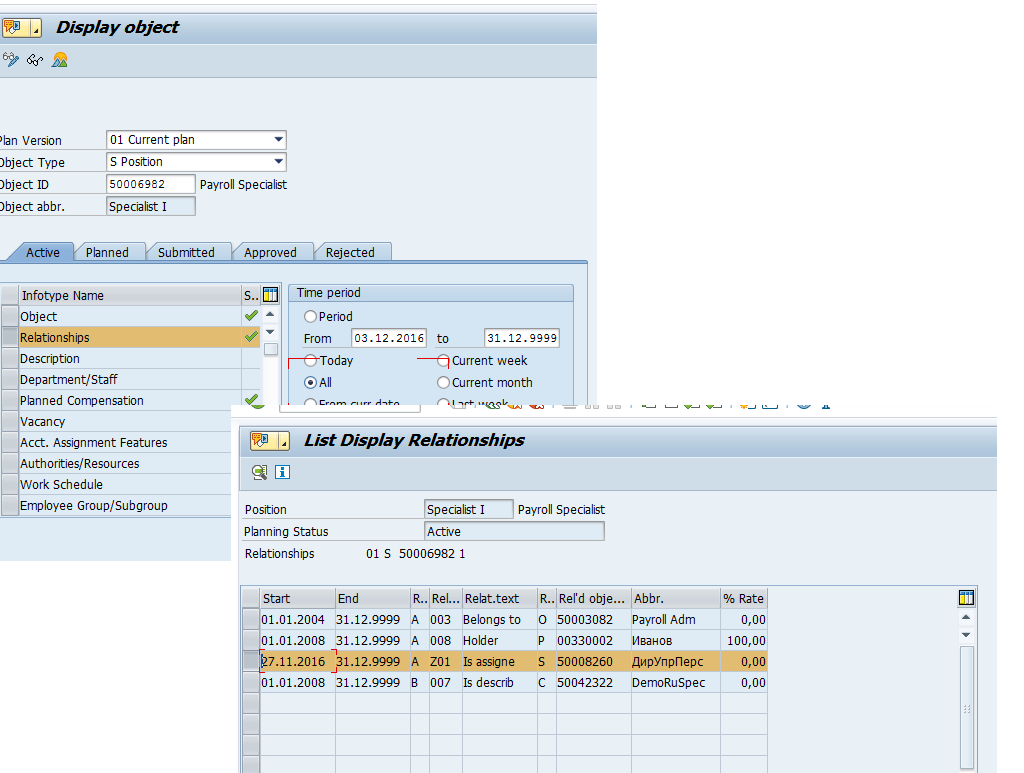
An employee is assigned to that linked position, and their infotype 0105 (subtype 0001) contains a system user name.
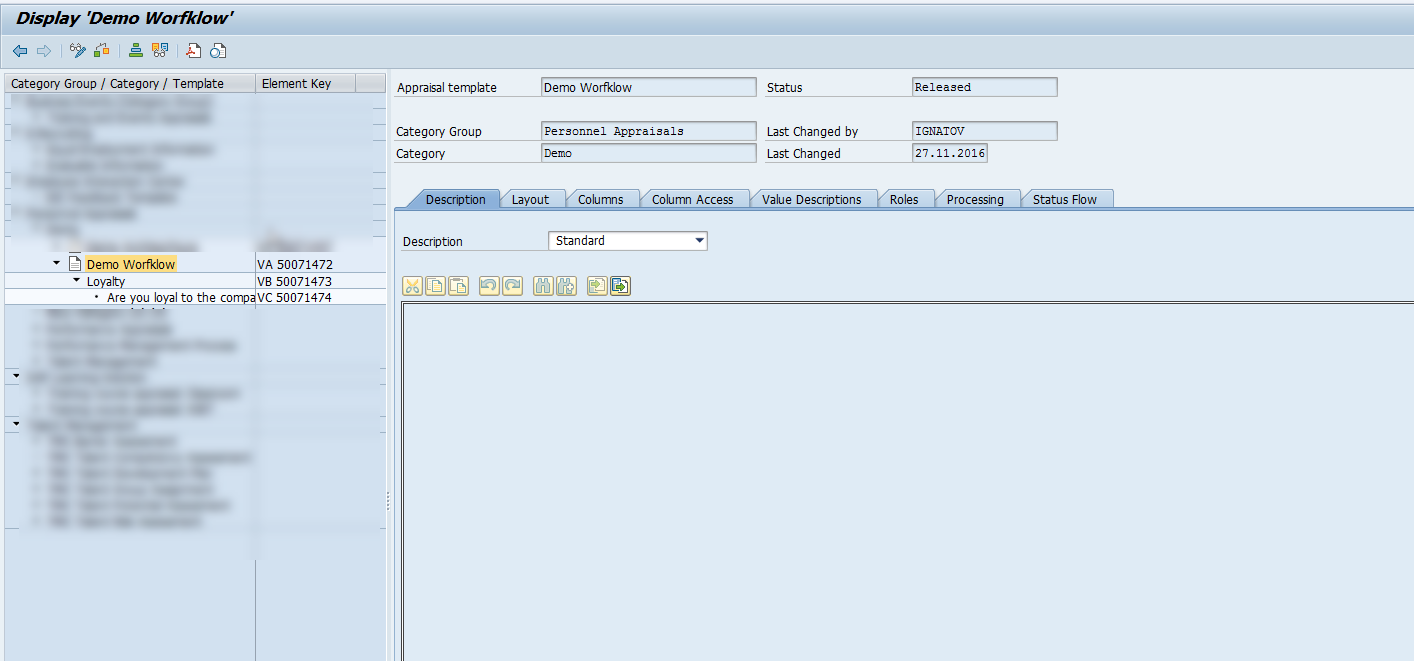
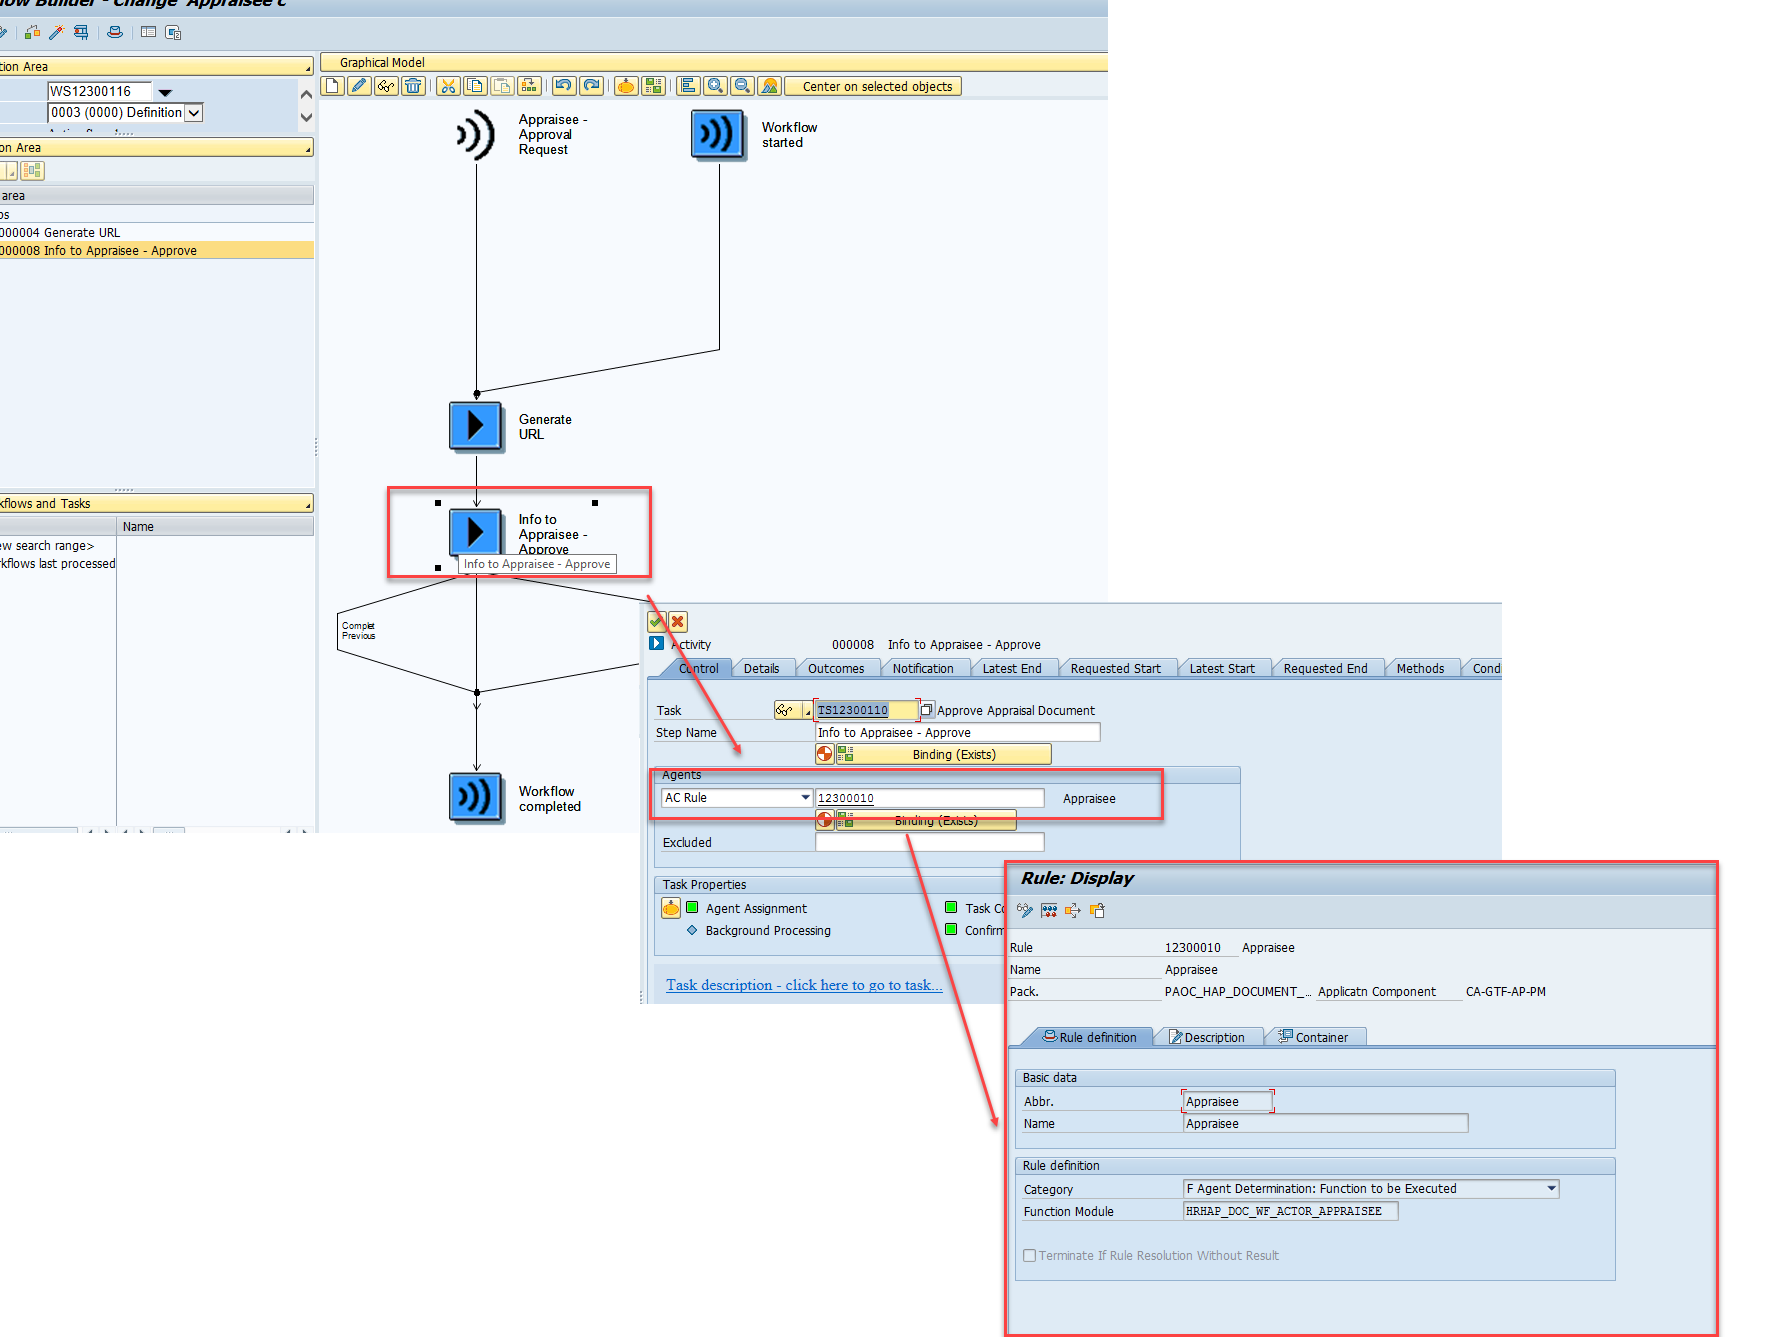
We’ll use standard workflow WS12300116.
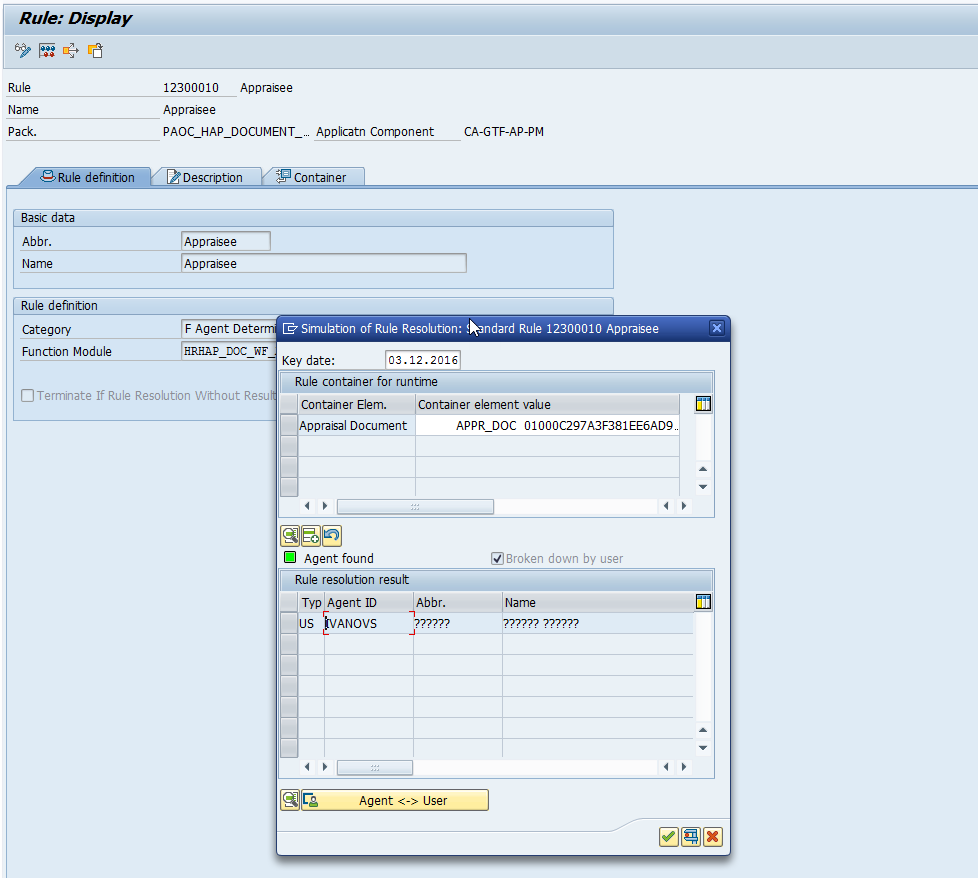
This workflow generates a link to the appraisal document and sends it to the appraisee. The processor is determined using rule 12300010, which uses function module HRHAP_DOC_WF_ACTOR_APPRAISEE to get the appraisee’s user ID.
For our task, this workflow is suitable. We'll copy it and create a new task that uses our custom logic to find a processor.
2. Creating a New Workflow
Open transaction PFTC, enter the ID of the standard workflow, and copy it.
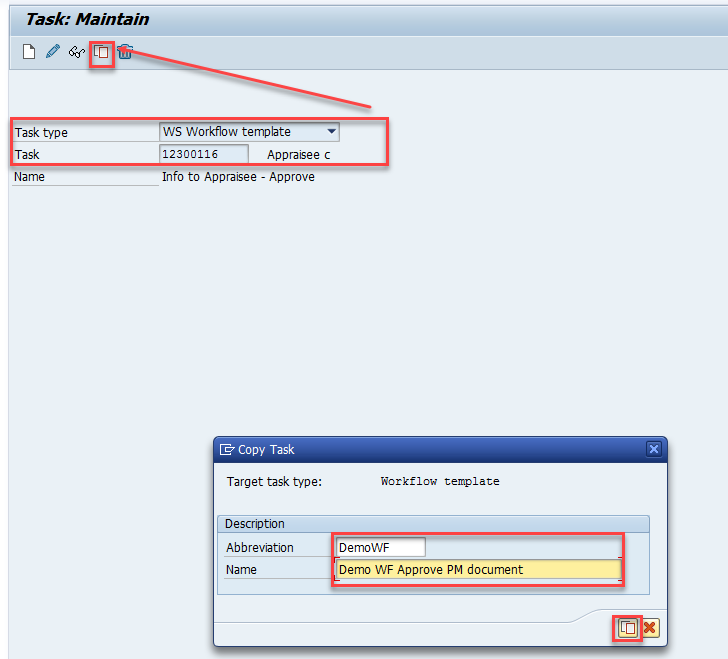
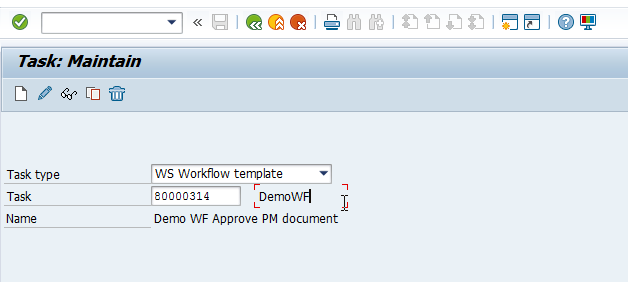
The new workflow will be assigned an 8-digit ID and is now ready for configuration.
3. Creating a Utility Class
As mentioned in my other note on debugging background workflow tasks, utility classes are often used in workflows. We'll use one here to find the processor.
See: ABAP Classes in Workflow
Create a new class in transaction SE24
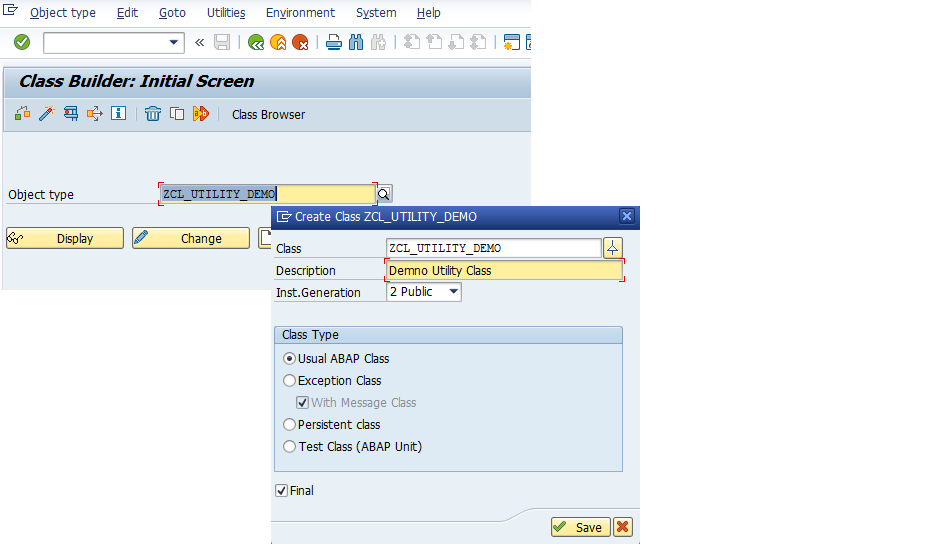
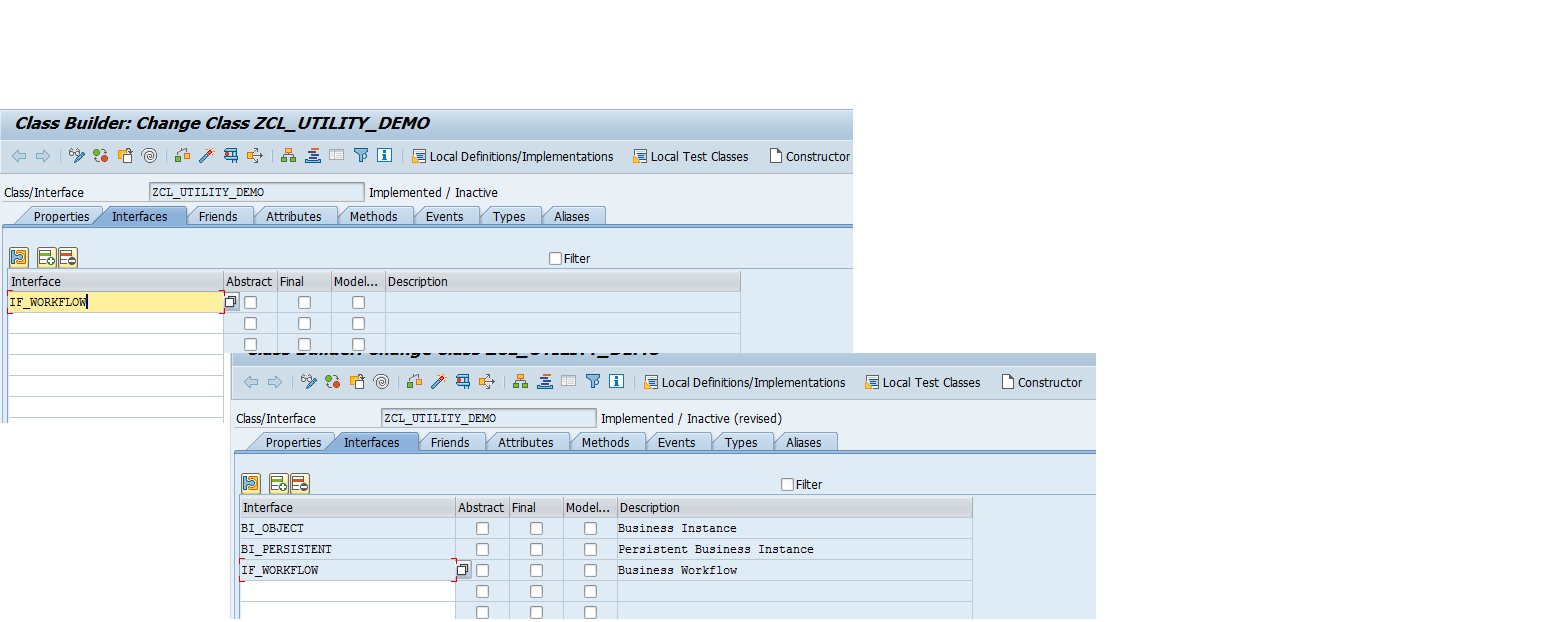
go to the Interfaces tab, enter IF_WORKFLOW, and hit Enter.
Go to Methods, and create a new static, public method for determining the processor.
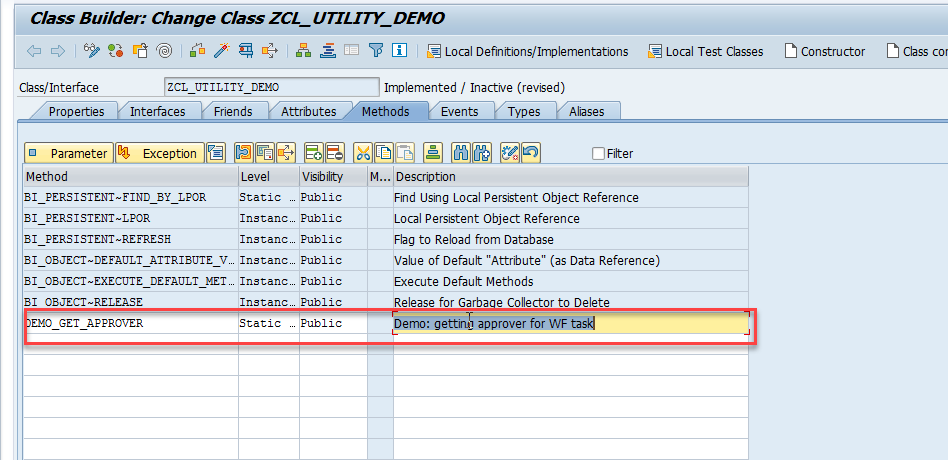
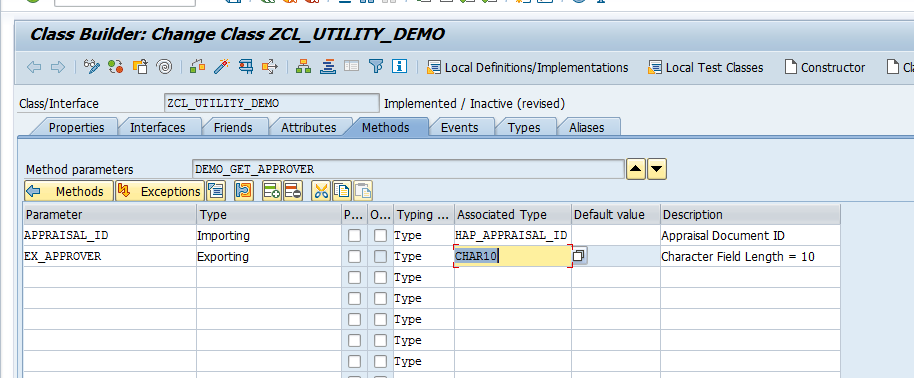
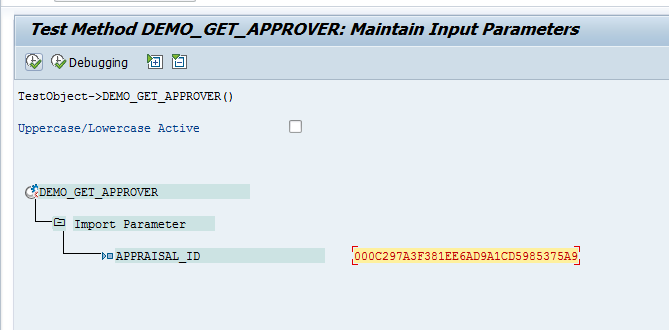
It should accept APPRAISAL_ID as input and return the found user ID in EX_APPROVER.
Now comes the fun part—ABAP, baby! I won't share the full code to spare you the horror, but here's the logic for EX_APPROVER:
- Get the appraisee’s personnel number from the appraisal ID.
- From that, get their position.
- From that position, find the linked position (type Z01).
- From that, get the employee and read infotype 0105, subtype 0001.
- Prefix the result with "US" so the workflow recognizes it as a user.
Once implemented, activate all methods in your class, including:
BI_PERSISTENT~FIND_BY_LPORBI_PERSISTENT~LPORBI_PERSISTENT~REFRESHBI_OBJECT~DEFAULT_ATTRIBUTE_VALUEBI_OBJECT~EXECUTE_DEFAULT_METHODBI_OBJECT~RELEASE
4. Testing the Method
Create an appraisal document using transaction PHAP_CREATE
Copy its ID using PHAP_ADMIN
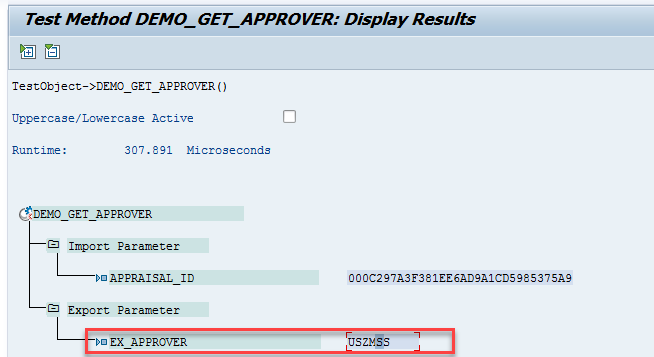
and test your method with the ID.
EX_APPROVER should be filled with the proper user ID prefixed by "US"
5. Workflow Configuration
5.1 Adding a New Container Element
In SWDD, open your workflow and add a new container element named APPROVER, enabling Import and Export flags.

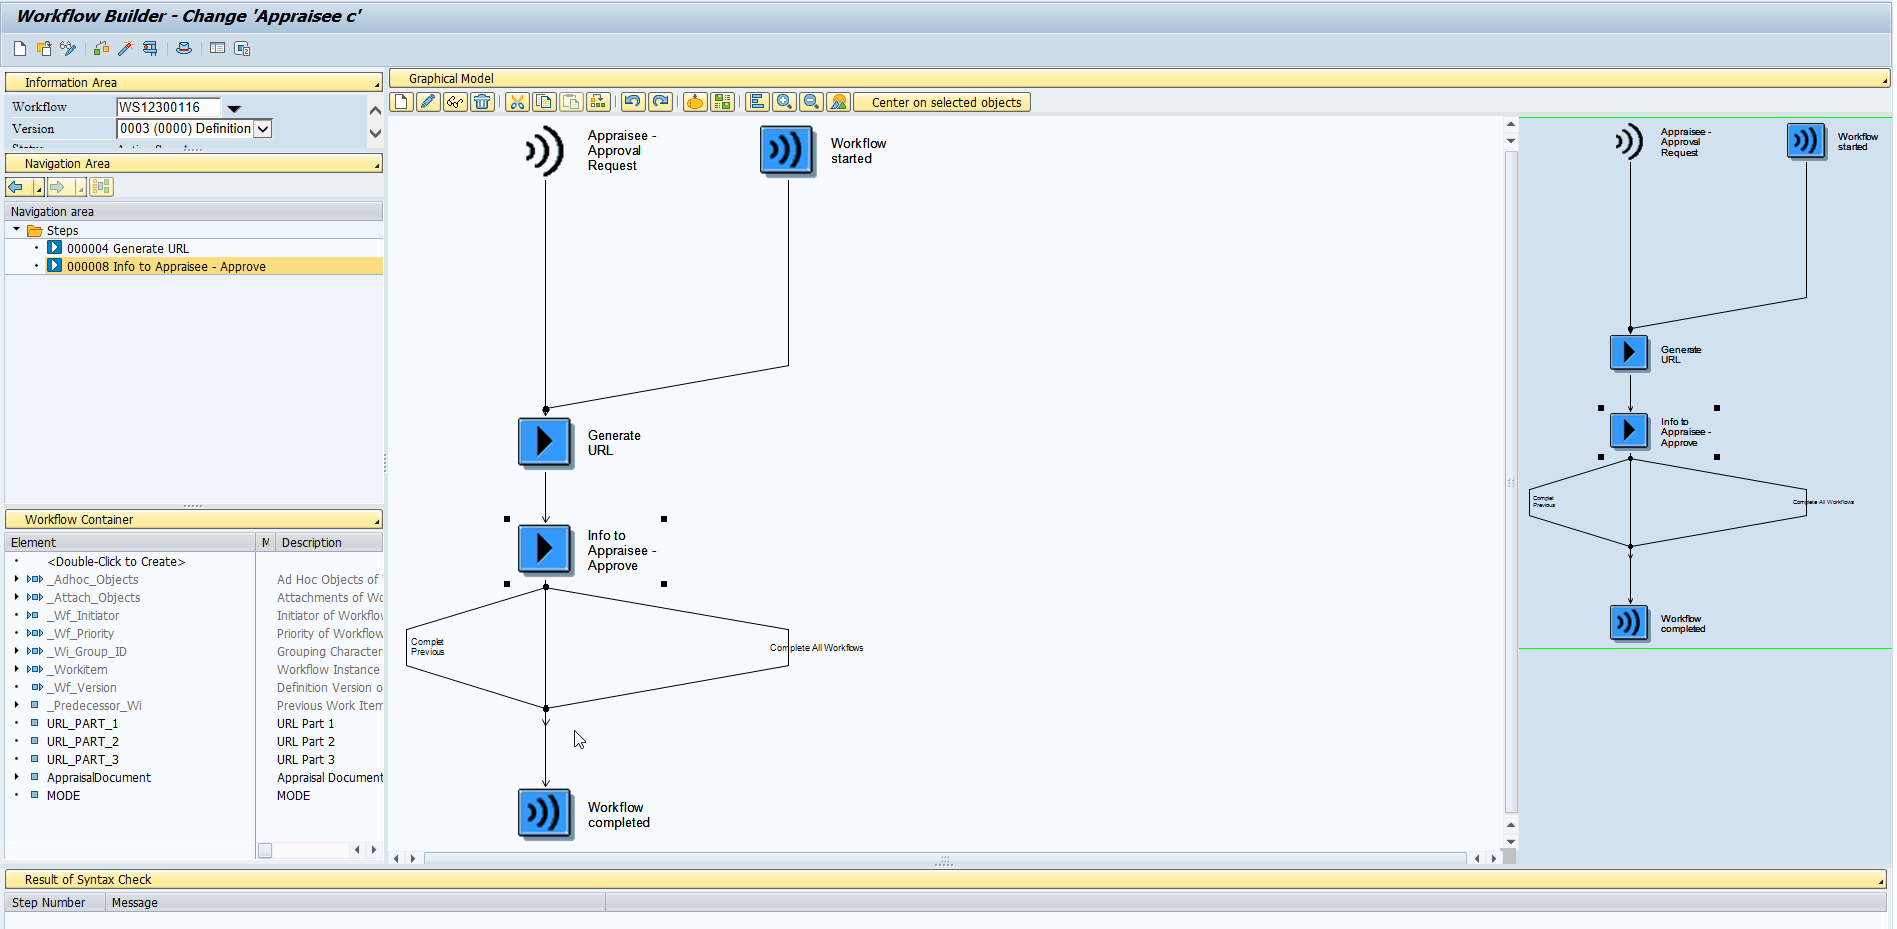
5.2 Adding a New Task to the Workflow
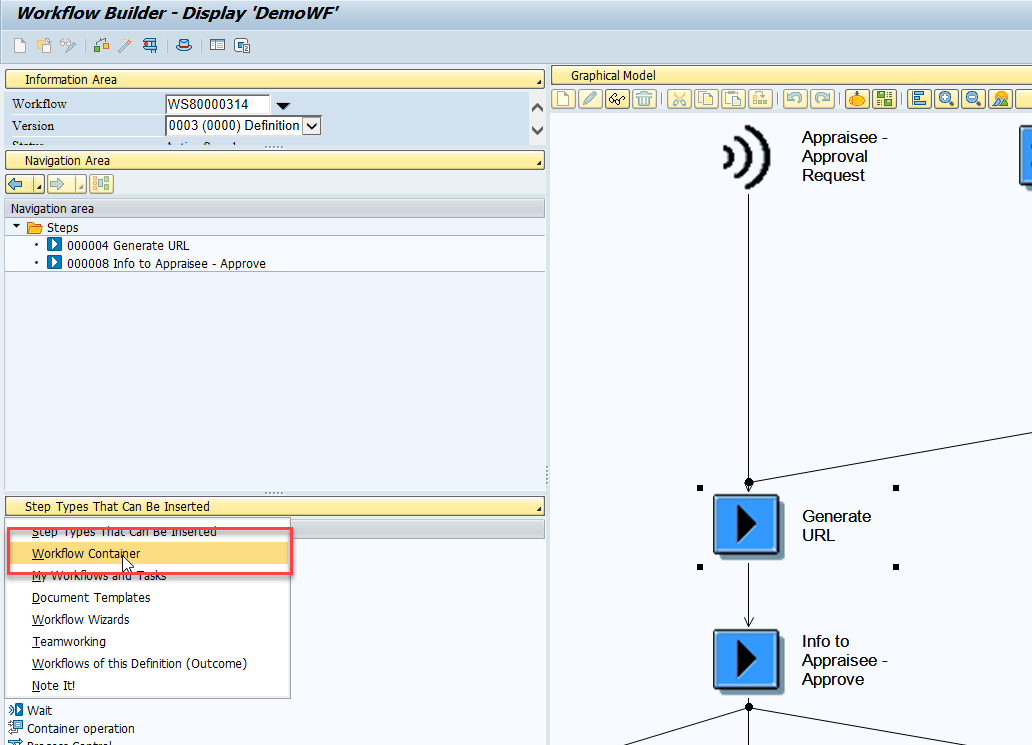
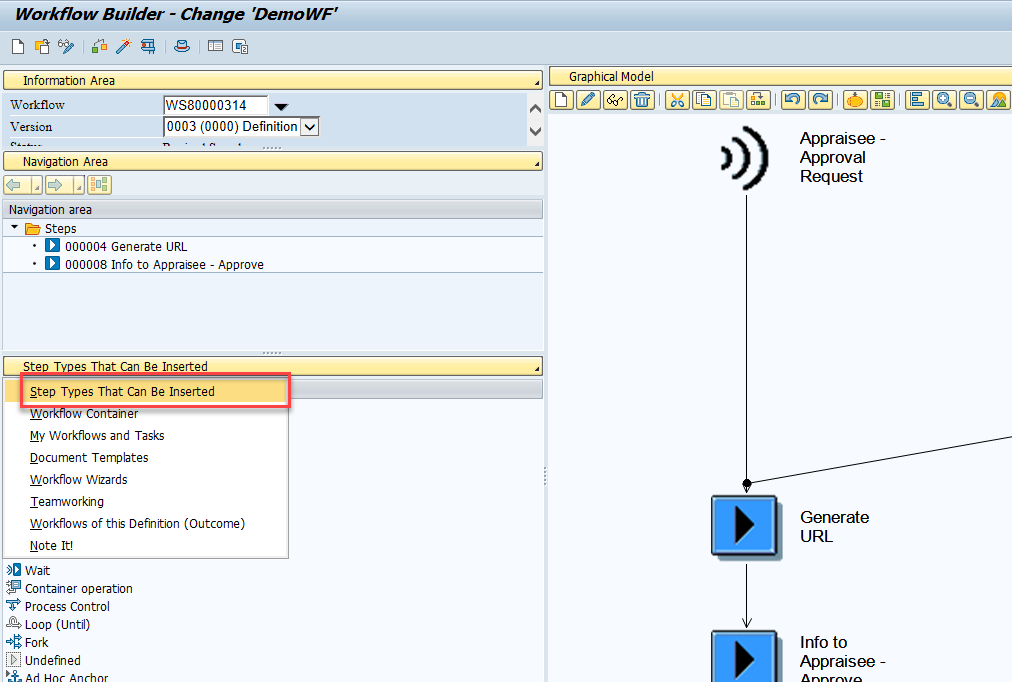
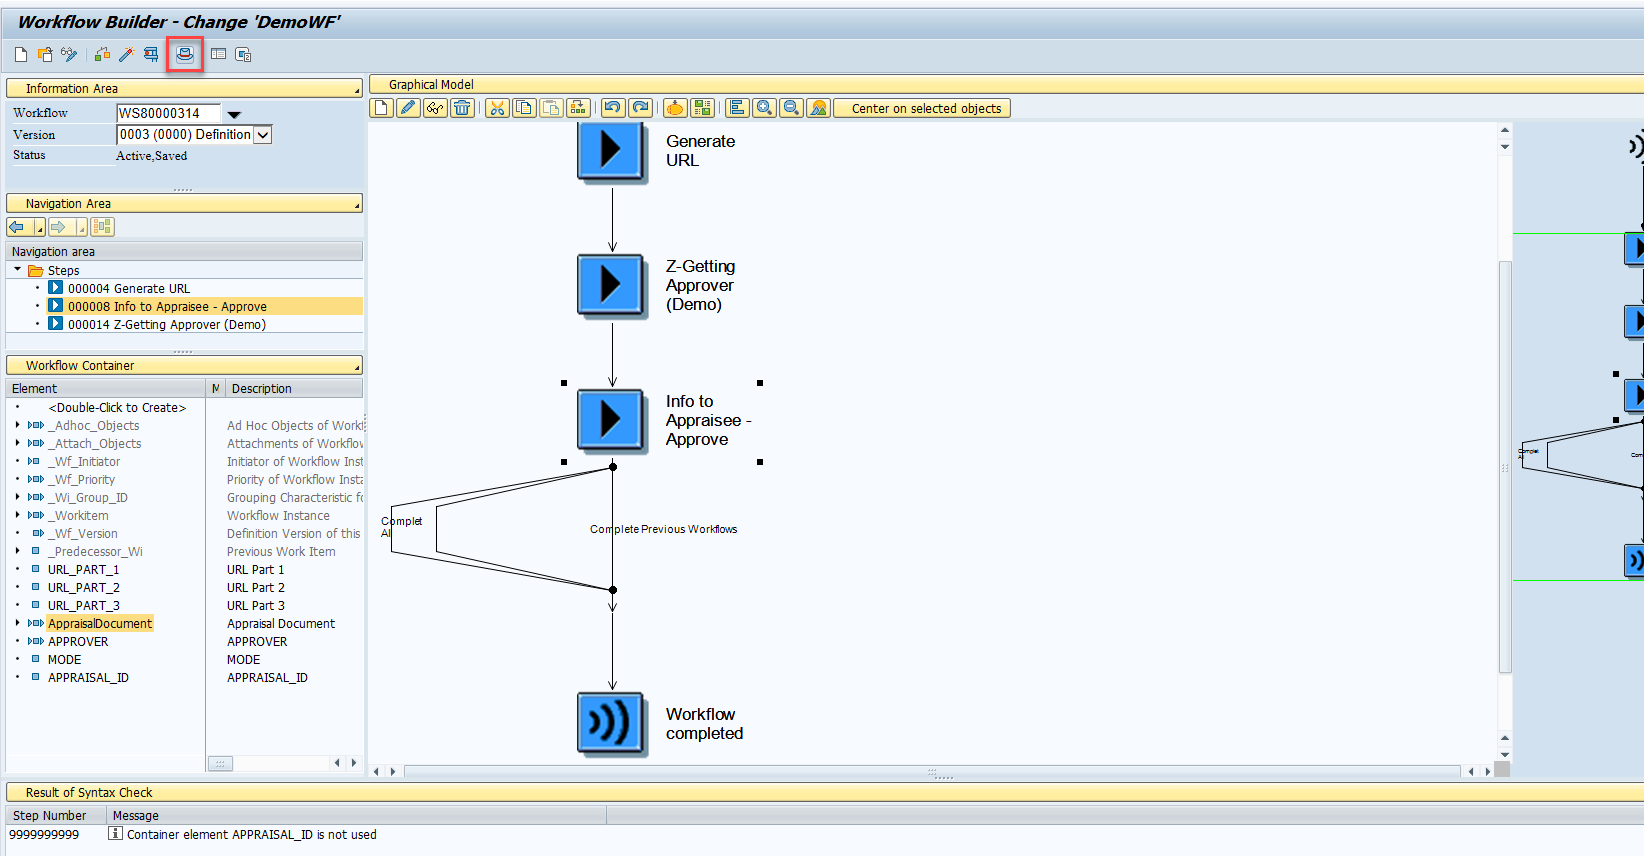
Now you need to add a new task in which the processor will be determined using the previously created class. Click on the button and select from the menu Step Types That Can Be Inserted
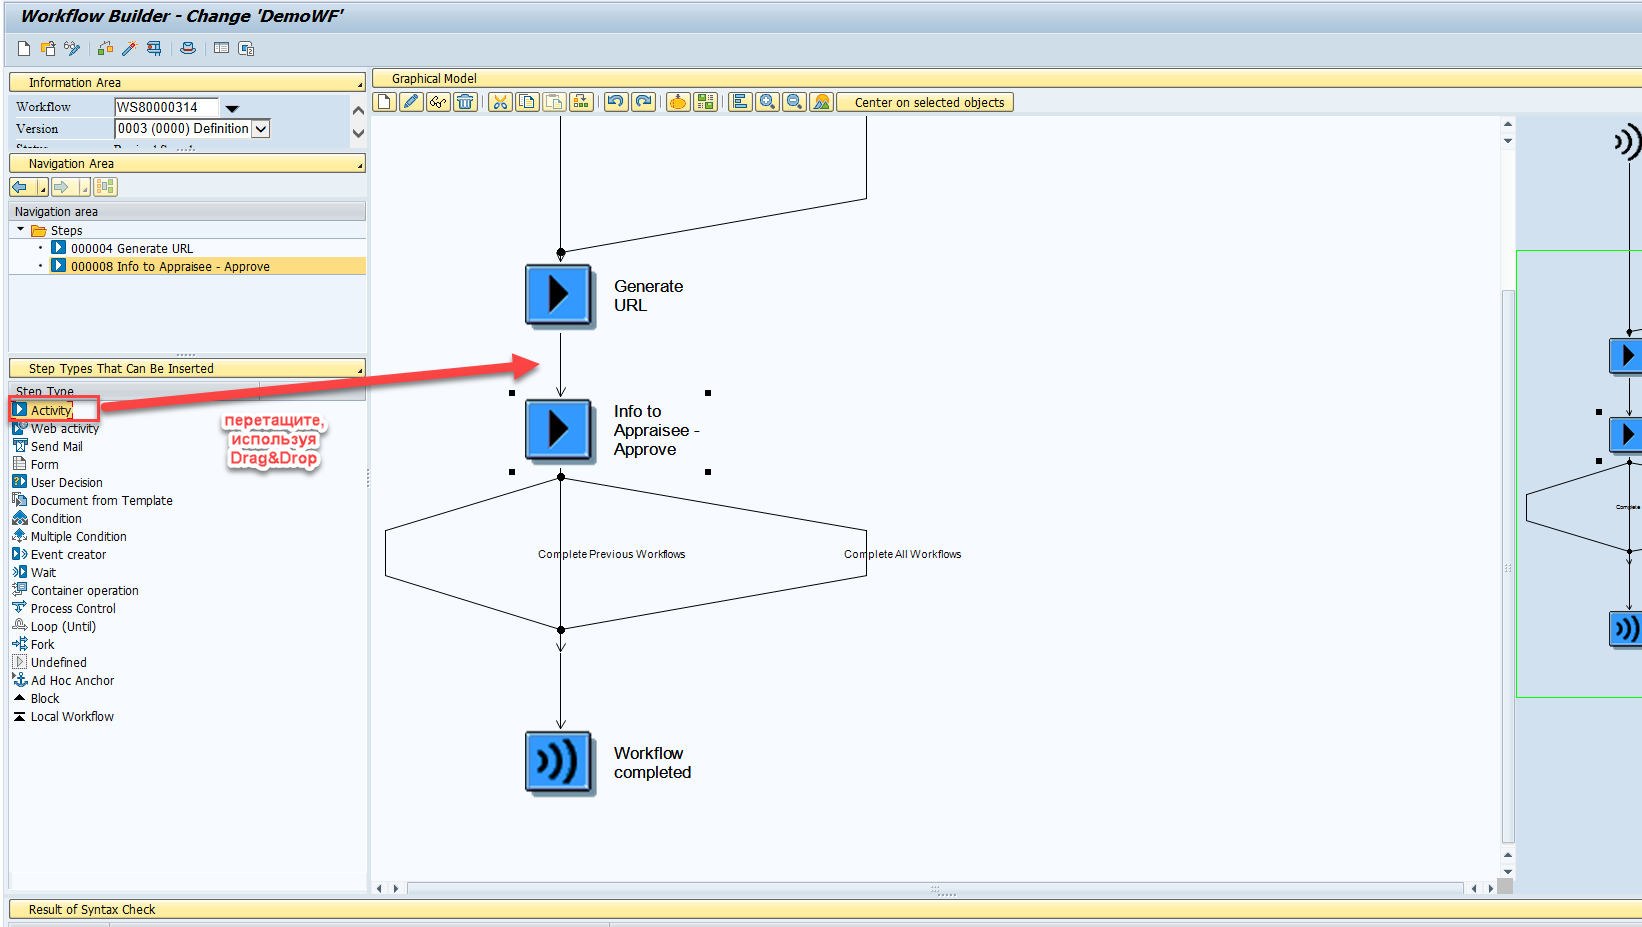
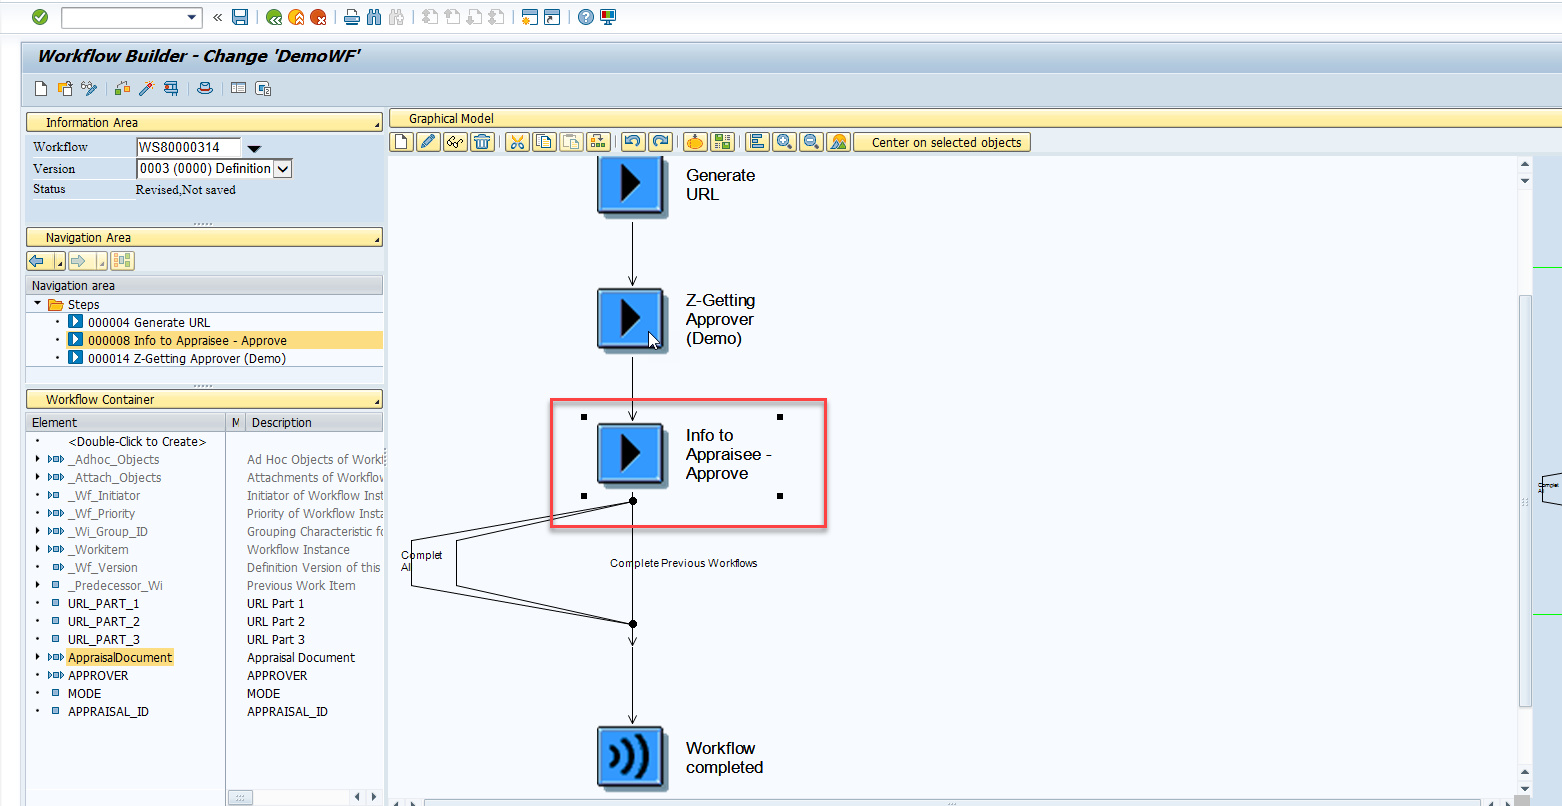
Drag the 'Activity' step type onto the workflow schema located on the right side of the screen, between the tasks Generate URL and Info to Appraisee - Approve
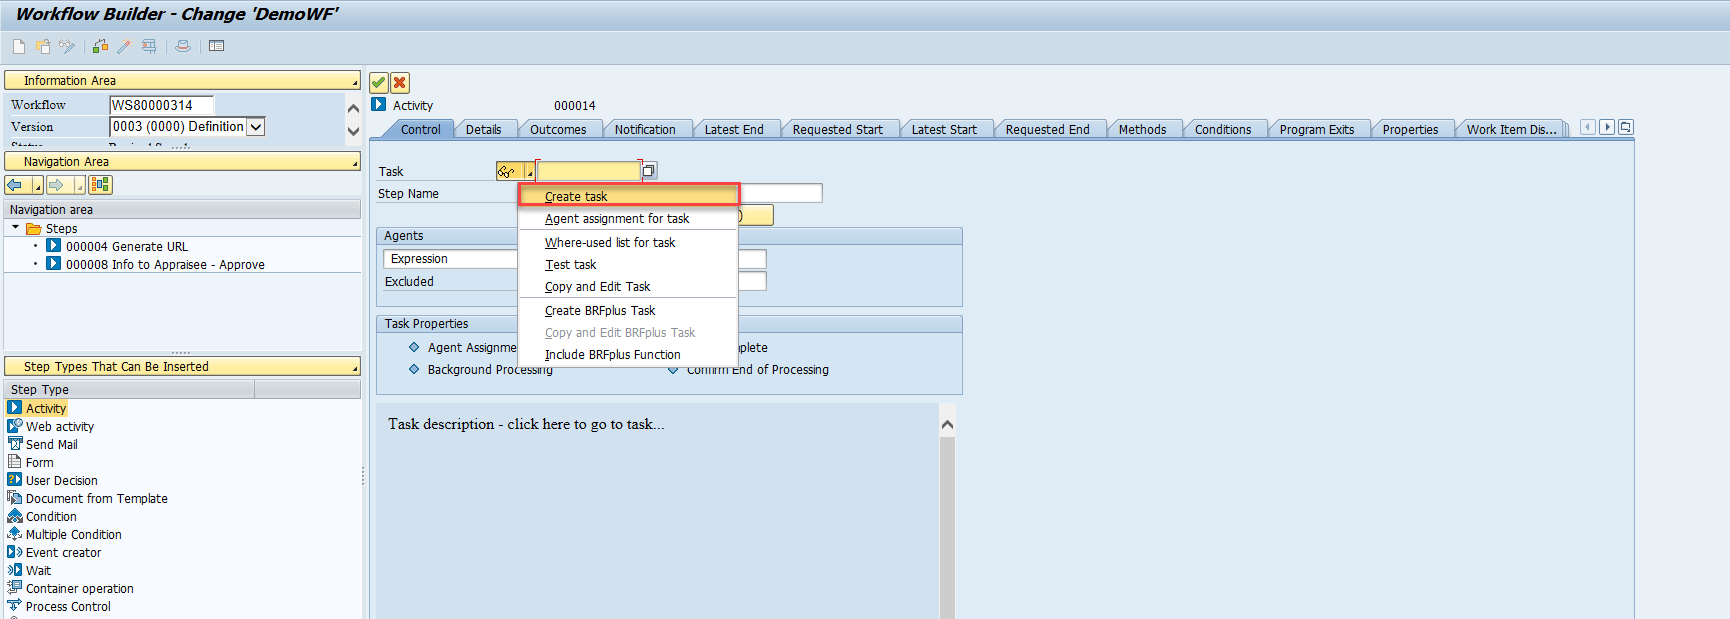
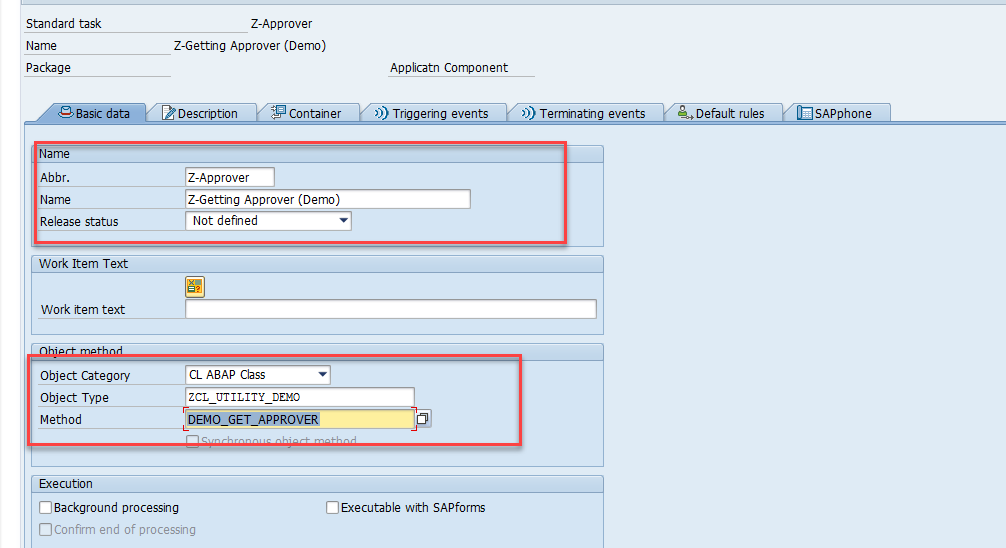
In the context menu of the Task field, select Create task
In the new task creation screen that opens, enter its name. In the Object method field group, select category ABAP Class and specify the name of the class and method created earlier.
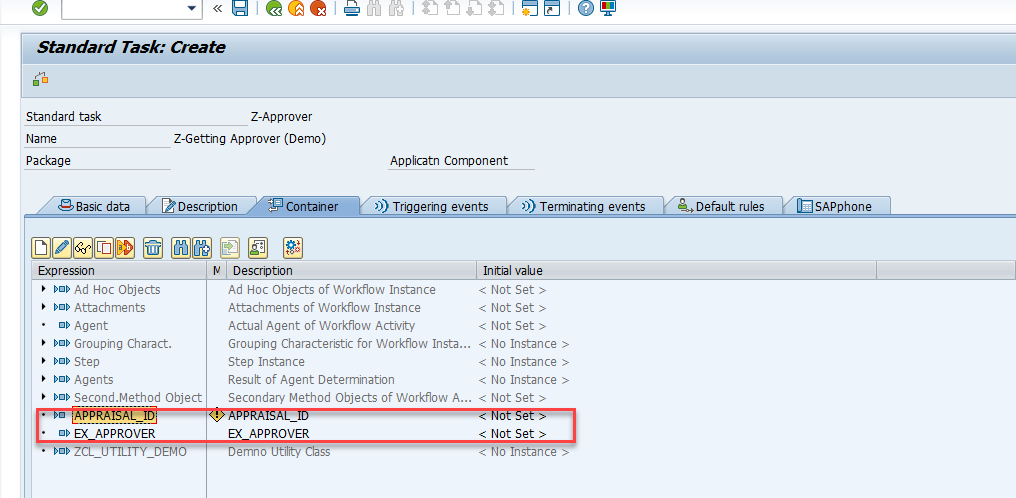
Open the Container tab and ensure that the parameters defined for your utility class are available in the list.
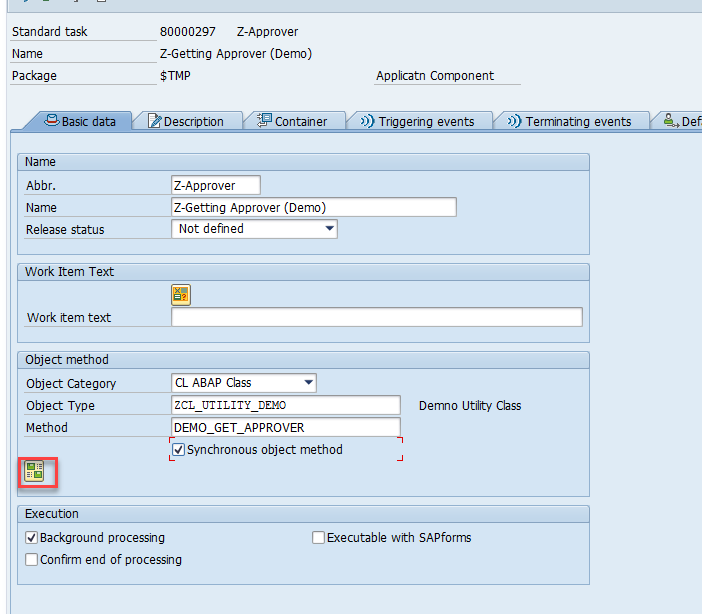
Enable the options Background processing and Synchronous Object Method
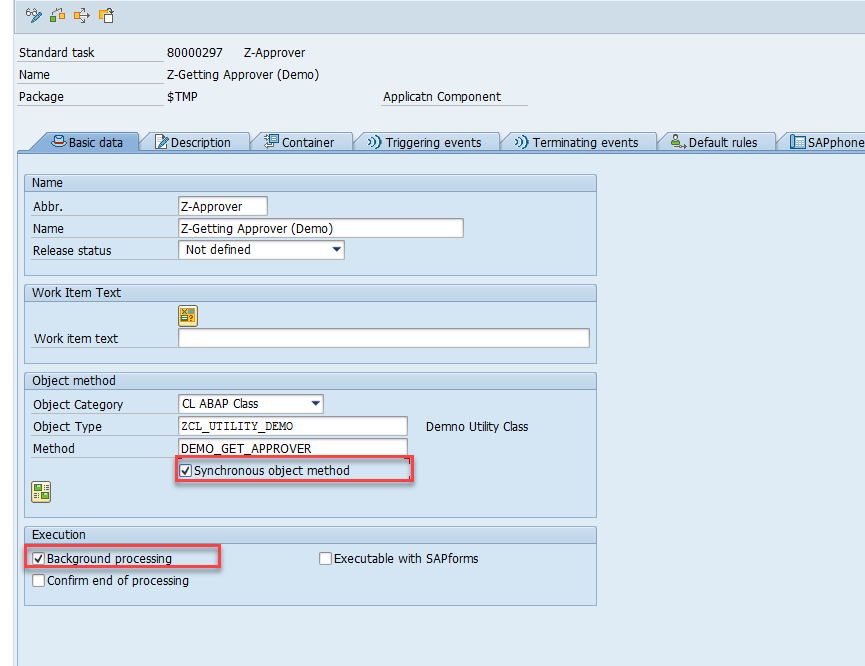
Then click the button Binding Object Method
Perform the following mapping of workflow container elements and the task in which the processor will be determined
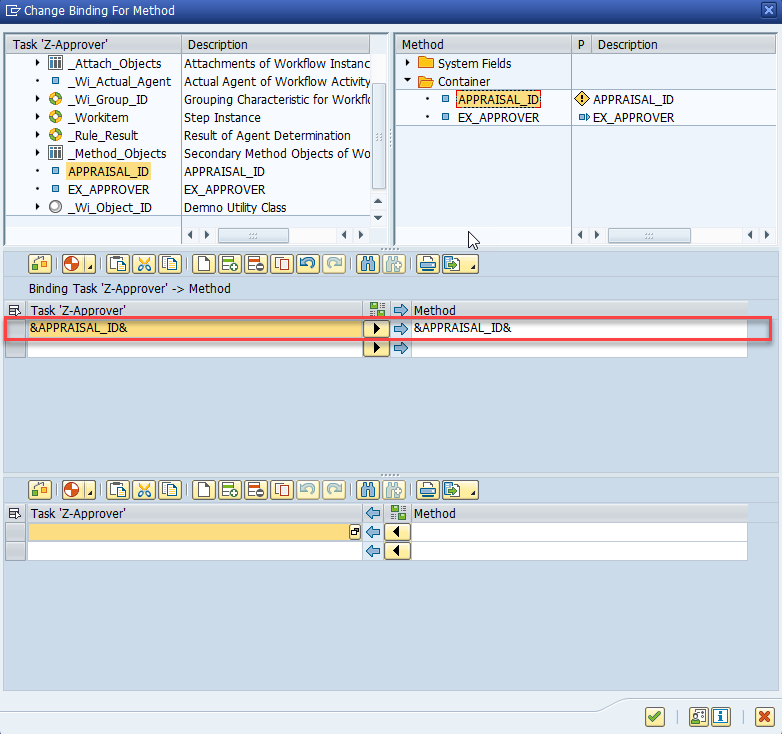
Save the changes, return to the task creation screen, and click the Binding button
At this stage, you need to map the elements of the workflow container and the new task to:
- Pass the correct workflow container element that contains the appraisal document ID as input to the task
- Receive the correctly filled workflow container element that contains the user name as output from the task
The appraisal document ID (APPRAISAL_ID) will be automatically filled thanks to business object APPR_DOC
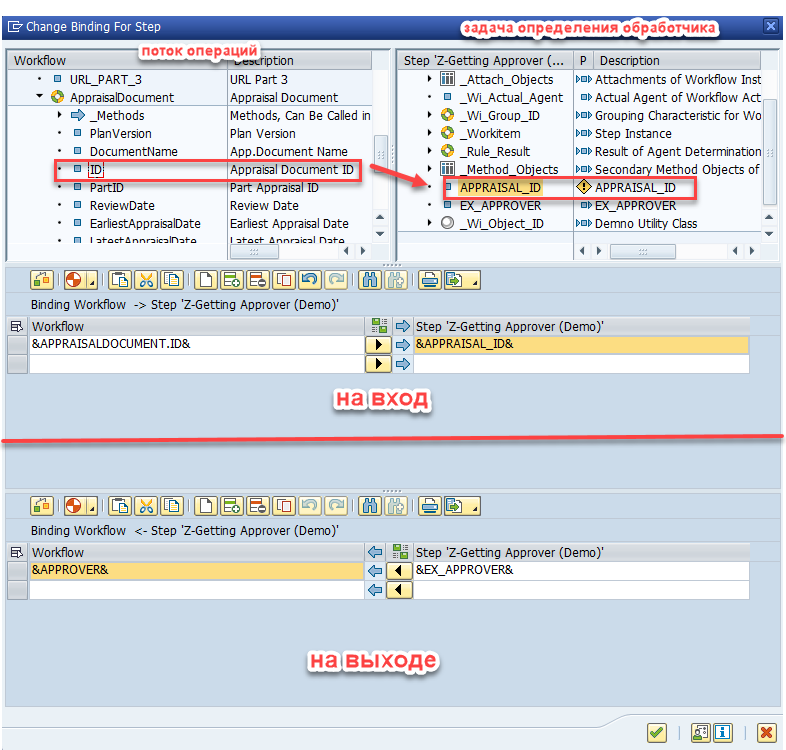
We passed the appraisal document ID (ID) as input to the task parameter APPRAISAL_ID. As output, we receive the filled parameter EX_APPROVER and return it to the workflow container element APPROVER. Save the changes.
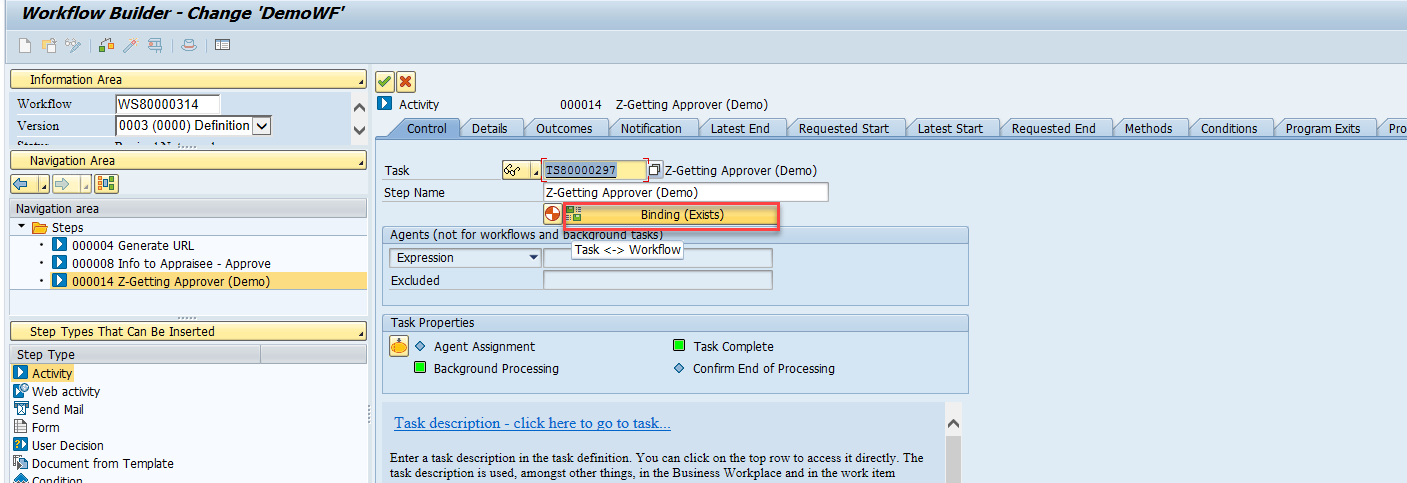
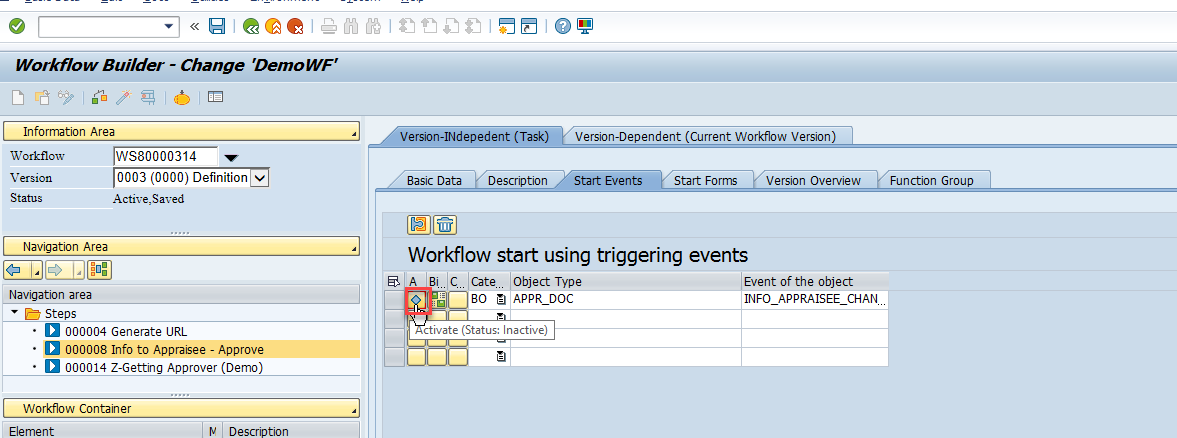
5.3 Configuring Triggering Events
Since the new workflow was copied from a standard one, it has also inherited the standard workflow's triggering events. Activate them by clicking the Basic data button
Open the Start Events tab and click the Activate button
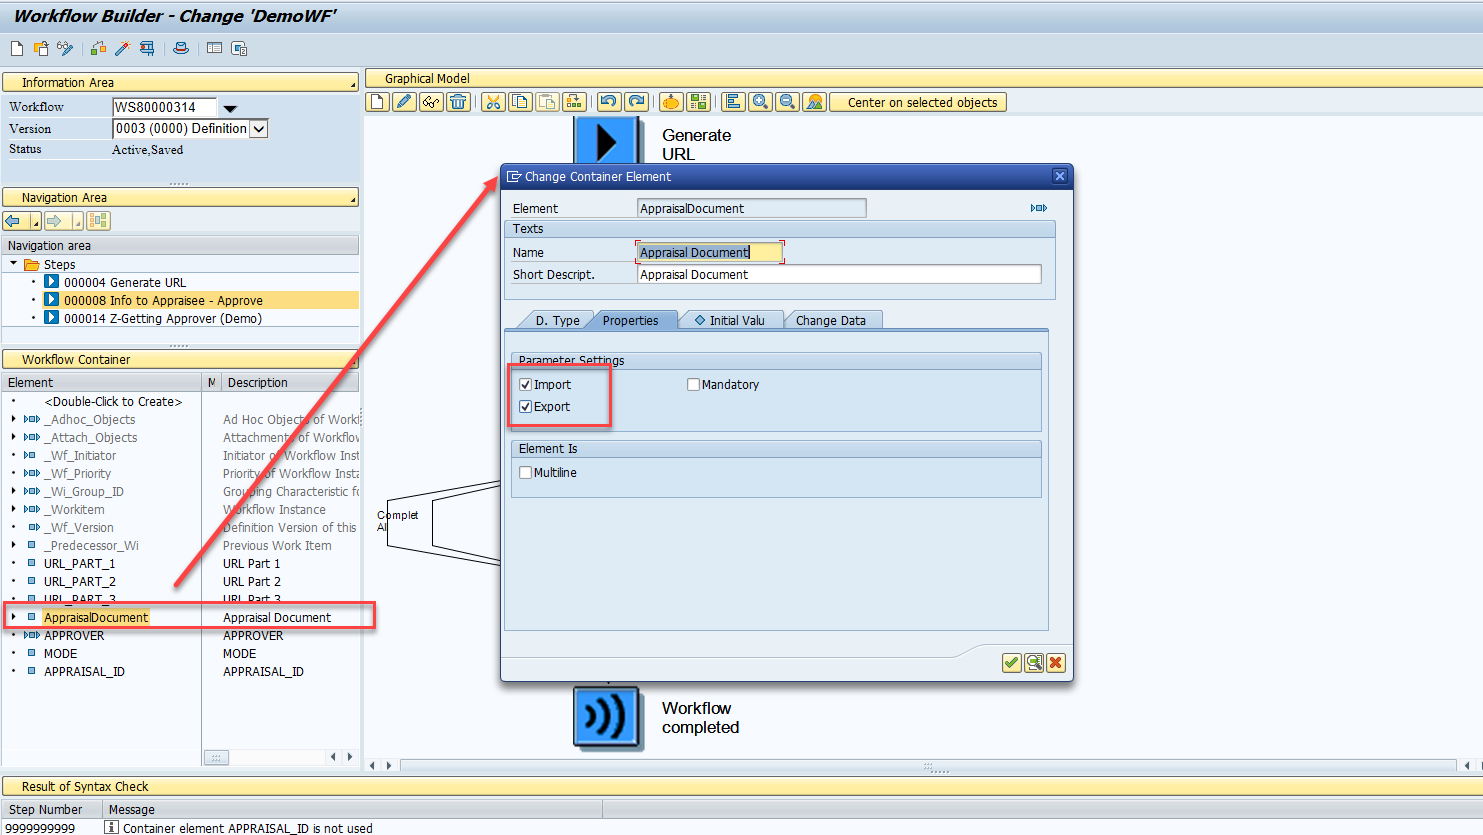
Now you need to activate Import/Export options for the AppraisalDocument element of the workflow container, which is populated by the business object APPR_DOC. Double-click this element
5.4 Reading the New Processor in the Workflow
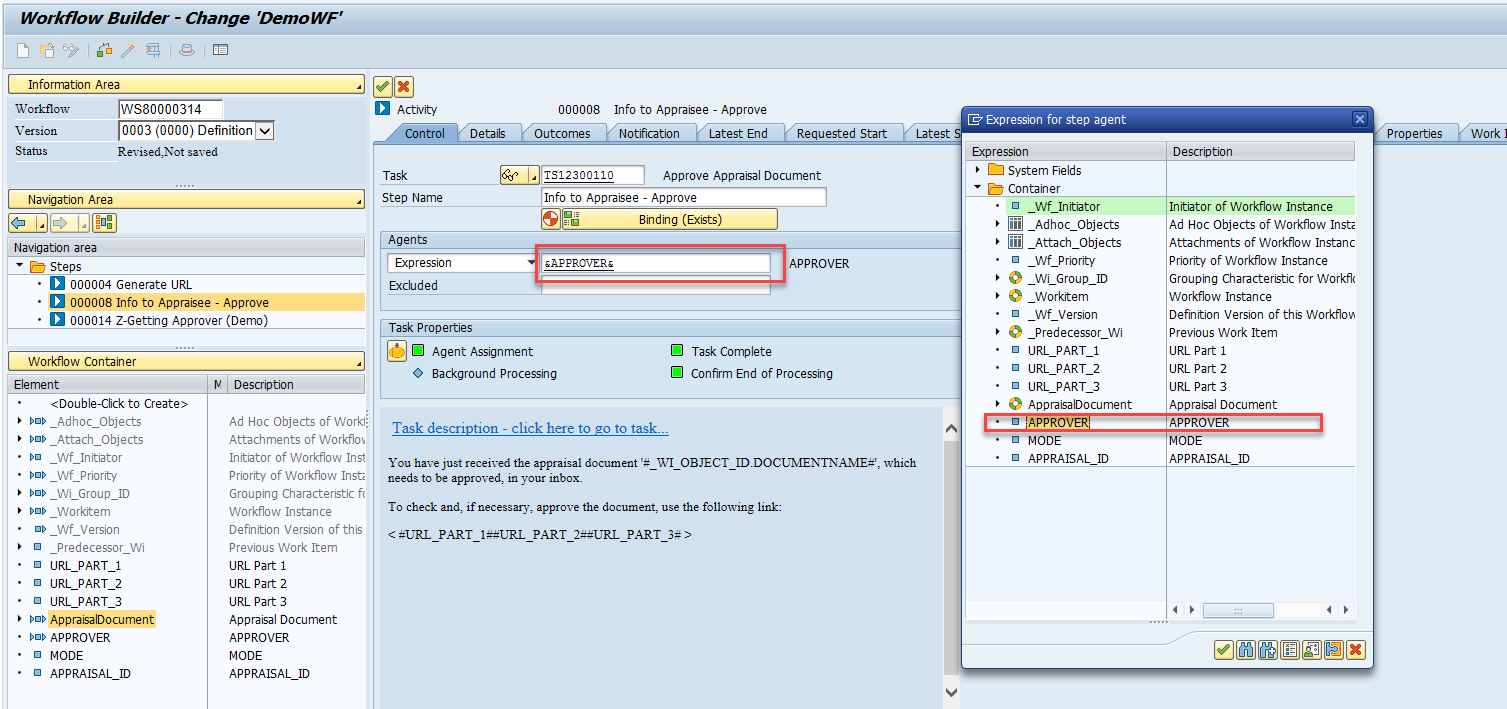
We're in the final stretch. For the task Info to Appraisee - Approve in our workflow, you need to specify the workflow container element that contains the user ID of the task processor. And it's easier than it sounds. Open the task Info to Appraisee - Approve
In the Expression field, select the workflow element APPROVER
Activate the workflow.
6. Testing
After activating the workflow, in the SWDD transaction screen, press F8 or click the corresponding button. Select the AppraisalDocument element
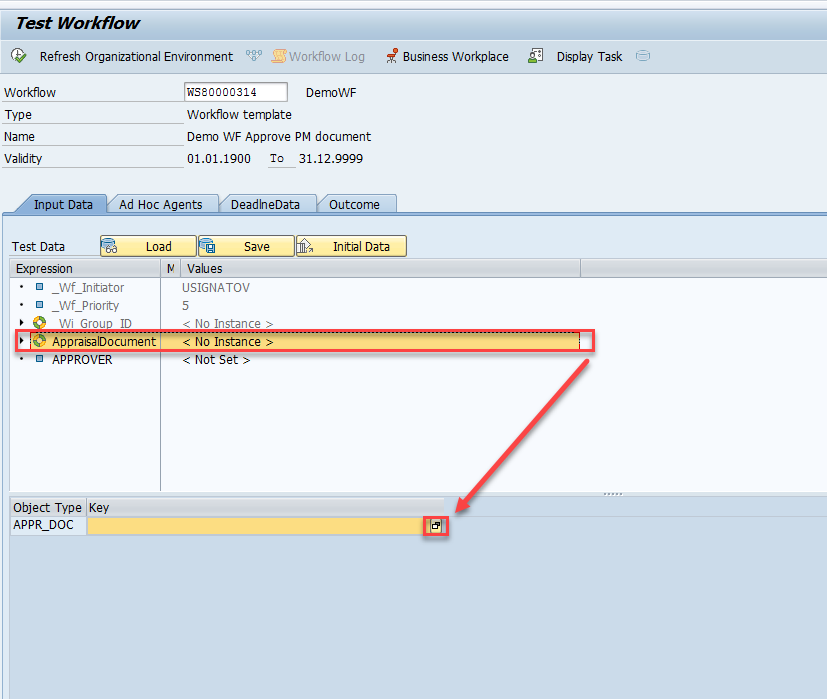
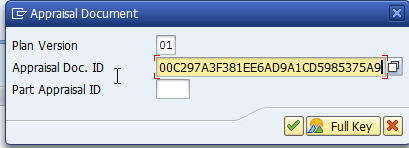
In the window that opens, enter the appraisal document ID.
Run the workflow
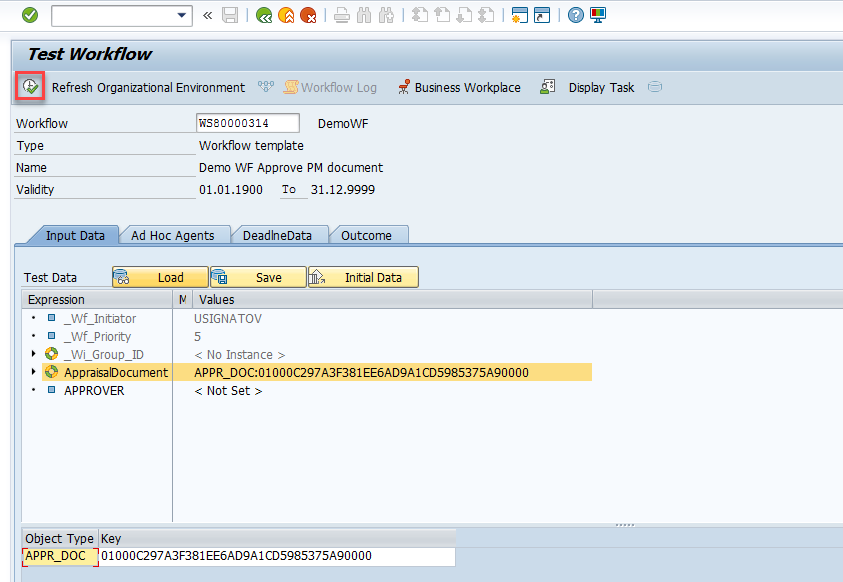
If the workflow starts successfully, you’ll see an informational message like

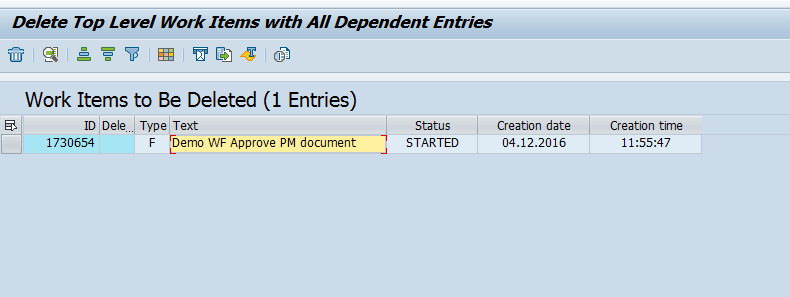
To see which processor was assigned to the task for viewing the appraisal document, use either transaction SWIA or SWWL_TOPLEVEL (whichever you prefer)
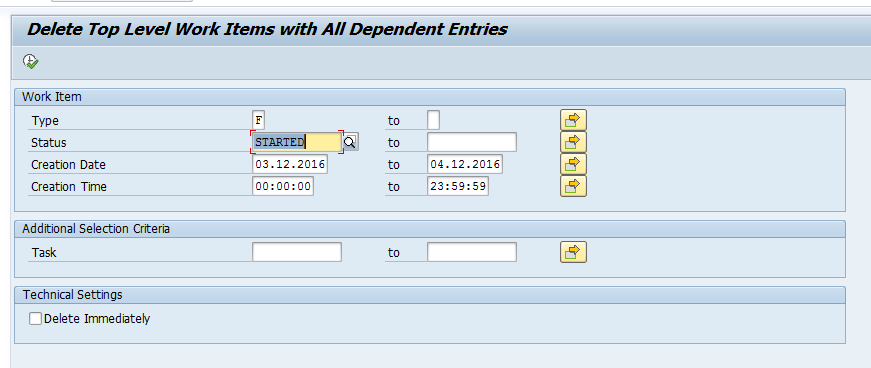
I will use transaction SWWL_TOPLEVEL. First, make sure the workflow hasn’t ended with an error. Its status should be STARTED
Next, we need to see how our class performed and how the workflow container elements were populated.

Select the relevant task and go to the Container tab
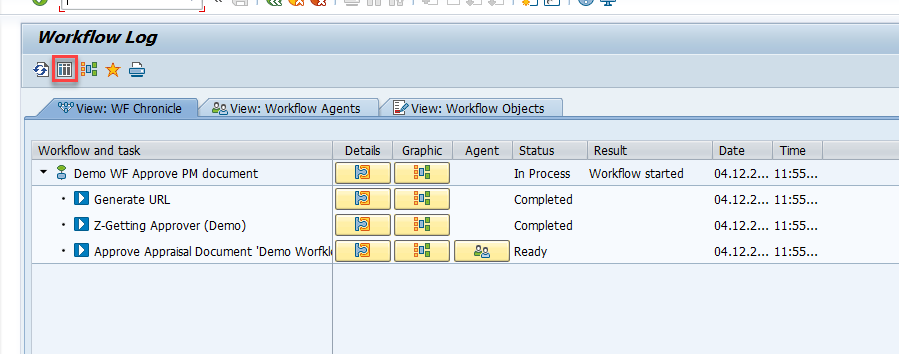
Perfect. The required processor was found, and the user ID value was written into the corresponding workflow container element. Now we can check who the processor is for the final task in the workflow
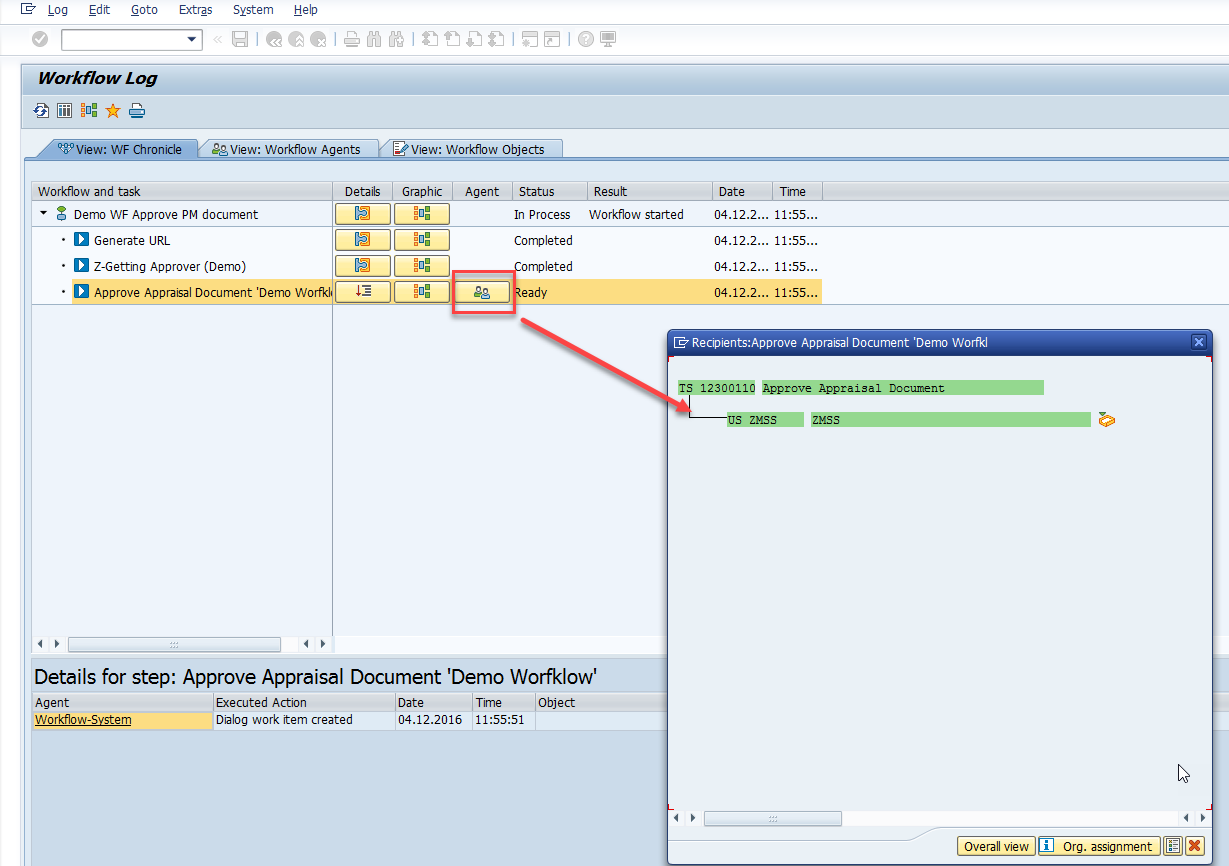
Exactly what we needed. The user was successfully assigned as the processor for the workflow task.
N.B. Make it a rule that in workflows where any kind of approval and processor search via algorithms (as in our example) is expected, you must handle situations where a processor is not found. For example, if no processor is found, an informational email should be sent to a user group, which can be defined using a Responsibility rule, with a message like:
"...you received this email because the processor for task XYZ could not be found..."
Summary
There's a lot more that could be said about workflows. Unfortunately, much that could have been included in this note was left out—partly because of the large volume, and partly because this material could easily warrant one or more separate notes.
I believe this note will still find its audience, and the description provided will help consultants and all interested practitioners working with workflows. What is presented here is just a drop in the ocean compared to what's possible in workflows.
The beginning has been made, and the rest is a matter of time and willingness.
Good luck!