Adding a New Object to the PPOME Scenario (Part 2)
Some time ago, we made life easier for our users by creating a custom PPOME transaction scenario that handled only the objects needed by our fictional users. In addition, a dedicated transaction was created, which automatically launches the required scenario upon execution.
In this article, we aim for no less ambitious a goal: adding a new object to the ZDEMO scenario, which currently works only with objects O and S. We also need to define a search tool for the new object, similar to those already in use. In this example, we will use the "Search Criterion" tool.
1. Adding a New Search Node to the Object Manager Scenario
Open SPRO and navigate to: IMG: Personnel Management → Organizational Management → Hierarchy Framework → Object Manager → Define Your Own Scenario
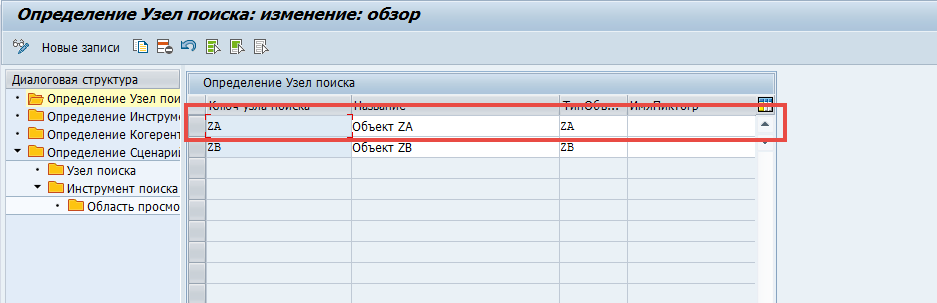
Select Define Search Node, and create a new entry for object ZA:
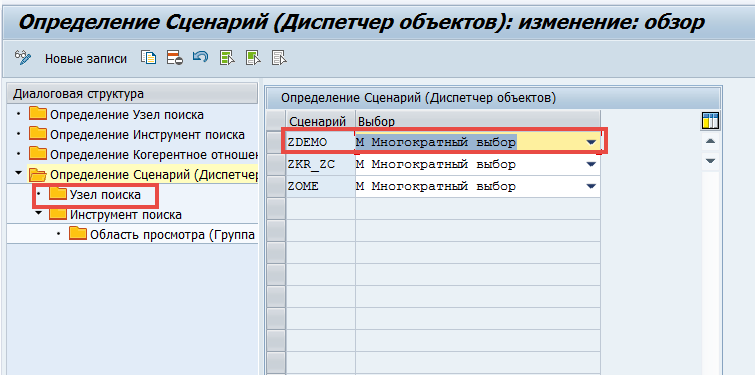
After saving, go to the Define Scenario (Object Manager) node, select the previously configured scenario ZDEMO, and navigate to the Search Node configuration:
Create a new entry for object ZA:
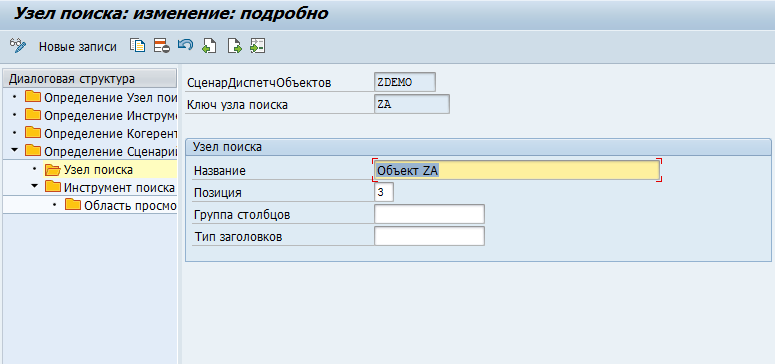
Assign sequence number 3 to object ZA (since O and S are already 1 and 2), and save the changes.
2. Defining Search Tools for New Objects in the Object Manager Scenario
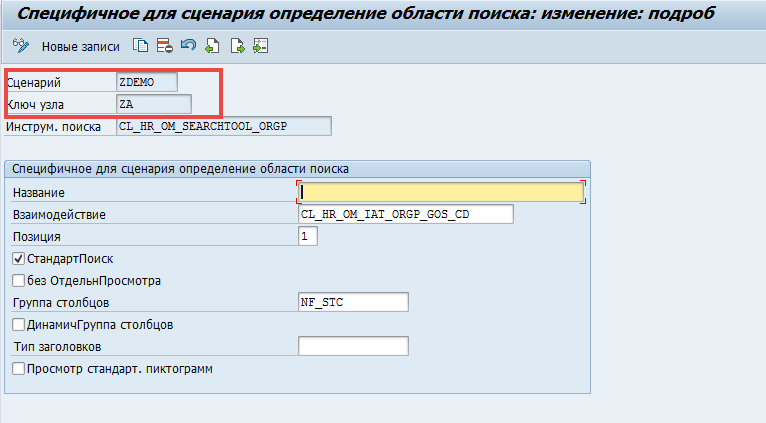
After adding the new object to the Object Manager, you need to define a search tool for it. Open transaction SM30, view V77FSEAT. Use the search tool for object S — namely, “Search Criterion” — as a template. Copy the entry with the search tool CL_HR_OM_SEARCHTOOL_ORGP from object S to the ZDEMO scenario, but for object ZA:
Save your changes.
3. Intermediate Testing of the Configurations
Let’s verify that our changes have some effect. Launch transaction ZDEMO_PPOME, or another transaction linked to your custom scenario (see section 3 of “Adding a New View to PPOME (Part 1)”):
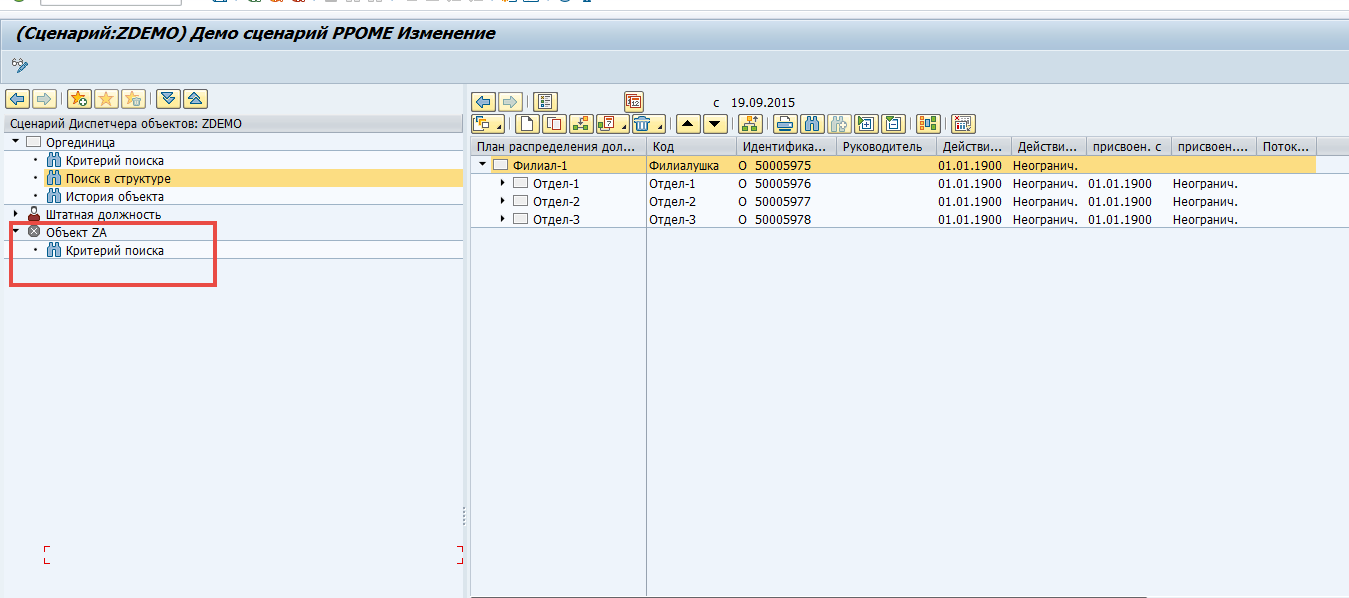
Notice that the Object Manager now includes the new object ZA, according to the sequence number you assigned (see section 1). The “Search Criterion” tool is also available for this object (see section 2), and using it will display the found objects:

Looks great. Let’s move on.
4. Defining Queries
Now we will configure the query that displays object ZA after selecting it from the search results. Open the T77FRAMEWORK cluster view and go to the node Define Query for Scenario ZDEMO:
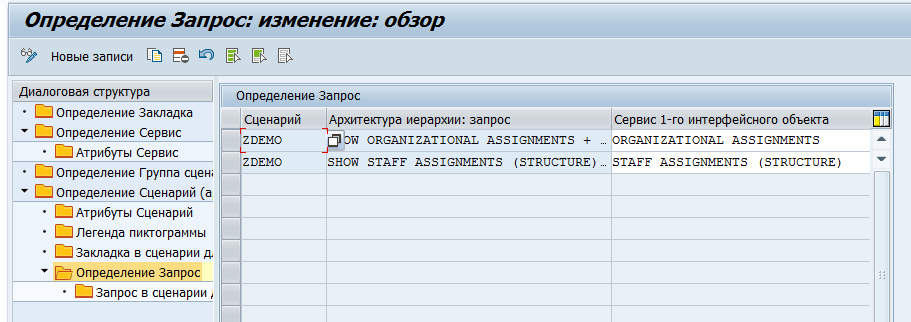
Currently, the ZDEMO scenario has two defined queries — one for object O and one for object S. We need to add another.
4.1 Defining the Service
In the T77FRAMEWORK cluster, open the node Define Service, and create a new entry. Assign a name to your service and specify object key GOWD, then click Save:
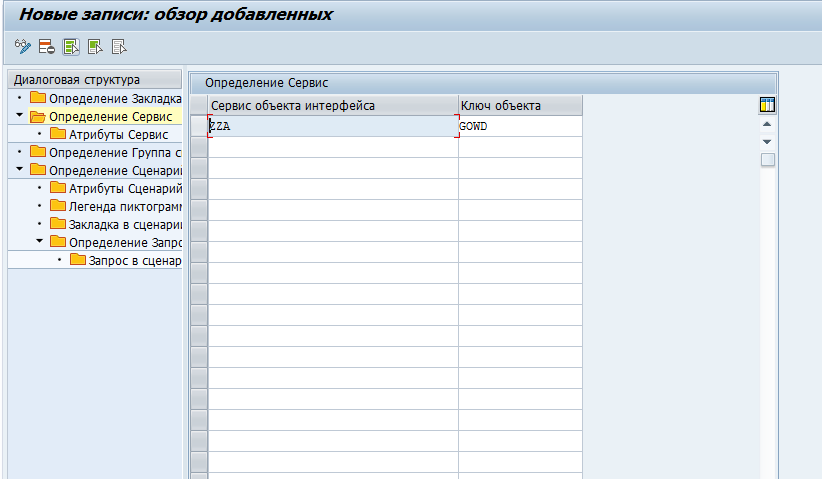
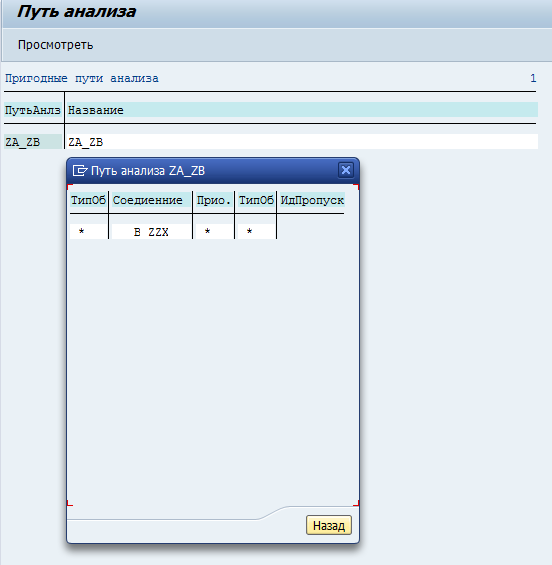
I used ZZA as the service name. After saving, select the new entry and go to the Service Attributes node. Here, define the analysis path to locate the object. In this example, we use the path ZA_ZB. Set the object type, enable Multiple Selection, and set the column group to NF_GEN_OV:

4.2 Defining the Query
Now we can create a query that displays the selected ZA object in the detail area. Still within T77FRAMEWORK, select scenario ZDEMO, go to Define Query, and create a new entry.
- For the Hierarchy Architecture: Query field, enter:sqlCopyEdit
SHOWZZA
(ZZA is the name of your custom service, see section 4.1) - For Service of 1st Interface Object, enter:nginxCopyEdit
ZZA - For Service of 2nd Interface Object, enter:scssCopyEditDETAIL (GENERAL)
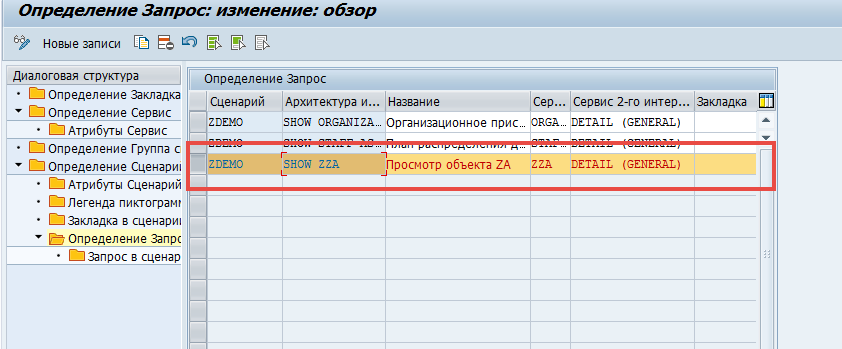
Choose a suitable name for the query.
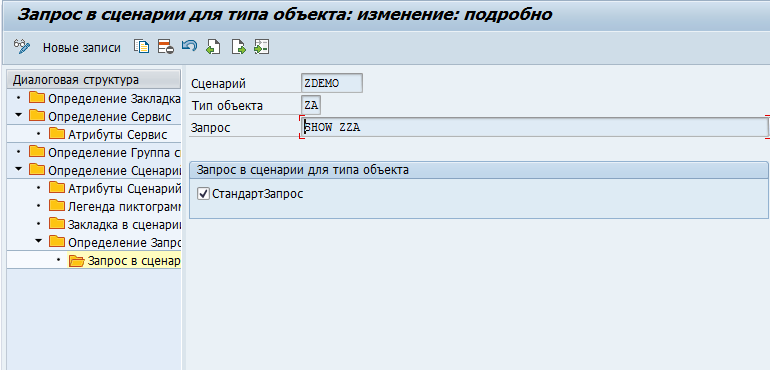
Save the new entry, then select it and go to the Query in Scenario by Object Type node. Create a new entry, where the object type is ZA, and the query is SHOW ZZA. Also, activate the Standard Query checkbox.
Save your changes.
5. Testing the Configurations
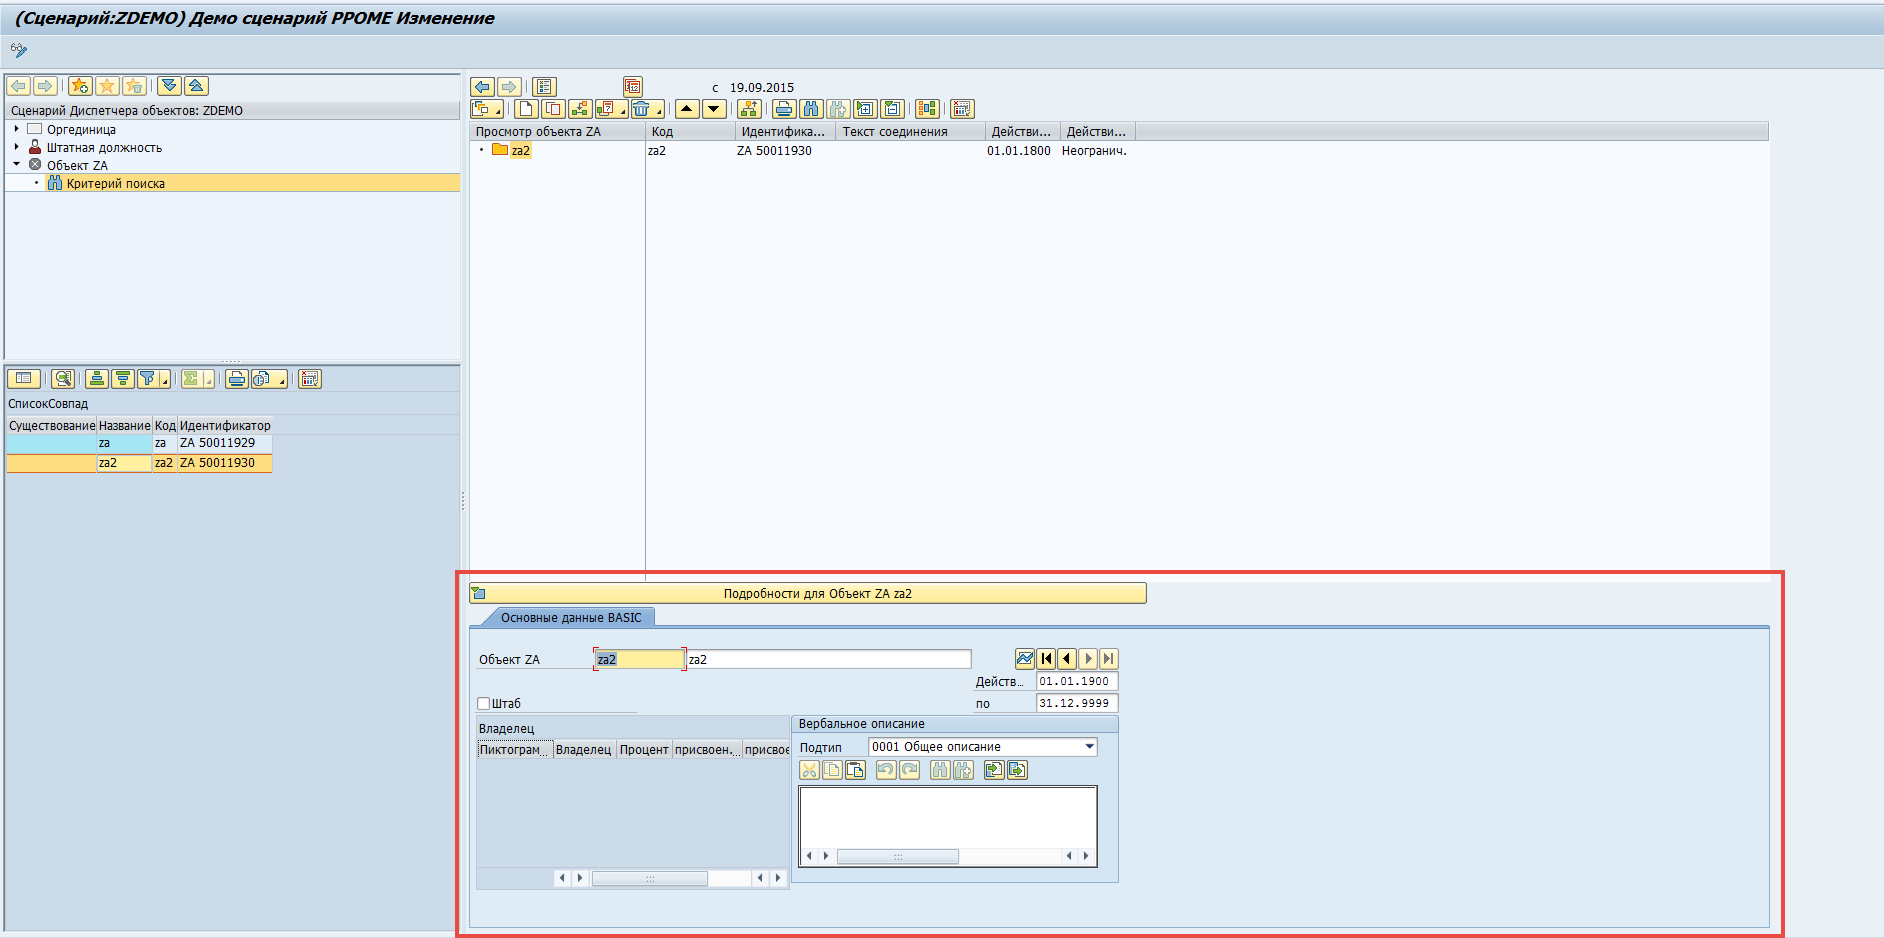
Launch transaction ZDEMO_PPOME. In the Object Manager, select the found object. A double-click triggers the ZZA query configured earlier.

It looks just as we need it. Now we only need to add a tab for viewing the main information of object ZA.
6. Adding a Tab for the Object
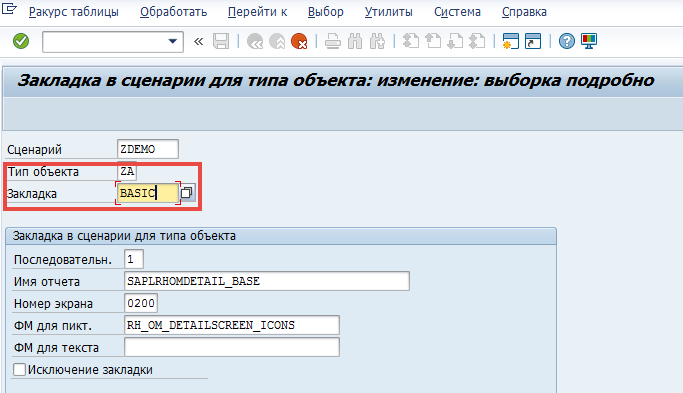
In the T77FRAMEWORK cluster, open the Tab in Scenario by Object Type node for the ZDEMO scenario. Create a new entry for object ZA. For the tab, select the value BASIC.
7. Final Testing
Let’s give ourselves a pat on the back. Now, the main information for object ZA is displayed properly:
The goal we set at the beginning of this note can be considered successfully achieved. But let’s not stop here — in the near future, I suggest we continue enhancing the ZDEMO scenario with additional features that may be useful in project work.