Creating a Web Application Using the SAPUI5 Framework (Part 4)
In the previous post on this topic, I rendered employee information into a view used in my application.
See post: Creating a Web Application Using the SAPUI5 Framework (Part 1)
See post: Creating a Web Application Using the SAPUI5 Framework (Part 2)
See post: Creating a Web Application Using the SAPUI5 Framework (Part 3)
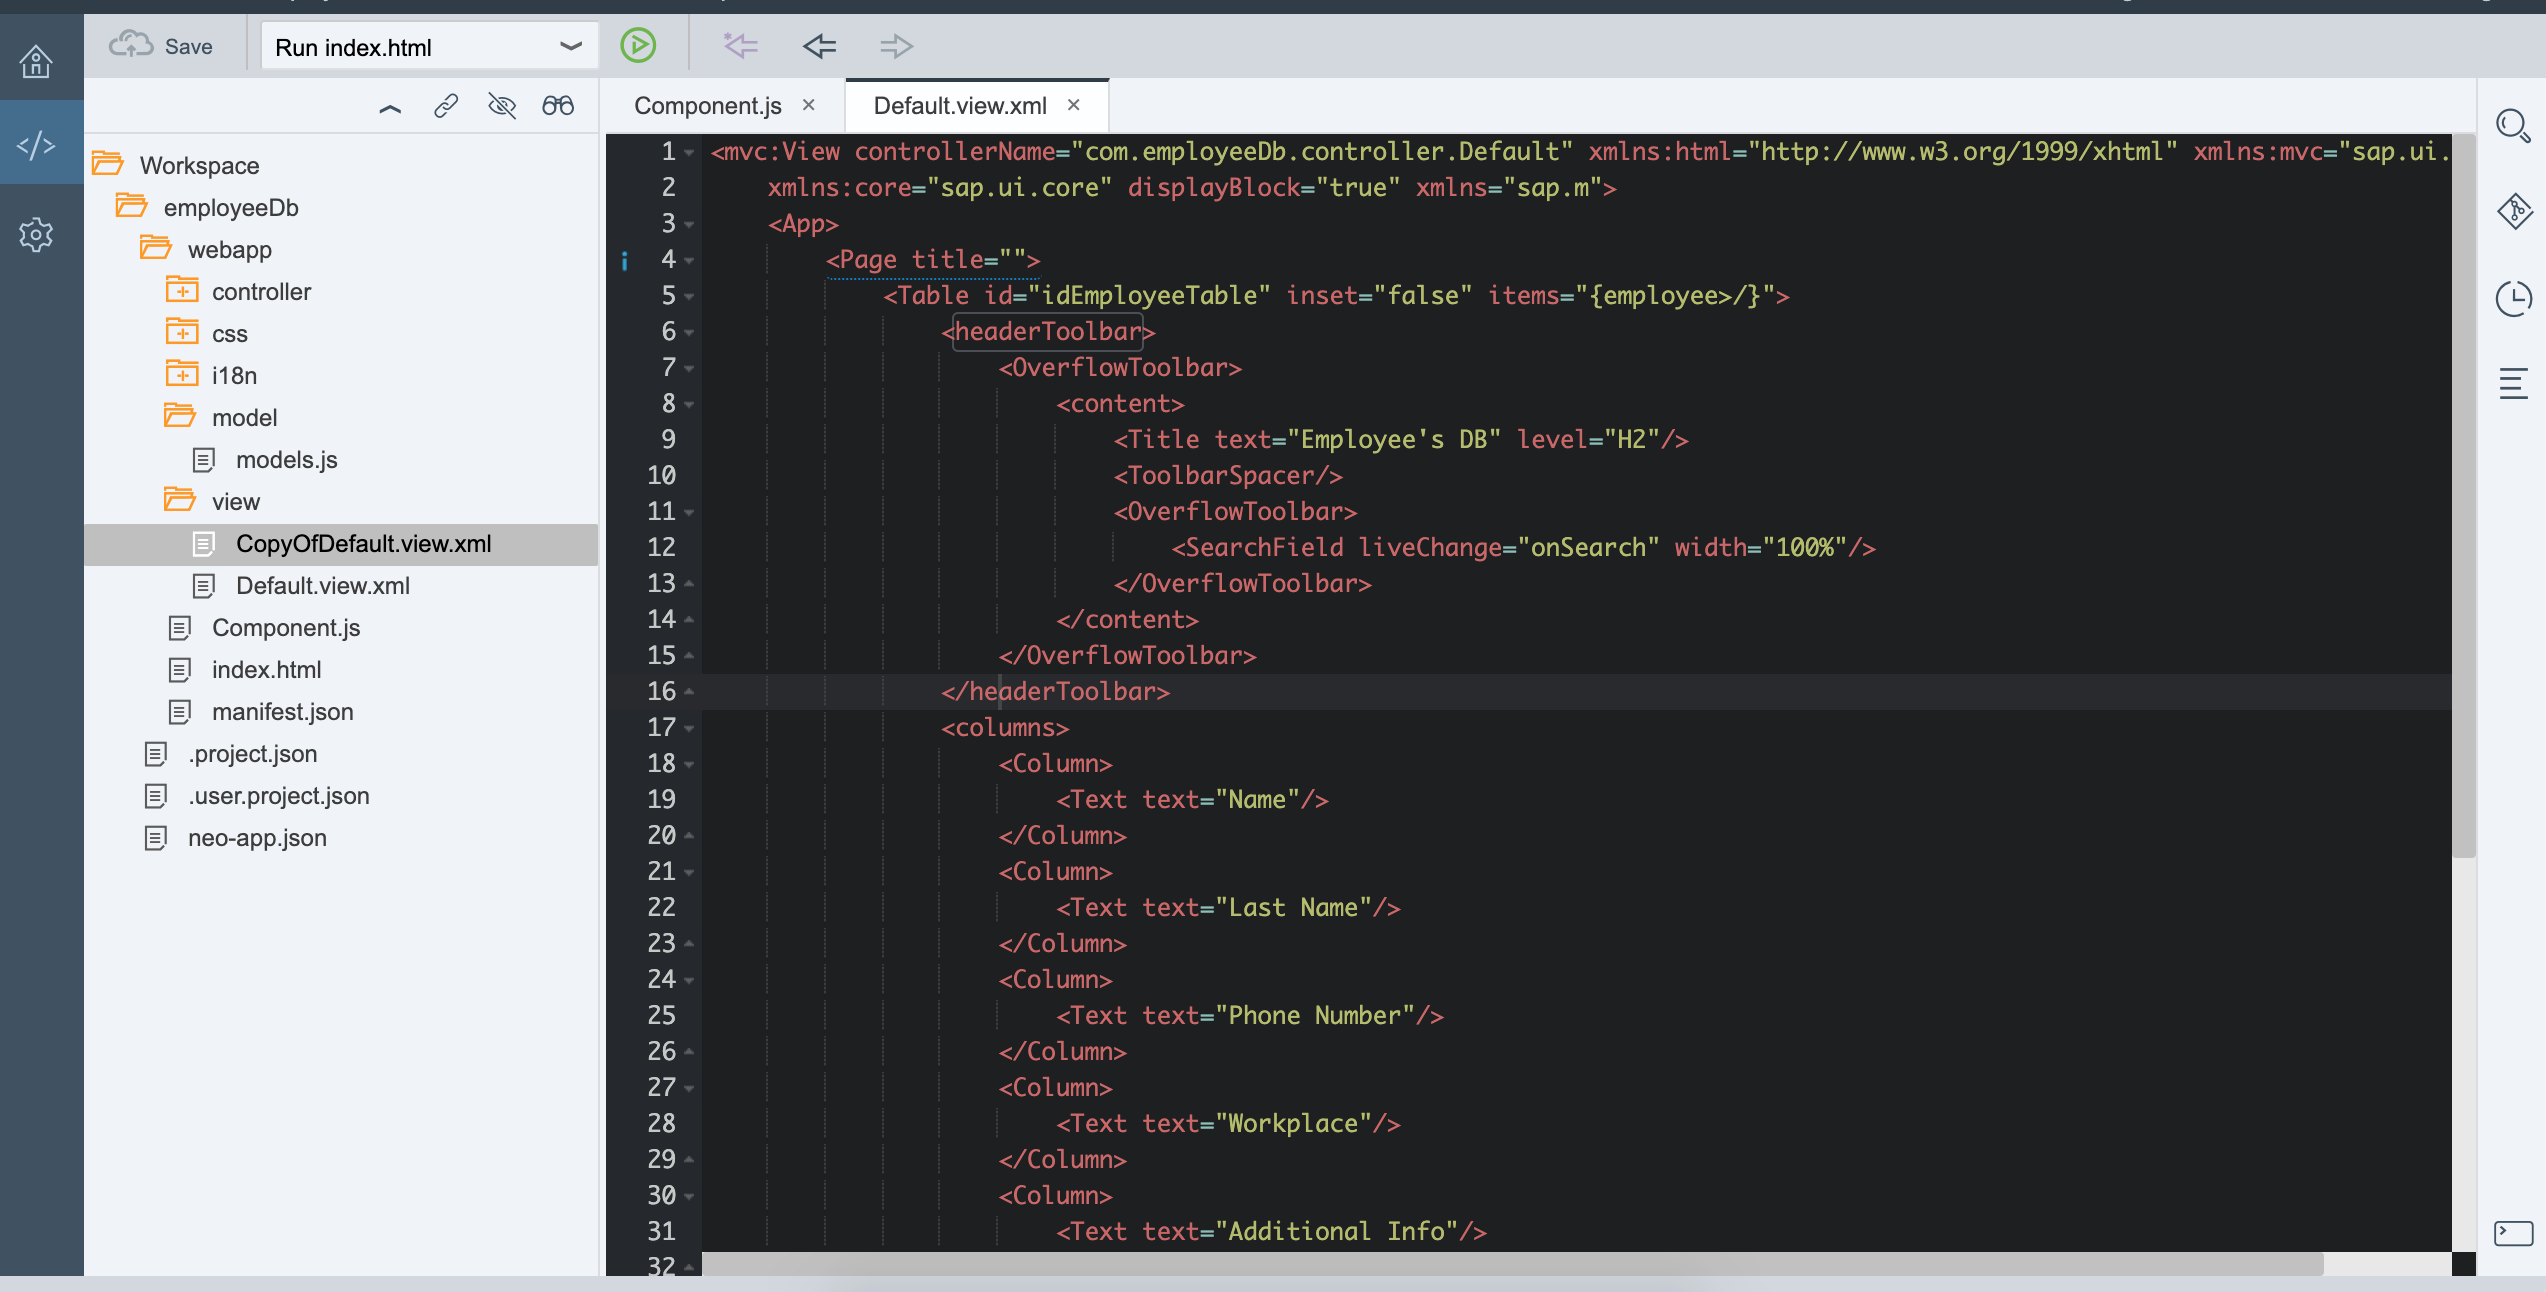
In this post, I’ll add the ability to filter data in the table that displays part of the employee information. All data that doesn’t fit into the main table will be shown on screen when clicking an icon located in one of the table columns.
Control: SearchField
See: SearchField
The control used for search/filtering in the table needs to be added to the view.
<mvc:View controllerName="com.employeeDb.controller.Default" xmlns:html="http://www.w3.org/1999/xhtml" xmlns:mvc="sap.ui.core.mvc"
    xmlns:core="sap.ui.core" displayBlock="true" xmlns="sap.m">
    <App>
        <Page title="">
            <Table id="idEmployeeTable" inset="false" items="{employee>/}">
                <headerToolbar>
                    <OverflowToolbar>
                        <content>
                            <Title text="Employee's DB" level="H2"/>
                            <ToolbarSpacer/>

                        <OverflowToolbar>
                <SearchField liveChange="onSearch" width="100%" />
            </OverflowToolbar>
                        </content>
                    </OverflowToolbar>
                </headerToolbar>
                <columns>
                    <Column>
                        <Text text="Name"/>
                    </Column>
                    <Column>
                        <Text text="Last Name"/>
                    </Column>
                    <Column>
                        <Text text="Phone Number"/>
                    </Column>
                    <Column>
                        <Text text="Workplace"/>
                    </Column>
                    <Column>
                        <Text text="Additional Info"/>
                    </Column>
                </columns>
                <items>
                    <ColumnListItem>
                        <cells>
                            <Text text="{employee>emplName}"/>
                            <Text text="{employee>emplLName}"/>
                            <Text text="{employee>emplPhoneNum}"/>
                            <Text text="{employee>emplWorkPlace}"/>
                            <core:Icon src="sap-icon://process"/>
                        </cells>
                    </ColumnListItem>
                </items>
            </Table>
        </Page>
    </App>
</mvc:View>
Testing the changes:
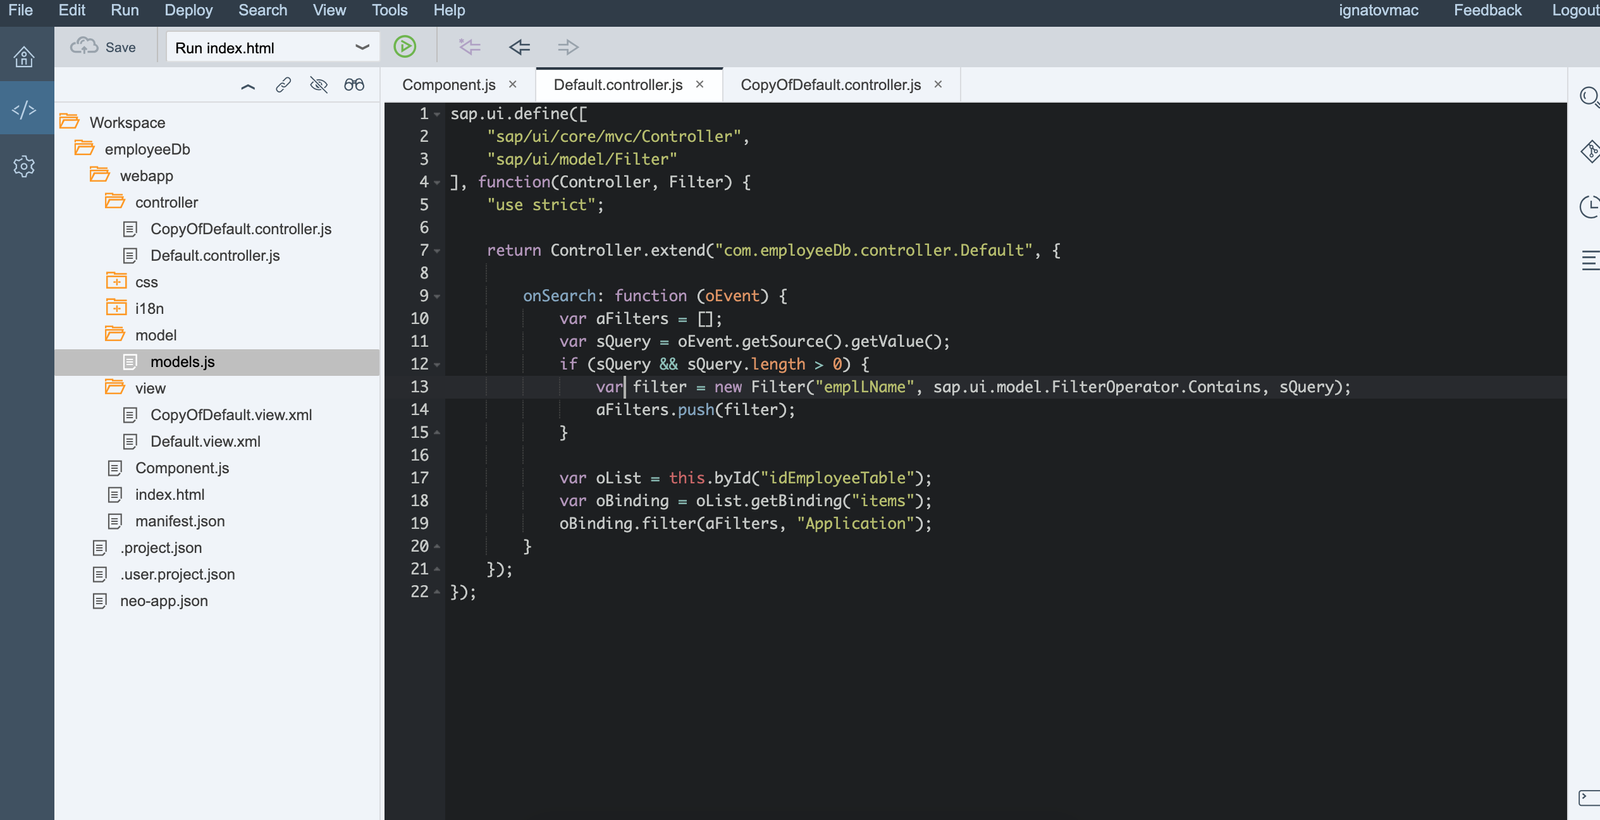
Event: onSearch in the Controller
To handle the search/filter input entered by the user, the onSearch event must be defined in the application controller. The filter will be applied to the column containing the employee’s last name.
See:Filter
<mvc:View controllerName="com.employeeDb.controller.Default" xmlns:html="http://www.w3.org/1999/xhtml" xmlns:mvc="sap.ui.core.mvc"
    xmlns:core="sap.ui.core" displayBlock="true" xmlns="sap.m">
    <App>
        <Page title="">
            <Table id="idEmployeeTable" inset="false" items="{employee>/}">
                <headerToolbar>
                    <OverflowToolbar>
                        <content>
                            <Title text="Employee's DB" level="H2"/>
                            <ToolbarSpacer/>

                        <OverflowToolbar>
                <SearchField liveChange="onSearch" width="100%" />
            </OverflowToolbar>
                        </content>
                    </OverflowToolbar>
                </headerToolbar>
                <columns>
                    <Column>
                        <Text text="Name"/>
                    </Column>
                    <Column>
                        <Text text="Last Name"/>
                    </Column>
                    <Column>
                        <Text text="Phone Number"/>
                    </Column>
                    <Column>
                        <Text text="Workplace"/>
                    </Column>
                    <Column>
                        <Text text="Additional Info"/>
                    </Column>
                </columns>
                <items>
                    <ColumnListItem>
                        <cells>
                            <Text text="{employee>emplName}"/>
                            <Text text="{employee>emplLName}"/>
                            <Text text="{employee>emplPhoneNum}"/>
                            <Text text="{employee>emplWorkPlace}"/>
                            <core:Icon src="sap-icon://process"/>
                        </cells>
                    </ColumnListItem>
                </items>
            </Table>
        </Page>
    </App>
</mvc:View>
Testing the changes:
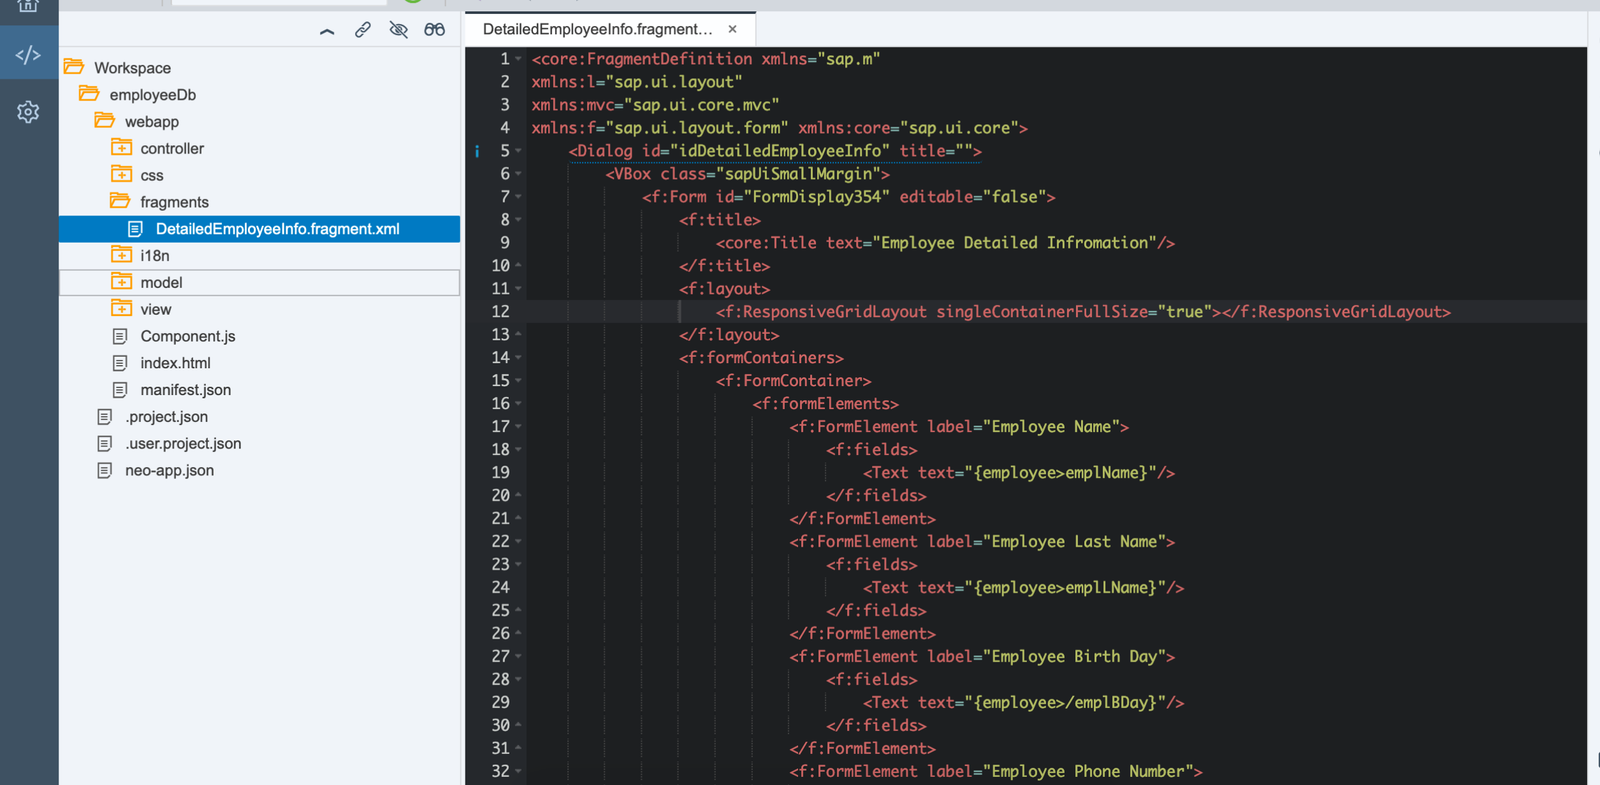
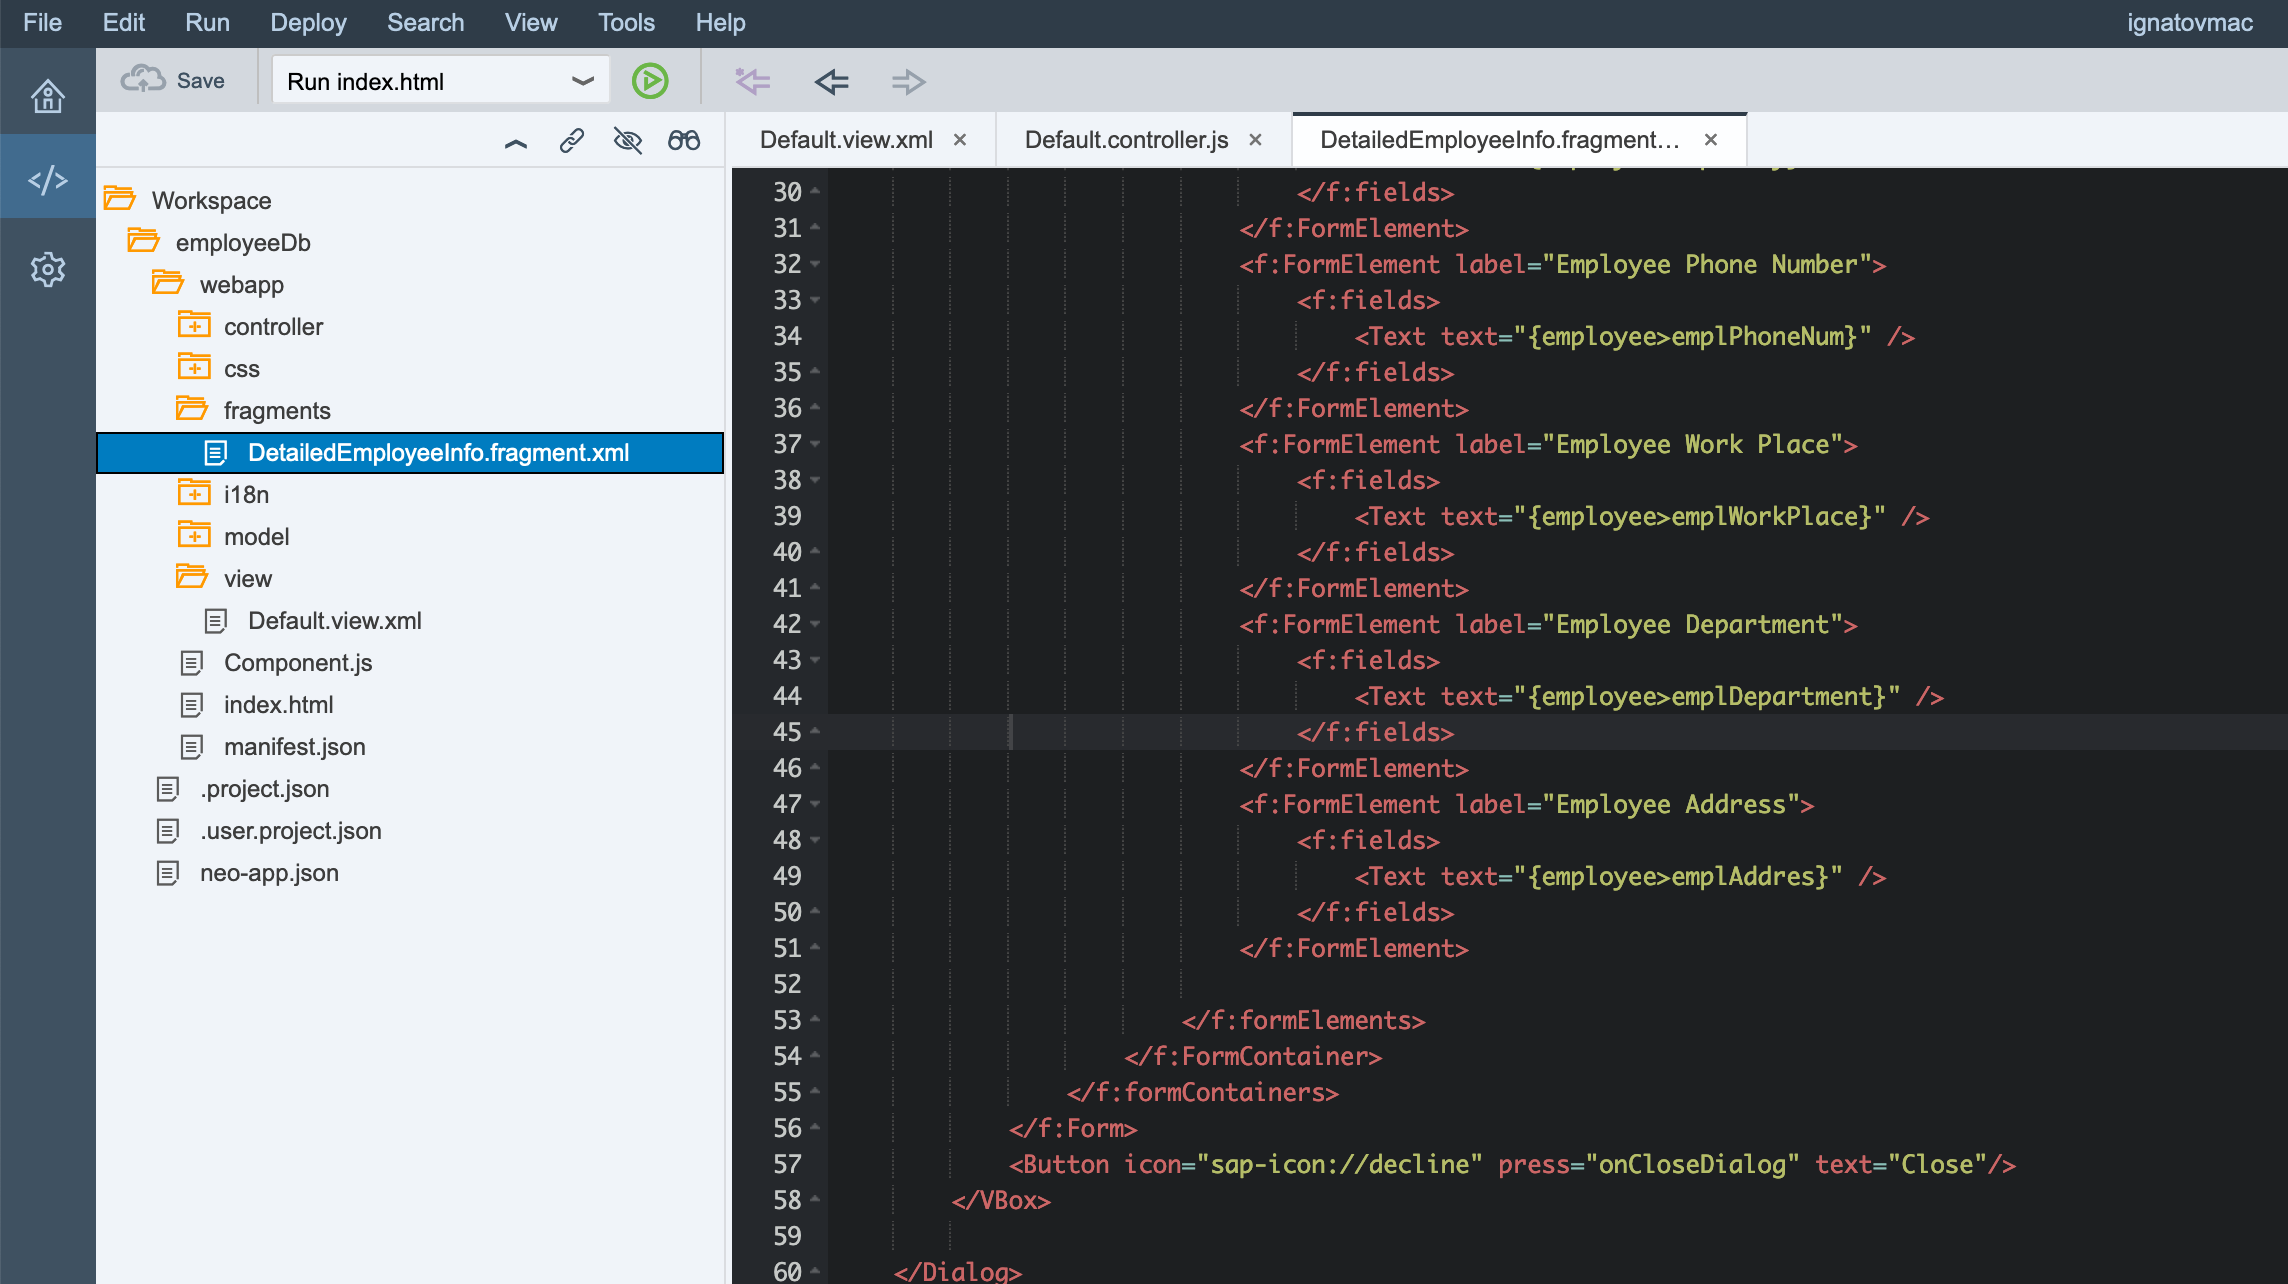
Fragments
The employee data model contains more information than what is displayed in the main table. To show this additional data to the user, we’ll use a fragment, which will be loaded when the icon in the “Additional Info” column is clicked.
Fragments support the definition of light-weight stand-alone UI control trees. This class acts as factory which returns the UI control tree defined inside the Fragments. When used within declarative Views, the Fragment content is imported and seamlessly integrated into the View.
Fragments are used similar as sap.ui.core.mvc.Views, but Fragments do not have a Controller on their own (they may know one, though), they are not a Control, they are not part of the UI tree and they have no representation in HTML. By default, in contrast to declarative Views, they do not do anything to guarantee ID uniqueness.
But like Views they can be defined in several Formats (XML, declarative HTML, JavaScript; support for other types can be plugged in), the declaration syntax is the same as in declarative Views and the name and location of the Fragment files is similar to Views. Controller methods can also be referenced in the declarations, but as Fragments do not have their own controllers, this requires the Fragments to be used within a View which does have a controller. That controller is used, then.
A fragment can be placed, for example, at the following project path in SAP WebIDE: /webapp/fragments/DetailedEmployeeInfo.fragment.xml
It will be handled by the same controller from which it is invoked.
<core:FragmentDefinition xmlns="sap.m"
xmlns:l="sap.ui.layout"
xmlns:mvc="sap.ui.core.mvc"
xmlns:f="sap.ui.layout.form" xmlns:core="sap.ui.core">
    <Dialog id="idDetailedEmployeeInfo" title="">
        <VBox class="sapUiSmallMargin">
            <f:Form id="FormDisplay354" editable="false">
                <f:title>
                    <core:Title text="Employee Detailed Infromation"/>
                </f:title>
                <f:layout>
                    <f:ResponsiveGridLayout singleContainerFullSize="true"></f:ResponsiveGridLayout>
                </f:layout>
                <f:formContainers>
                    <f:FormContainer>
                        <f:formElements>
                            <f:FormElement label="Employee Name">
                                <f:fields>
                                    <Text text="{employee>emplName}"/>
                                </f:fields>
                            </f:FormElement>
                            <f:FormElement label="Employee Last Name">
                                <f:fields>
                                    <Text text="{employee>emplLName}"/>
                                </f:fields>
                            </f:FormElement>
                            <f:FormElement label="Employee Birth Day">
                                <f:fields>
                                    <Text text="{employee>/emplBDay}"/>
                                </f:fields>
                            </f:FormElement>
                            <f:FormElement label="Employee Phone Number">
                                <f:fields>
                                    <Text text="{employee>emplPhoneNum}" />
                                </f:fields>
                            </f:FormElement>
                            <f:FormElement label="Employee Work Place">
                                <f:fields>
                                    <Text text="{employee>emplWorkPlace}" />
                                </f:fields>
                            </f:FormElement>
                            <f:FormElement label="Employee Department">
                                <f:fields>
                                    <Text text="{employee>emplDepartment}" />
                                </f:fields>
                            </f:FormElement>
                            <f:FormElement label="Employee Address">
                                <f:fields>
                                    <Text text="{employee>emplAddres}" />
                                </f:fields>
                            </f:FormElement>

                        </f:formElements>
                    </f:FormContainer>
                </f:formContainers>
            </f:Form>
            <Button icon="sap-icon://decline" press="onCloseDialog" text="Close"/>
        </VBox>

    </Dialog>
</core:FragmentDefinition>
See: Form
Loading the Fragment
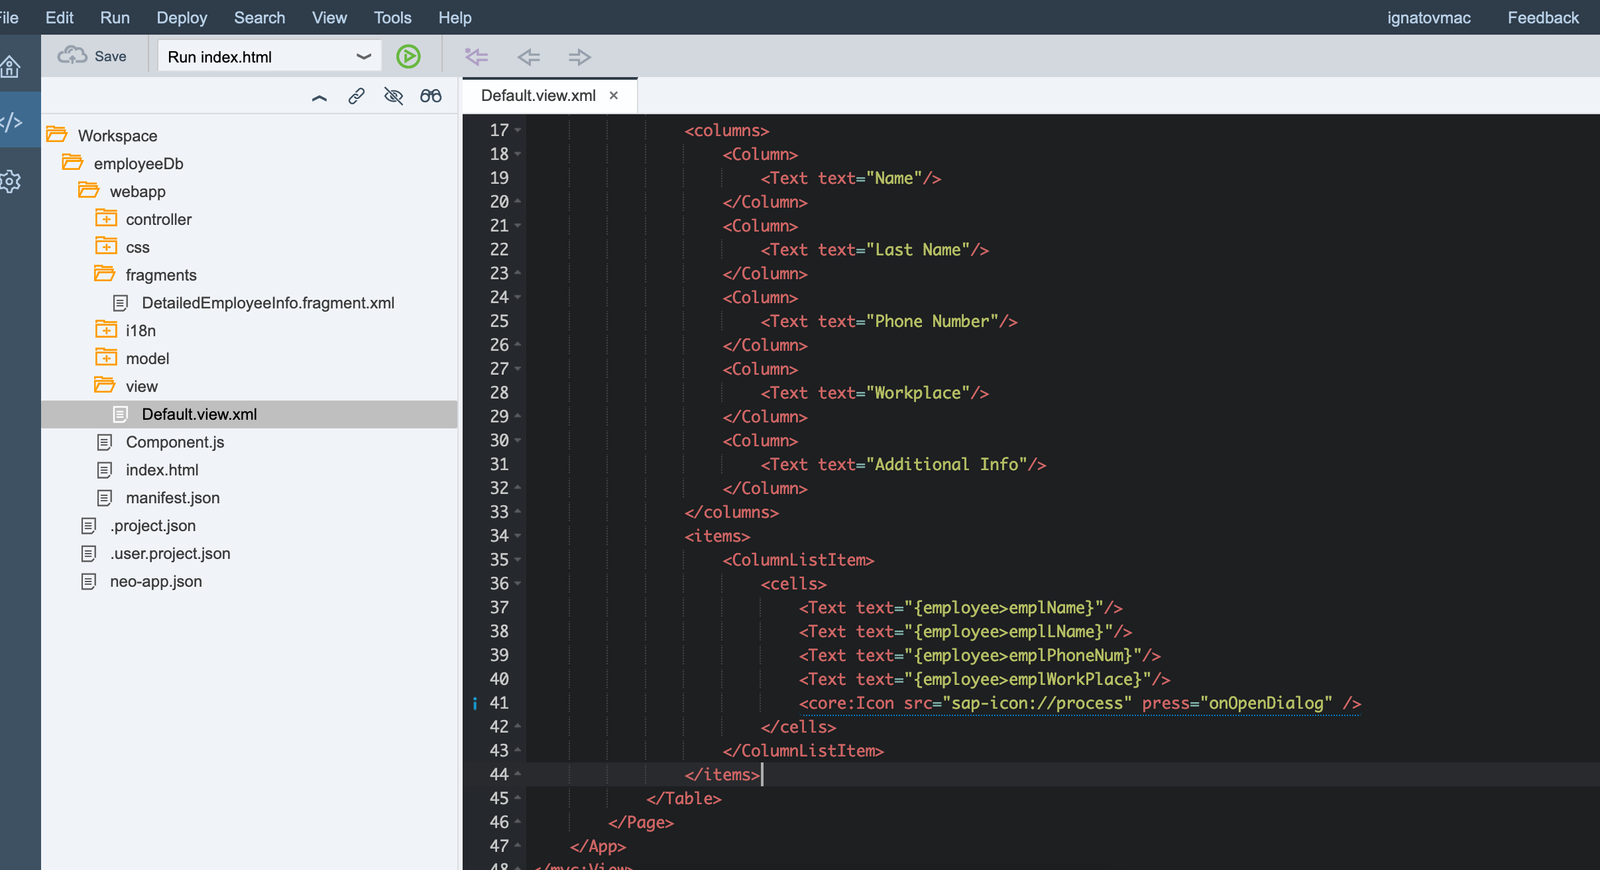
According to the design, the fragment should be loaded upon clicking the icon in the “Additional Info” column. To load the fragment, we capture the icon click in the main view:/webapp/view/Default.view.xml
<mvc:View controllerName="com.employeeDb.controller.Default" xmlns:html="http://www.w3.org/1999/xhtml" xmlns:mvc="sap.ui.core.mvc"
    xmlns:core="sap.ui.core" displayBlock="true" xmlns="sap.m">
    <App>
        <Page title="">
            <Table id="idEmployeeTable" inset="false" items="{employee>/}">
                <headerToolbar>
                    <OverflowToolbar>
                        <content>
                            <Title text="Employee's DB" level="H2"/>
                            <ToolbarSpacer/>
                            <OverflowToolbar>
                                <SearchField liveChange="onSearch" width="100%"/>
                            </OverflowToolbar>
                        </content>
                    </OverflowToolbar>
                </headerToolbar>
                <columns>
                    <Column>
                        <Text text="Name"/>
                    </Column>
                    <Column>
                        <Text text="Last Name"/>
                    </Column>
                    <Column>
                        <Text text="Phone Number"/>
                    </Column>
                    <Column>
                        <Text text="Workplace"/>
                    </Column>
                    <Column>
                        <Text text="Additional Info"/>
                    </Column>
                </columns>
                <items>
                    <ColumnListItem>
                        <cells>
                            <Text text="{employee>emplName}"/>
                            <Text text="{employee>emplLName}"/>
                            <Text text="{employee>emplPhoneNum}"/>
                            <Text text="{employee>emplWorkPlace}"/>
                            <core:Icon src="sap-icon://process" press="onOpenDialog" />
                        </cells>
                    </ColumnListItem>
                </items>
            </Table>
        </Page>
    </App>
</mvc:View>
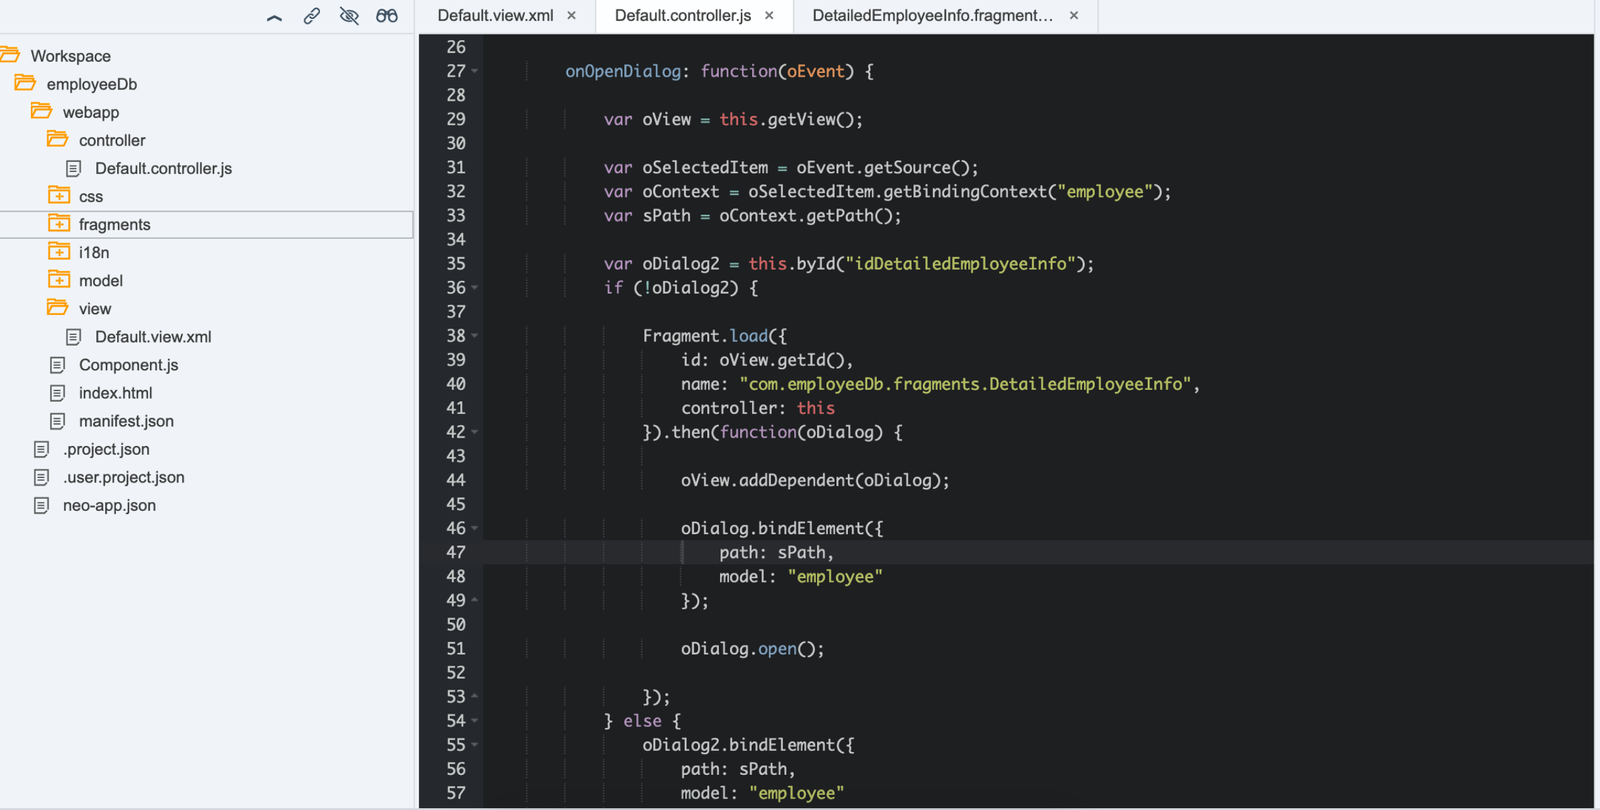
Defining onOpenDialog in the Controller
onOpenDialog: function(oEvent) {

            var oView = this.getView();

            var oSelectedItem = oEvent.getSource();
            var oContext = oSelectedItem.getBindingContext("employee");
            var sPath = oContext.getPath();

            var oDialog2 = this.byId("idDetailedEmployeeInfo");
            if (!oDialog2) {

                Fragment.load({
                    id: oView.getId(),
                    name: "com.employeeDb.fragments.DetailedEmployeeInfo",
                    controller: this
                }).then(function(oDialog) {

                    oView.addDependent(oDialog);

                    oDialog.bindElement({
                        path: sPath,
                        model: "employee"
                    });

                    oDialog.open();

                });
            } else {
                oDialog2.bindElement({
                    path: sPath,
                    model: "employee"
                });
                oDialog2.open();
            }
        }
Testing:
Closing the Fragment
The fragment can be conveniently closed via a button and an event in the controller that finalizes the user's action. Without this, the fragment can still be closed using the Esc key.
<core:FragmentDefinition xmlns="sap.m"
xmlns:l="sap.ui.layout"
xmlns:mvc="sap.ui.core.mvc"
xmlns:f="sap.ui.layout.form" xmlns:core="sap.ui.core">
    <Dialog id="idDetailedEmployeeInfo" title="">
        <VBox class="sapUiSmallMargin">
            <f:Form id="FormDisplay354" editable="false">
                <f:title>
                    <core:Title text="Employee Detailed Infromation"/>
                </f:title>
                <f:layout>
                    <f:ResponsiveGridLayout singleContainerFullSize="true"></f:ResponsiveGridLayout>
                </f:layout>
                <f:formContainers>
                    <f:FormContainer>
                        <f:formElements>
                            <f:FormElement label="Employee Name">
                                <f:fields>
                                    <Text text="{employee>emplName}"/>
                                </f:fields>
                            </f:FormElement>
                            <f:FormElement label="Employee Last Name">
                                <f:fields>
                                    <Text text="{employee>emplLName}"/>
                                </f:fields>
                            </f:FormElement>
                            <f:FormElement label="Employee Birth Day">
                                <f:fields>
                                    <Text text="{employee>emplBDay}"/>
                                </f:fields>
                            </f:FormElement>
                            <f:FormElement label="Employee Phone Number">
                                <f:fields>
                                    <Text text="{employee>emplPhoneNum}" />
                                </f:fields>
                            </f:FormElement>
                            <f:FormElement label="Employee Work Place">
                                <f:fields>
                                    <Text text="{employee>emplWorkPlace}" />
                                </f:fields>
                            </f:FormElement>
                            <f:FormElement label="Employee Department">
                                <f:fields>
                                    <Text text="{employee>emplDepartment}" />
                                </f:fields>
                            </f:FormElement>
                            <f:FormElement label="Employee Address">
                                <f:fields>
                                    <Text text="{employee>emplAddres}" />
                                </f:fields>
                            </f:FormElement>

                        </f:formElements>
                    </f:FormContainer>
                </f:formContainers>
            </f:Form>
            <Button icon="sap-icon://decline" press="onCloseDialog" text="Close"/>
        </VBox>

    </Dialog>
</core:FragmentDefinition>
Add the onCloseDialog action to the controller:
    onCloseDialog: function() {
            this.byId("idDetailedEmployeeInfo").close();
        }

Testing: