How to Update Backend Data in SAP via an SAPUI5 Application?
How to Perform Backend Data Updates Using an SAPUI5 Application?
According to project statistics, SAP consultants and developers rarely receive requests to create SAPUI5 applications that only display data from the backend system.
See SAP Note: Creating a Web Application Using the SAPUI5 Framework (8)
Business users are primarily interested in deep interaction with the data shown in the frontend. Anything they modify, delete, create, or analyze(!) must eventually be reflected in a report or form the basis for another business process.
Objective
Review a simple example of updating data in a custom table in the backend system, where the contents of that table are visualized through an SAPUI5 application.
Initial Setup
- A custom table containing some data
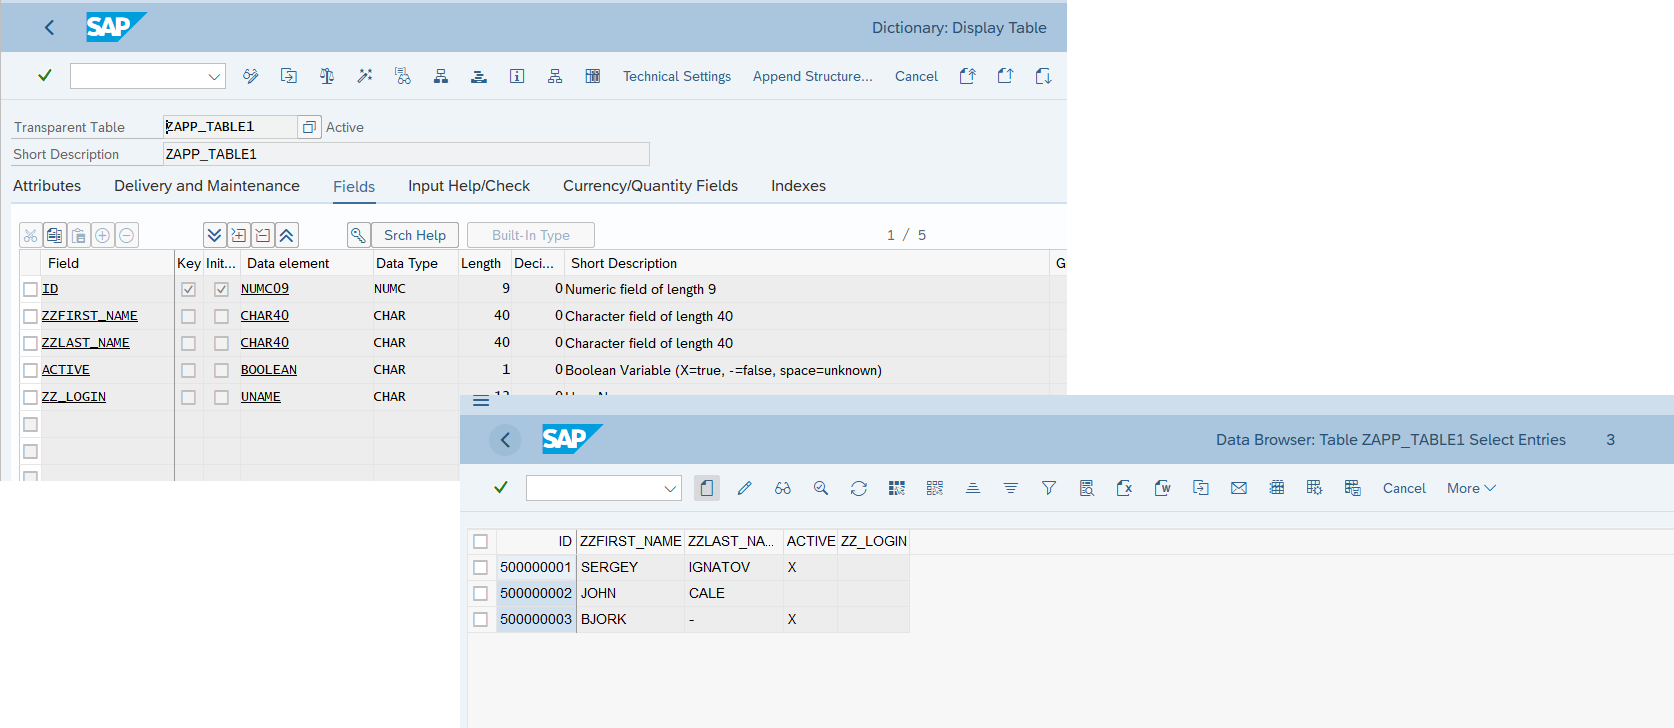
- An OData service that populates the
PersonEntitySet
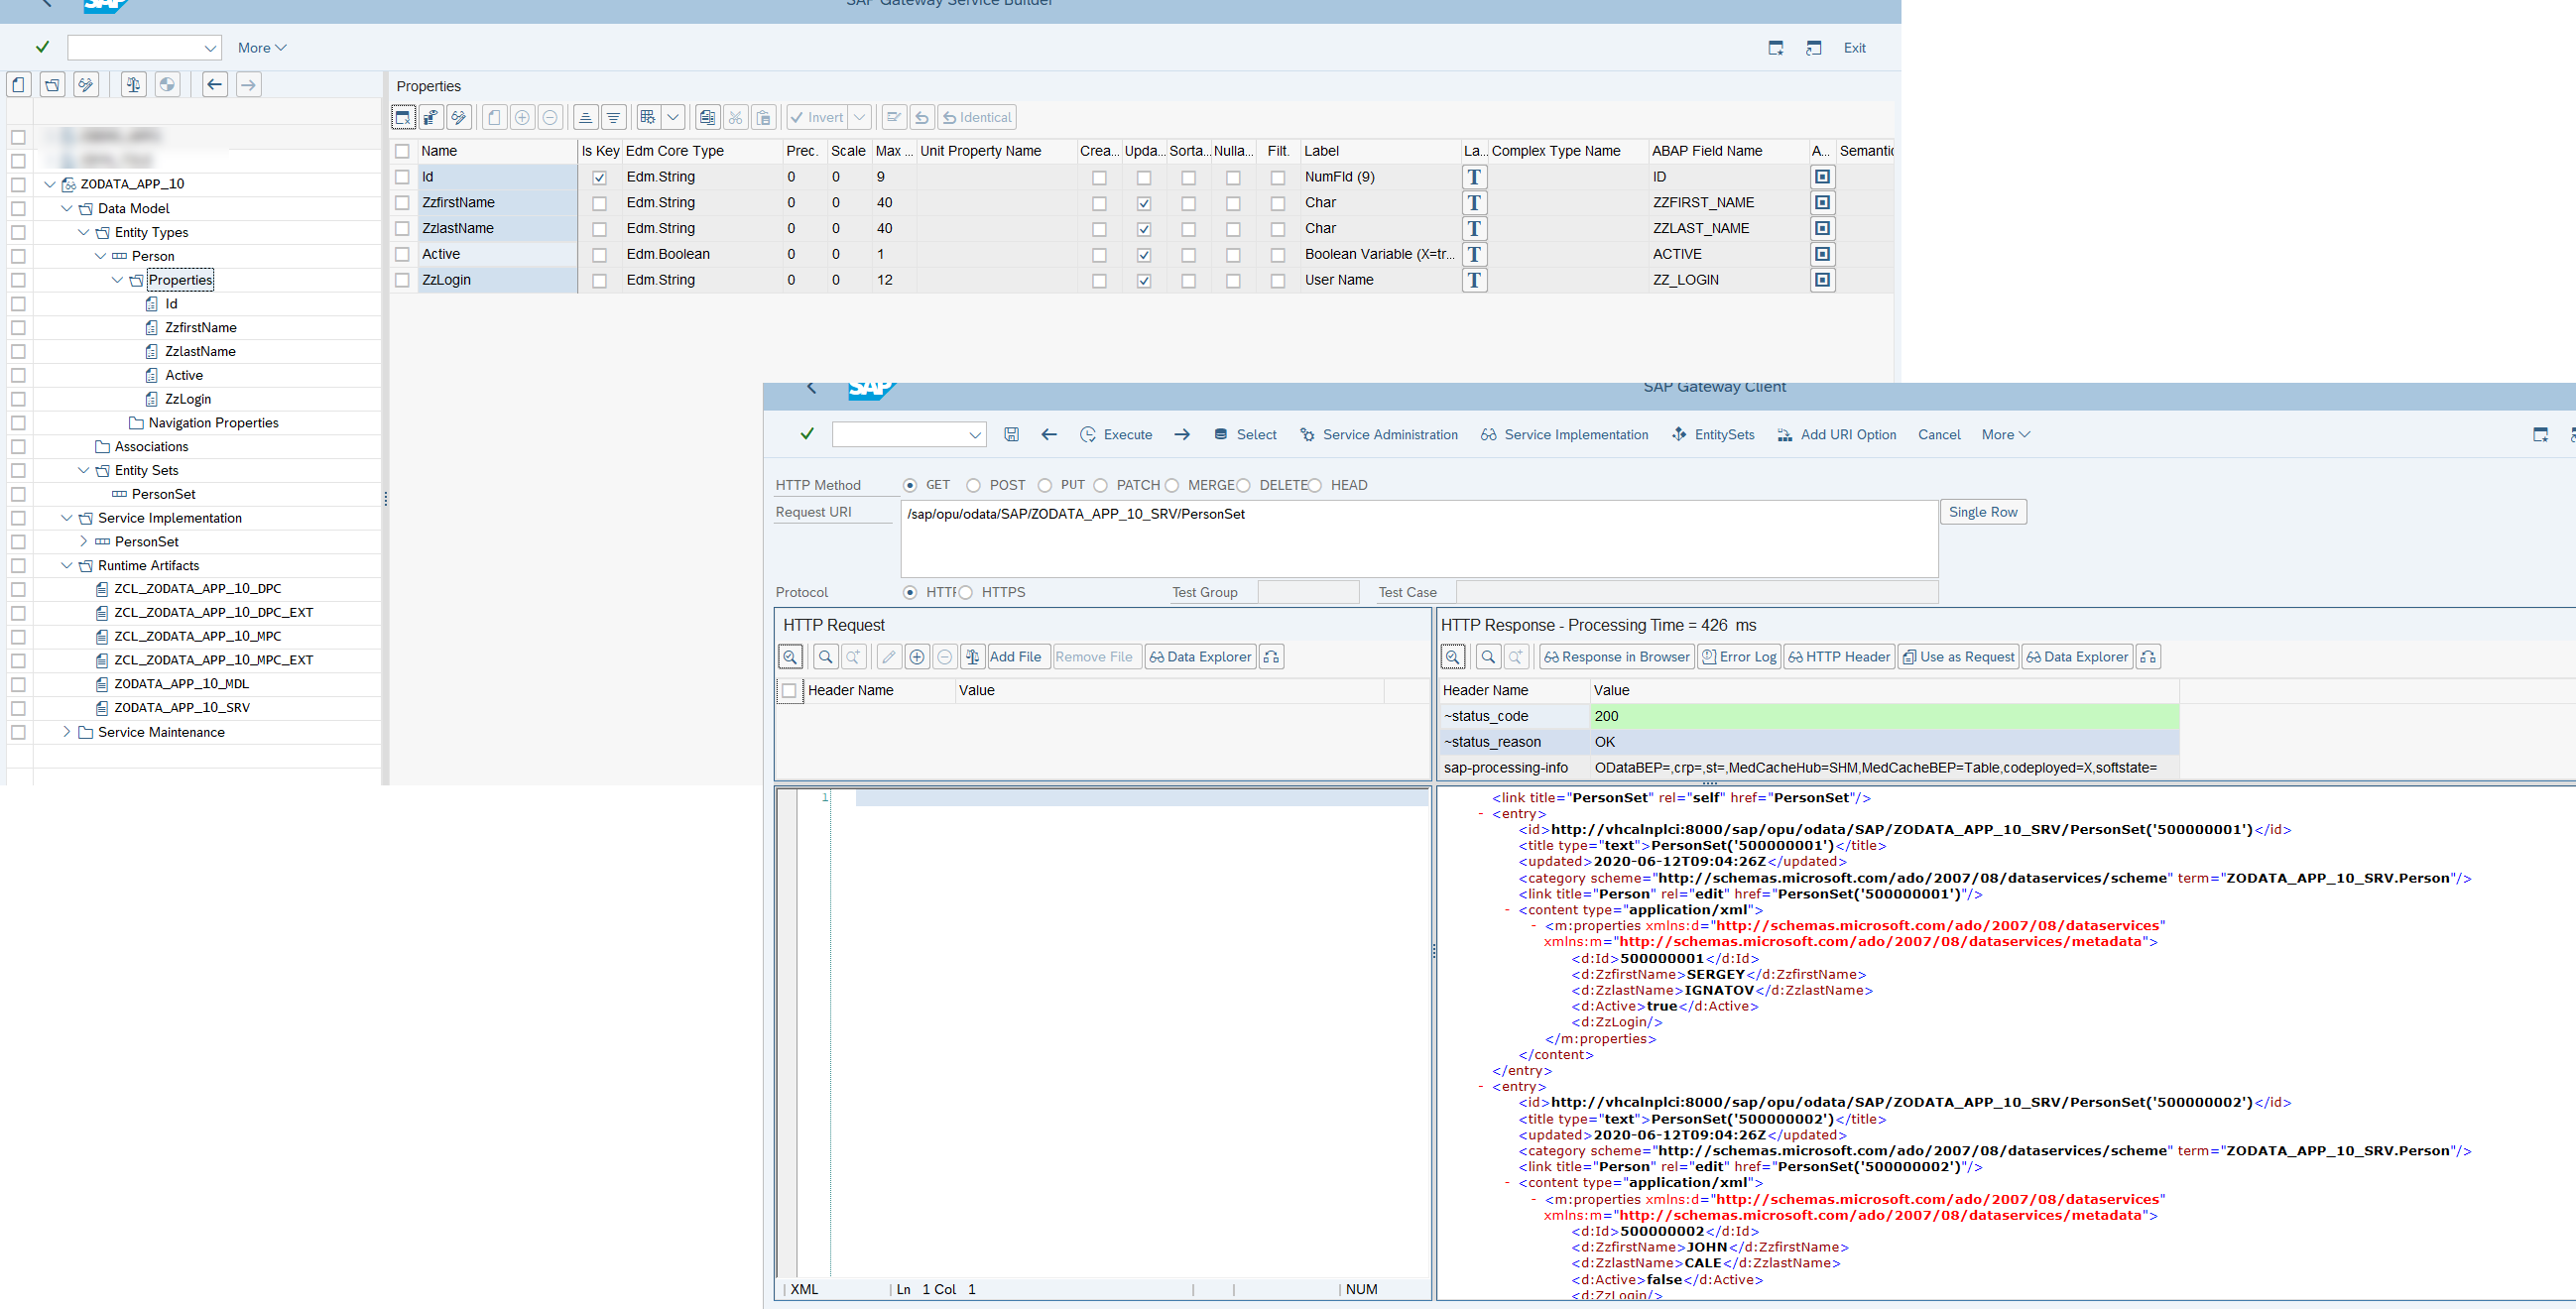
- An SAPUI5 application displaying the contents of the custom table
Data Modification – Step 1 (Frontend)
In the proposed scenario, a user can edit a record by clicking on a pencil icon. This opens a fragment with the selected record’s data, allowing the user to make changes.
See: class sap.ui.core.Fragment
Function in the Controller to Open the Fragment:
openEditDialog: function(oEvent) {
            var oView = this.getView();
            var oSelectedItem = oEvent.getSource();
            var oContext = oSelectedItem.getBindingContext("person");
            var sPath = oContext.getPath();
            var oView = this.getView();

            if (!this._oDialog) {
                Fragment.load({
                    id: "EditFr2",
                    name: "com.app10.view.EditFragment",
                    controller: this
                }).then(function(oDialog) {
                    this._oDialog = oDialog;
                    oView.addDependent(oDialog);

                    oDialog.bindElement({
                        path: sPath,
                        model: "person"
                    });

                    oDialog.open();

                }.bind(this));
            } else {
                this._oDialog.bindElement({
                    path: sPath,
                    model: "person"
                });
                this._oDialog.open();
            }
        }
Fragment XML Source Code:
<core:FragmentDefinition xmlns:l="sap.ui.layout"
xmlns:f="sap.ui.layout.form" xmlns:mvc="sap.ui.core.mvc" xmlns:core="sap.ui.core"
    xmlns="sap.m">
    <Dialog id="idEditDialog" title="">
        <f:SimpleForm editable="true">
            <f:content>
                <VBox class="sapUiSmallMargin">
                    <Input value="{person>Id}" id="idPerson" editable="false"/>
                    <Input value="{person>ZzfirstName}" id="idfName"/>
                    <Input value="{person>ZzlastName}" id="idlName"></Input>
                    <CheckBox text="Active" selected="{person>Active}" id="idChB"></CheckBox>
                </VBox>
            </f:content>
        </f:SimpleForm>
        <FlexBox alignItems="Center">
            <Button type="Accept" icon="sap-icon://refresh" press="onUpdate" text="Update"/>
            <Button icon="sap-icon://decline" press="onCloseDialog" text="Close" type="Reject"/>
        </FlexBox>
    </Dialog>
</core:FragmentDefinition>
Once changes are made, the user clicks the Update button. (In the attached video, the update functionality isn’t yet implemented.)
Data Modification – Step 2 (Backend)
We must also enable the backend system (SAP NetWeaver in this case) to handle updates made in the frontend. In the OData service, override the UPDATE_ENTITY method and implement ABAP code:
See: Service Implementation
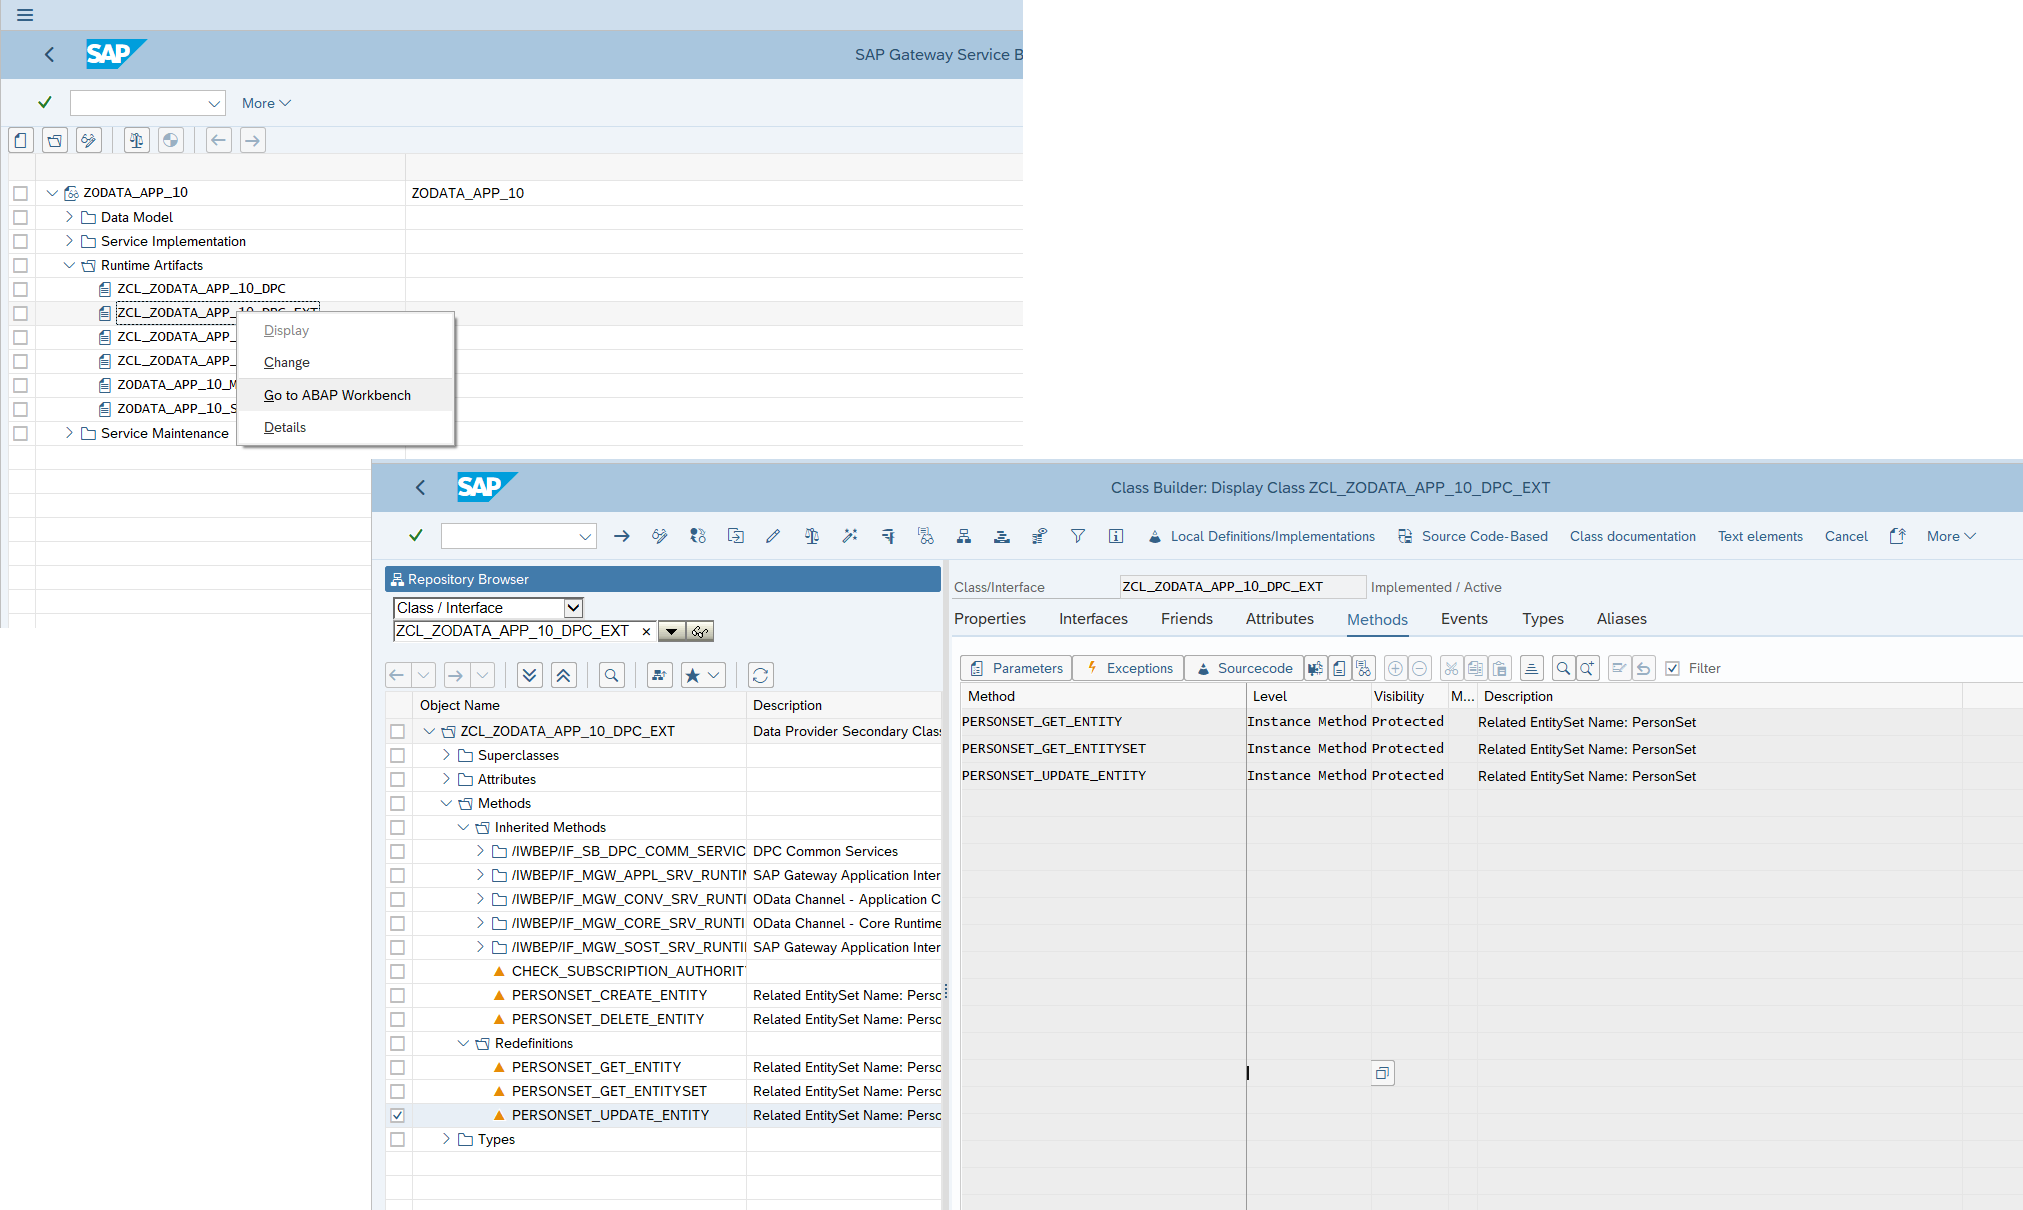
ABAP Implementation:
METHOD personset_update_entity.

    DATA: ls_entity     TYPE zcl_zodata_app_10_mpc=>ts_person,
          ls_key_value  TYPE zcl_zodata_app_10_mpc=>ts_person,
          ls_app_table1 TYPE zapp_table1.

    io_data_provider->read_entry_data( IMPORTING es_data = ls_entity ).
    io_tech_request_context->get_converted_keys( IMPORTING es_key_values = ls_key_value ).

    SELECT * FROM zapp_table1 INTO ls_app_table1 WHERE  id = ls_key_value.
      ls_app_table1-zzfirst_name = ls_entity-zzfirst_name.
      ls_app_table1-zzlast_name = ls_entity-zzlast_name.
      ls_app_table1-active = ls_entity-active.
      ls_app_table1-zz_login = sy-uname.
      MODIFY zapp_table1 FROM ls_app_table1.
      IF sy-subrc NE 0.
        "raise exception
      ENDIF.

    ENDSELECT.

    er_entity = ls_entity.
This code ensures that updated data from the UI is saved in the custom table.
Data Modification – Step 3 (Frontend)
The final step is to send the updated data from the SAPUI5 application to the backend. This is triggered by the "Update" button's press event, defined in the application controller.
See: class sap.ui.model.odata.v2.ODataModel
Update Function in the Controller:
onUpdate: function() {

            var oEntry = {};
            oEntry.Id = sap.ui.core.Fragment.byId("EditFr2", "idPerson").getValue();
            oEntry.ZzfirstName = sap.ui.core.Fragment.byId("EditFr2", "idfName").getValue();
            oEntry.ZzlastName = sap.ui.core.Fragment.byId("EditFr2", "idlName").getValue();
            oEntry.Active = sap.ui.core.Fragment.byId("EditFr2", "idChB").getSelected();

            var sUrl = "/sap/opu/odata/SAP/ZODATA_APP_10_SRV/";

            var oModel = new sap.ui.model.odata.v2.ODataModel(sUrl);
            oModel.update("/PersonSet('" + oEntry.Id + "')", oEntry, {
                success: function(){MessageToast.show(" Entry was successfully updated");},
                error: function(oError){ if(oError) {MessageToast.show("Entry was not updated");}}
            }
            );
        }
Testing
Repeat the above steps under a different user to verify functionality and access control.