SAP Idocs. Creating and Configuring a Custom Idoc from Scratch
SAP Idocs. Creating and Configuring a Custom Idoc from Scratch
What is the author trying to say by publishing this note? Most likely, this will be the question on your mind when reading the title. Since there's not much new to say on the topic due to its extensive coverage and availability on the Internet, I’ll pursue only one goal by publishing this material: a concise and sequential outline of steps that, I hope, will be useful for quickly diving into the topic when encountering such a task during project work.
What task will be addressed in this article?
- Create a new Idoc in the SAP system, where the structure gathers information for saving into a standard infotype in personnel administration.
- Populate the new Idoc with data and send it to a receiving system (another SAP system in my example).
- In the receiving system, receive and process the incoming Idoc data, saving the segment content into a personnel infotype.
Step 1. Create a segment for the custom Idoc (Transaction WE31)
Use transaction WE31 to create a segment that will be used to transmit and store the necessary information.
See: Defining Segments
Also discussed in: Заполнение нового типа IDoc посредством запуска ABAP программы
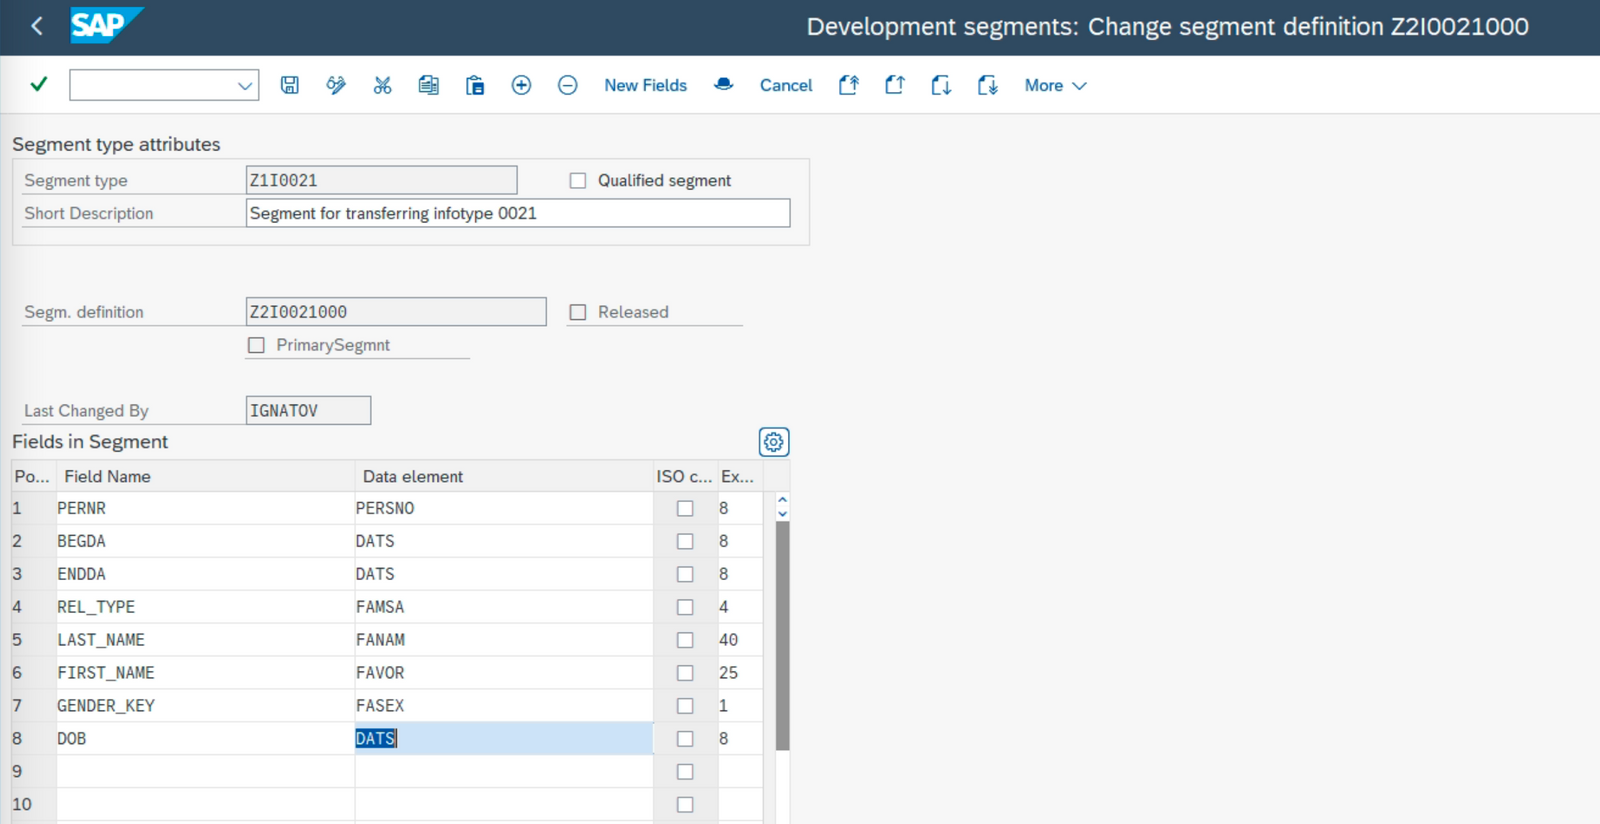
In this article, I’ll use the example of developing a new Idoc and processing it with reference to infotype 0021 – "Family Member/Dependents".
Step 2. Define a Basic Type (Transaction WE30)
Use transaction WE30 to create a basic type and include the previously created segment in it.
See: Defining and Using a Basic Type
See: Defining a Basic Type
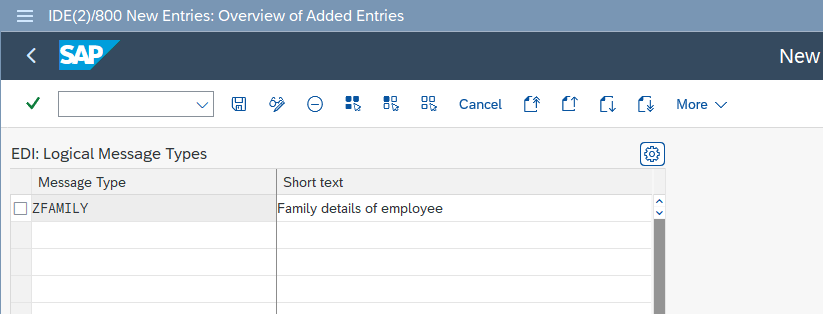
Step 3. Create a Message Type (Transaction WE81)
Define a name for the message type for the new Idoc in transaction WE81.
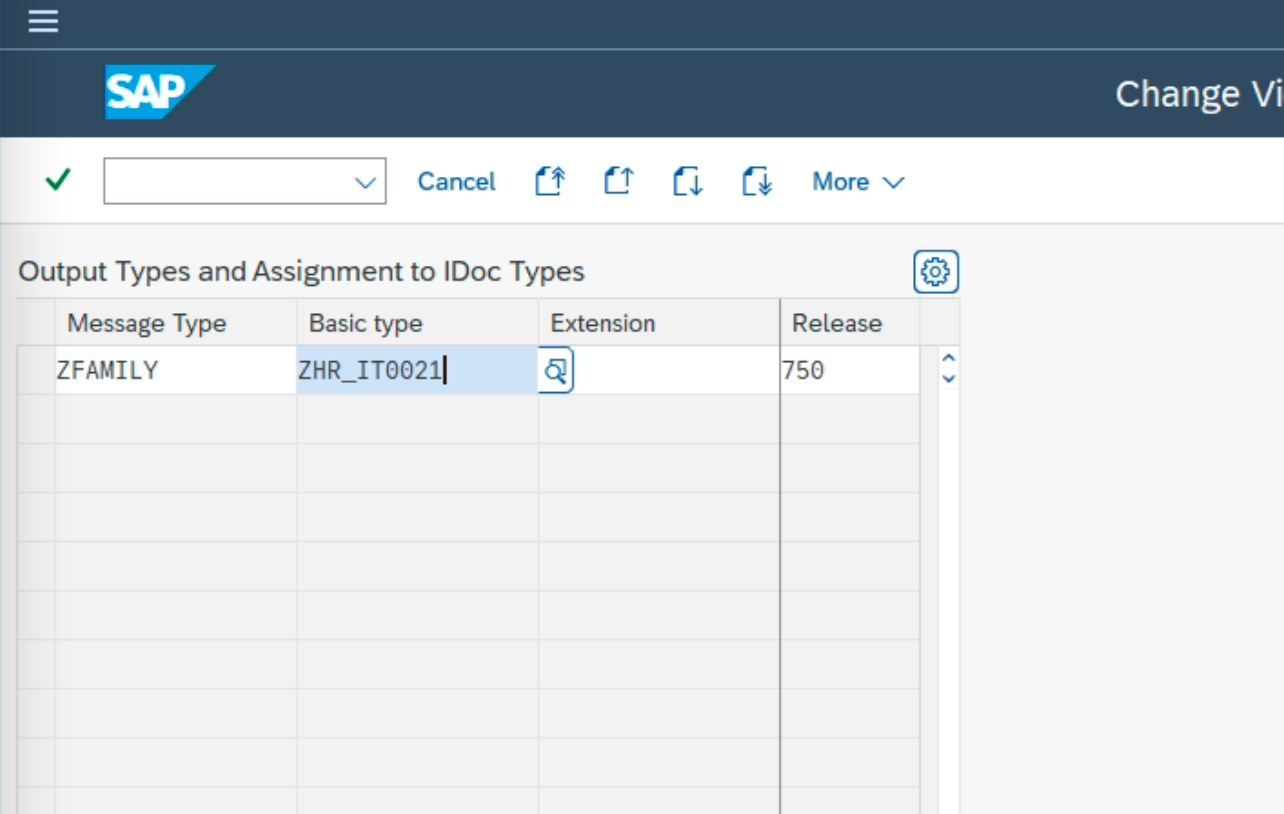
Step 4. Assign the Message Type to the Basic Type (Transaction WE82)
Link the message type to the basic type in transaction WE82.
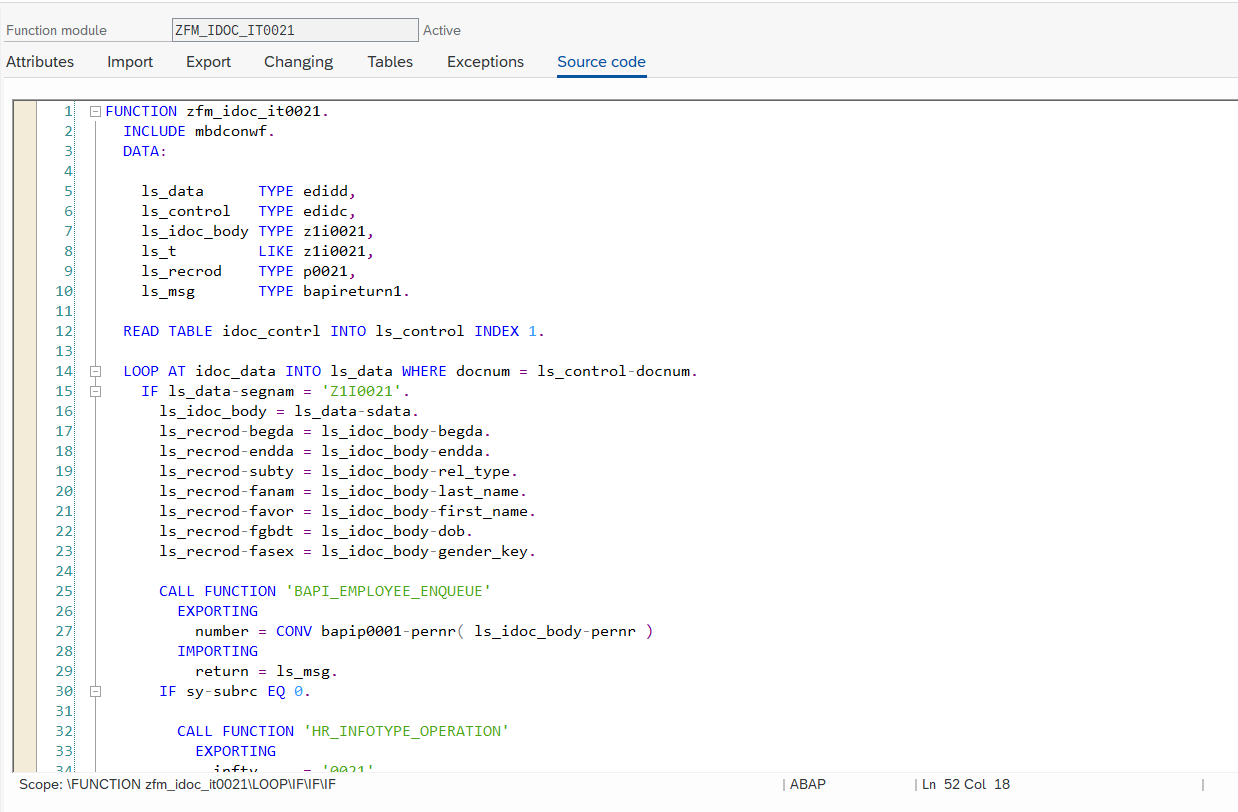
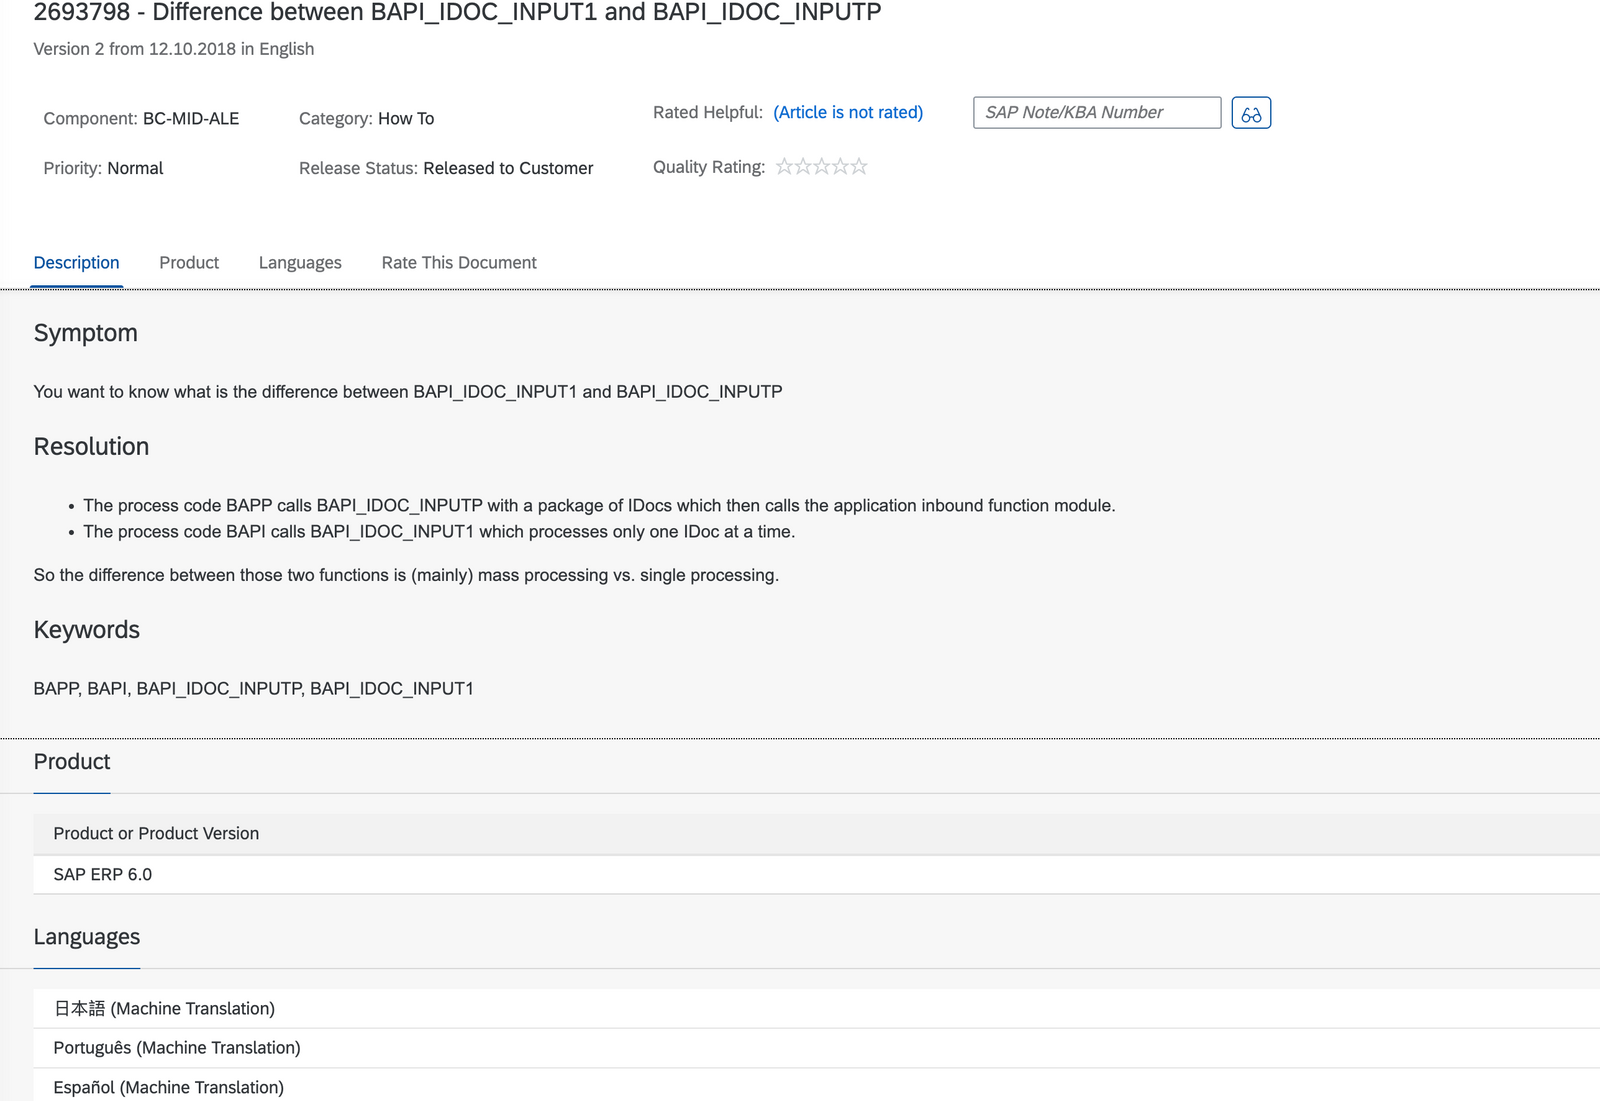
Step 5. Create a Function Module to Process the Incoming Idoc (Transaction SE80)
Create a functional module to process the incoming Idoc and transfer the data into the appropriate infotype. You can base your code on FM BAPI_IDOC_INPUT1.
See: SAP Note 2693798 - Difference between BAPI_IDOC_INPUT1 and BAPI_IDOC_INPUTP
Let’s assume the function module source code might look like the following:
FUNCTION zfm_idoc_it0021.
  INCLUDE mbdconwf.
  DATA:

    ls_data      TYPE edidd,
    ls_control   TYPE edidc,
    ls_idoc_body TYPE z1i0021,
    ls_recrod    TYPE p0021,
    ls_msg       TYPE bapireturn1.

  READ TABLE idoc_contrl INTO ls_control INDEX 1.

  LOOP AT idoc_data INTO ls_data WHERE docnum = ls_control-docnum.
    IF ls_data-segnam = 'Z1I0021'.
      ls_idoc_body = ls_data-sdata.
      ls_recrod-begda = ls_idoc_body-begda.
      ls_recrod-endda = ls_idoc_body-endda.
      ls_recrod-subty = ls_idoc_body-rel_type.
      ls_recrod-fanam = ls_idoc_body-last_name.
      ls_recrod-favor = ls_idoc_body-first_name.
      ls_recrod-fgbdt = ls_idoc_body-dob.
      ls_recrod-fasex = ls_idoc_body-gender_key.

      CALL FUNCTION 'BAPI_EMPLOYEE_ENQUEUE'
        EXPORTING
          NUMBER = CONV bapip0001-pernr( ls_idoc_body-pernr )
        IMPORTING
          RETURN = ls_msg.
      IF sy-subrc EQ 0.

        CALL FUNCTION 'HR_INFOTYPE_OPERATION'
          EXPORTING
            infty     = '0021'
            NUMBER    = CONV p0001-pernr( ls_idoc_body-pernr )
            record    = ls_recrod
            operation = 'INS'
            tclas     = 'A'
          IMPORTING
            RETURN    = ls_msg.

        IF ls_msg-TYPE EQ 'E'.
          idoc_status-status = c_idoc_status_error.
          idoc_status-msgty  = sy-msgty.
          idoc_status-msgid  = ls_msg-ID.
          idoc_status-msgno  = ls_msg-NUMBER.
          idoc_status-msgv1  = ls_msg-MESSAGE.
          idoc_status-msgv2  = ls_msg-log_msg_no.
          idoc_status-msgv3  = ls_msg-message_v1.
          idoc_status-msgv4  = ls_msg-message_v2.
          workflow_result    = c_wf_result_error.
          return_variables-wf_param   = c_wf_par_error_idocs.
        ELSE.
          idoc_status-status = c_idoc_status_ok.
          idoc_status-msgty  = 'S'.
          idoc_status-msgid  = 'Delightfull!'(001).
          idoc_status-msgno  = 001.
          workflow_result    = c_wf_result_ok.
          return_variables-wf_param   = c_wf_par_processed_idocs.
        ENDIF.
      ENDIF.
      idoc_status-docnum = ls_control-docnum.
      idoc_status-repid  = sy-repid.
      APPEND idoc_status.
      return_variables-doc_number   = ls_control-docnum.
      APPEND return_variables.
    ENDIF.
  ENDLOOP.

ENDFUNCTION.
Step 6. Assign the Message Type to the Function Module (Transaction WE57)
Use transaction WE57 to assign the message type to the function module.
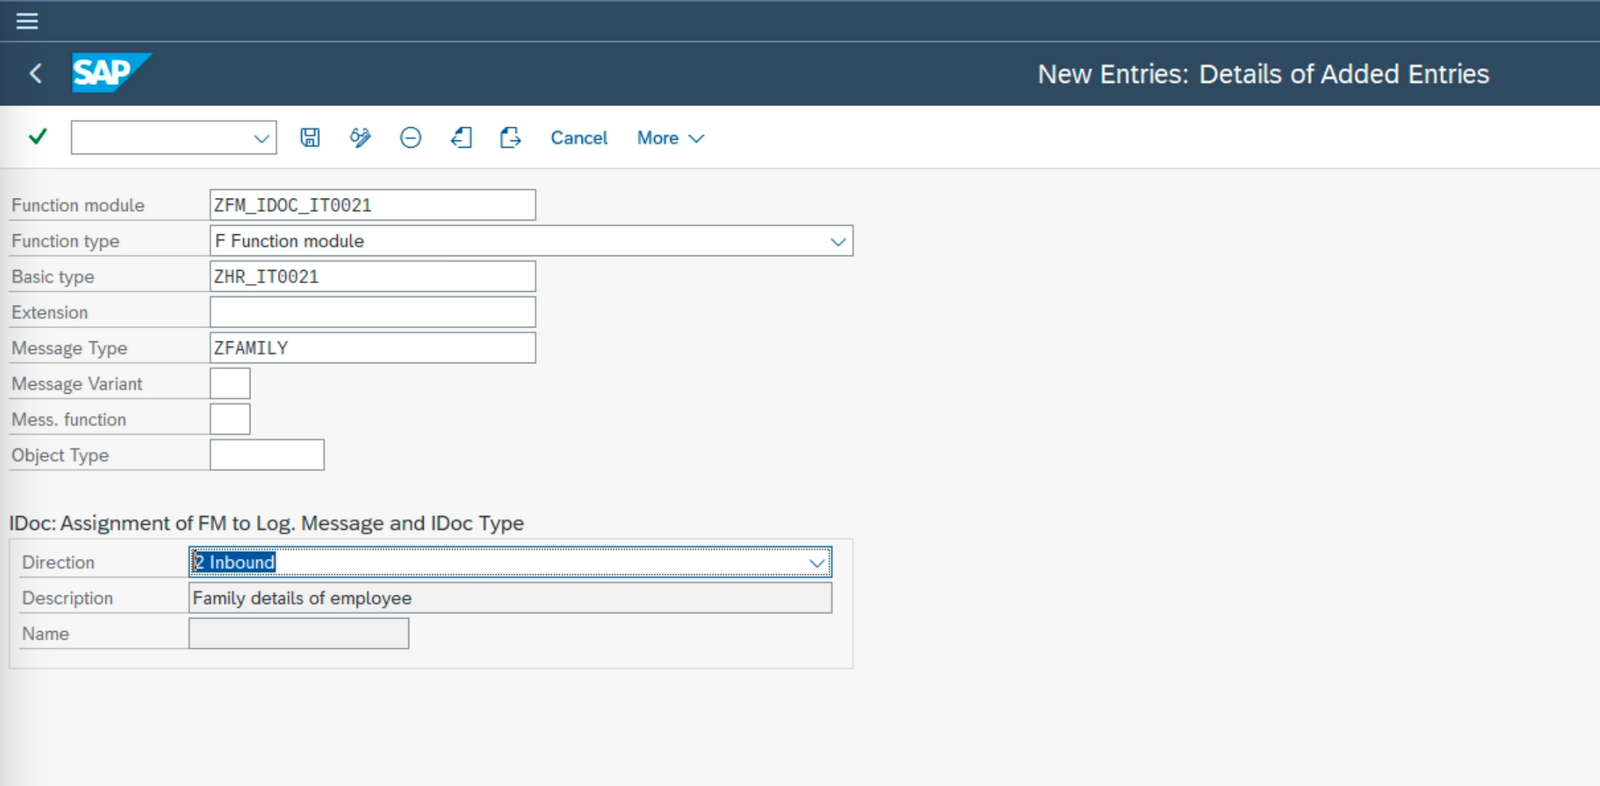
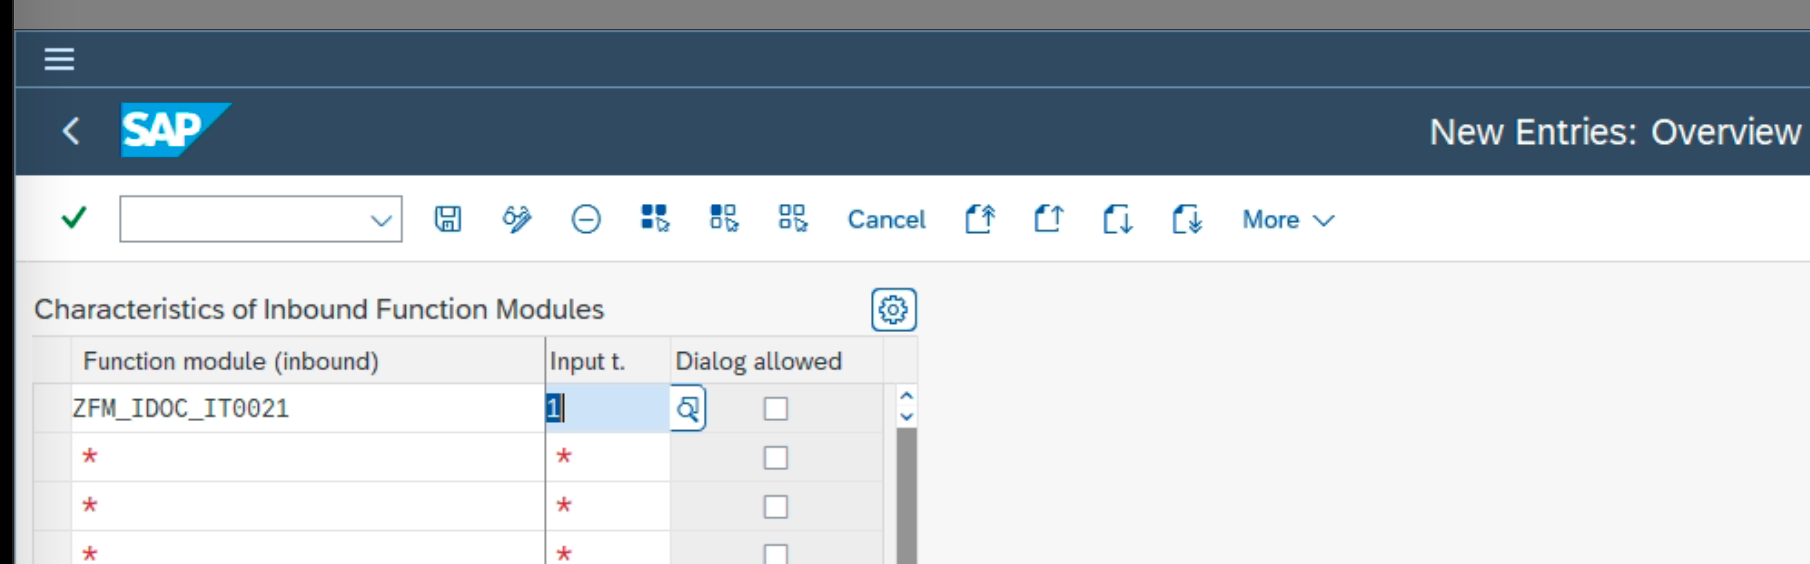
Step 7. Define Additional FM Attributes (Transaction BD51)
See: Maintaining the Attributes of a Function Module
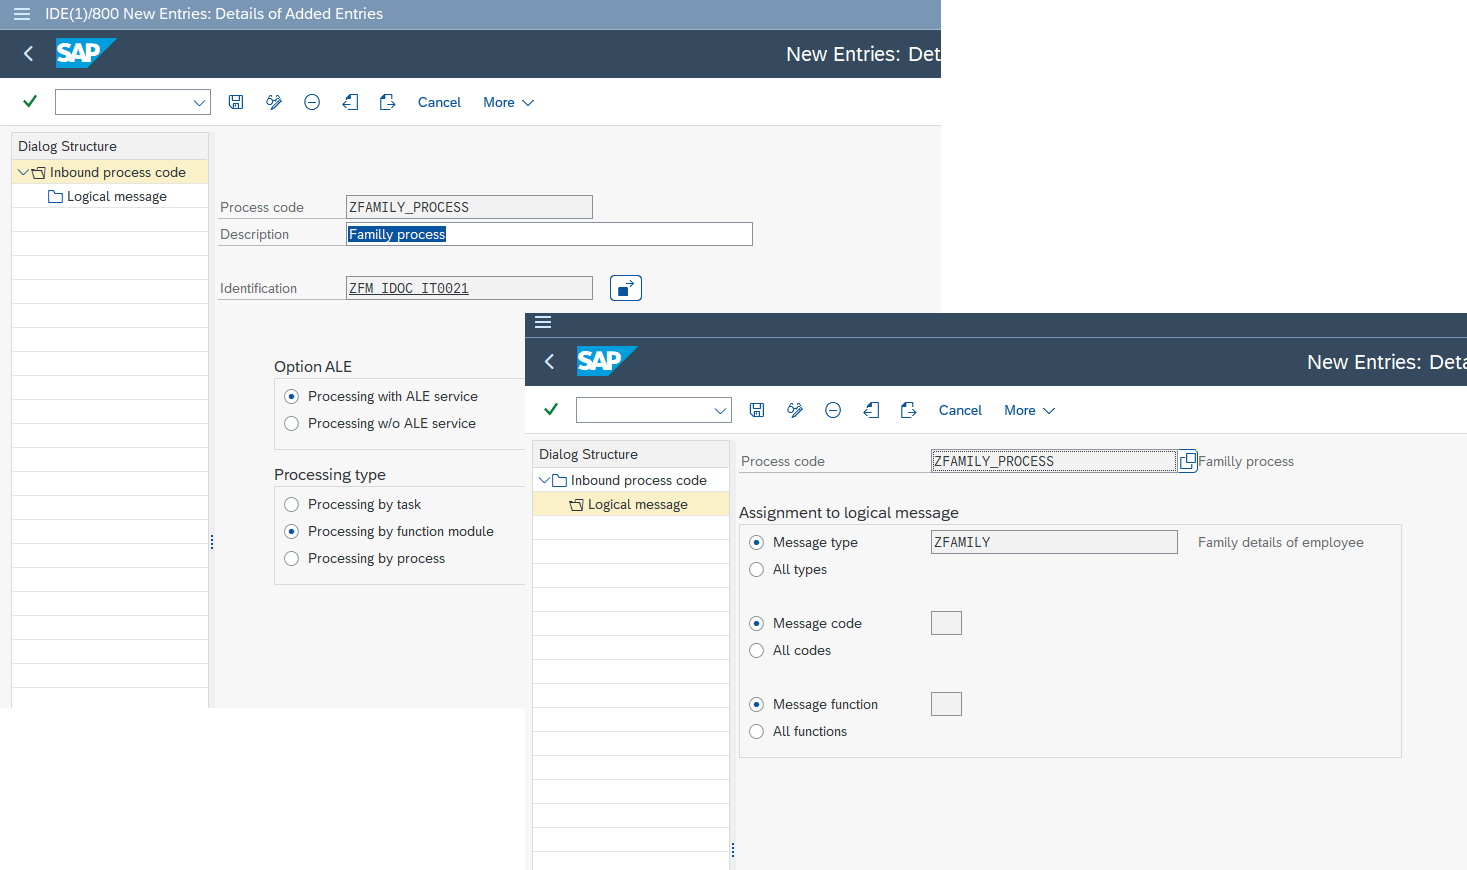
Step 8. Create a Process Code (Transaction WE42)
See: Aim and Purpose of Process Codes
Step 9. Configure the Partner Profile (Transaction WE20)
Set up the partner system where the new Idoc will be sent.
See: Defining Partners
In this article, I’ll use a simple example of sending an Idoc within the same system (e.g., from client 800 to client 810).
Настройки в системе-отправителе нового Idoc (транзакция WE20)
To demonstrate successfully and meet the article’s objectives, I need to maintain the outbound parameters for the target system of the newly created Idoc.
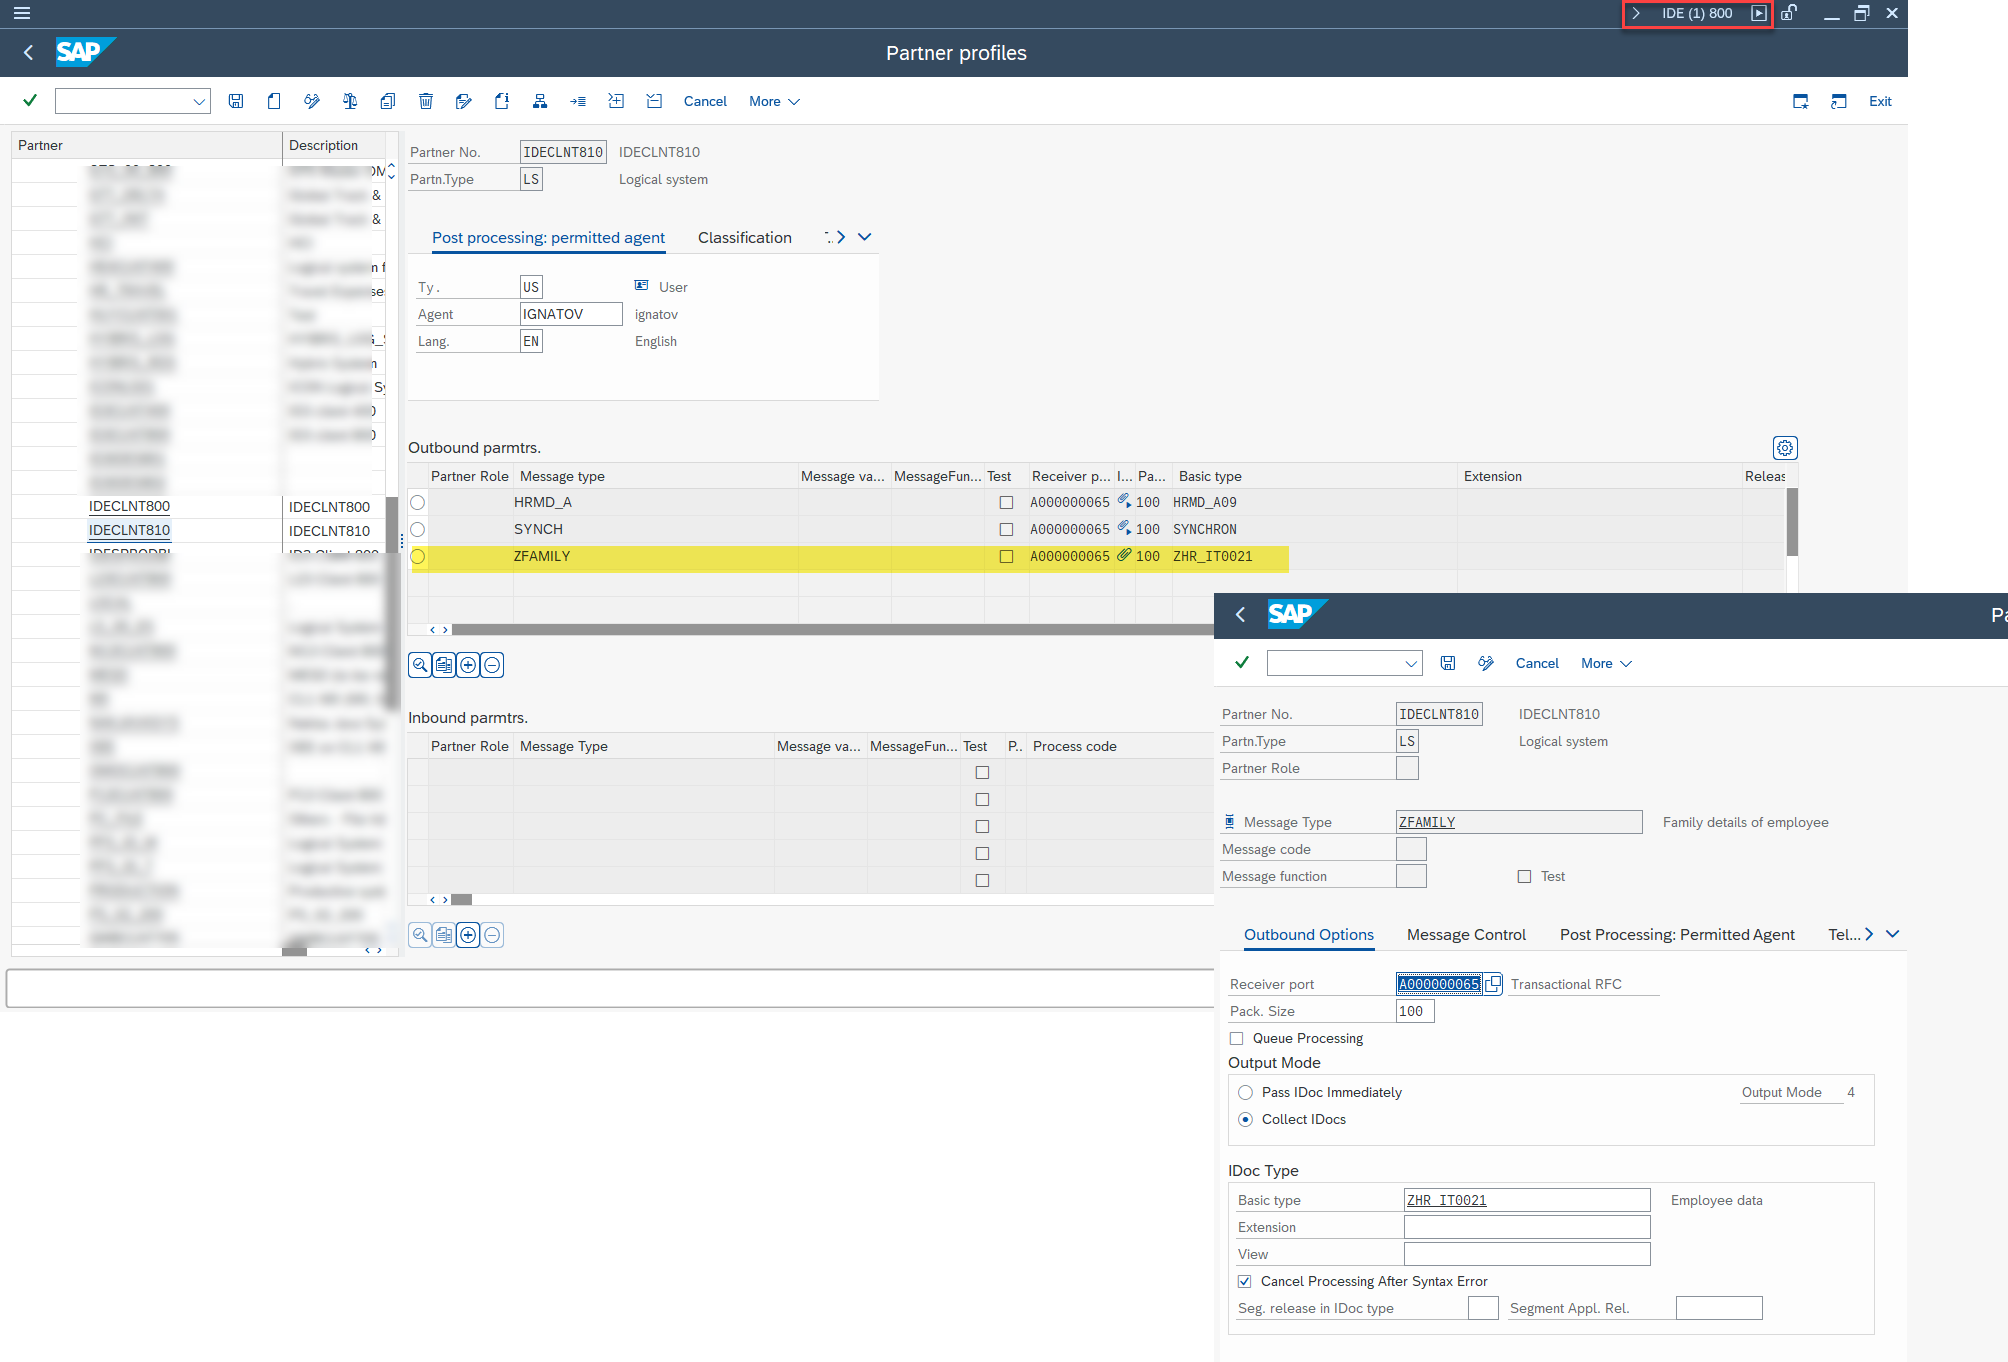
N.B. Please note: these changes are made in the system from which the Idoc is being sent. In my case, that's client 800.
Settings in the Receiving System (Transaction WE20)
To ensure the sent Idoc is successfully processed in the receiving system, I also need to maintain the relevant inbound parameters for the sending system.
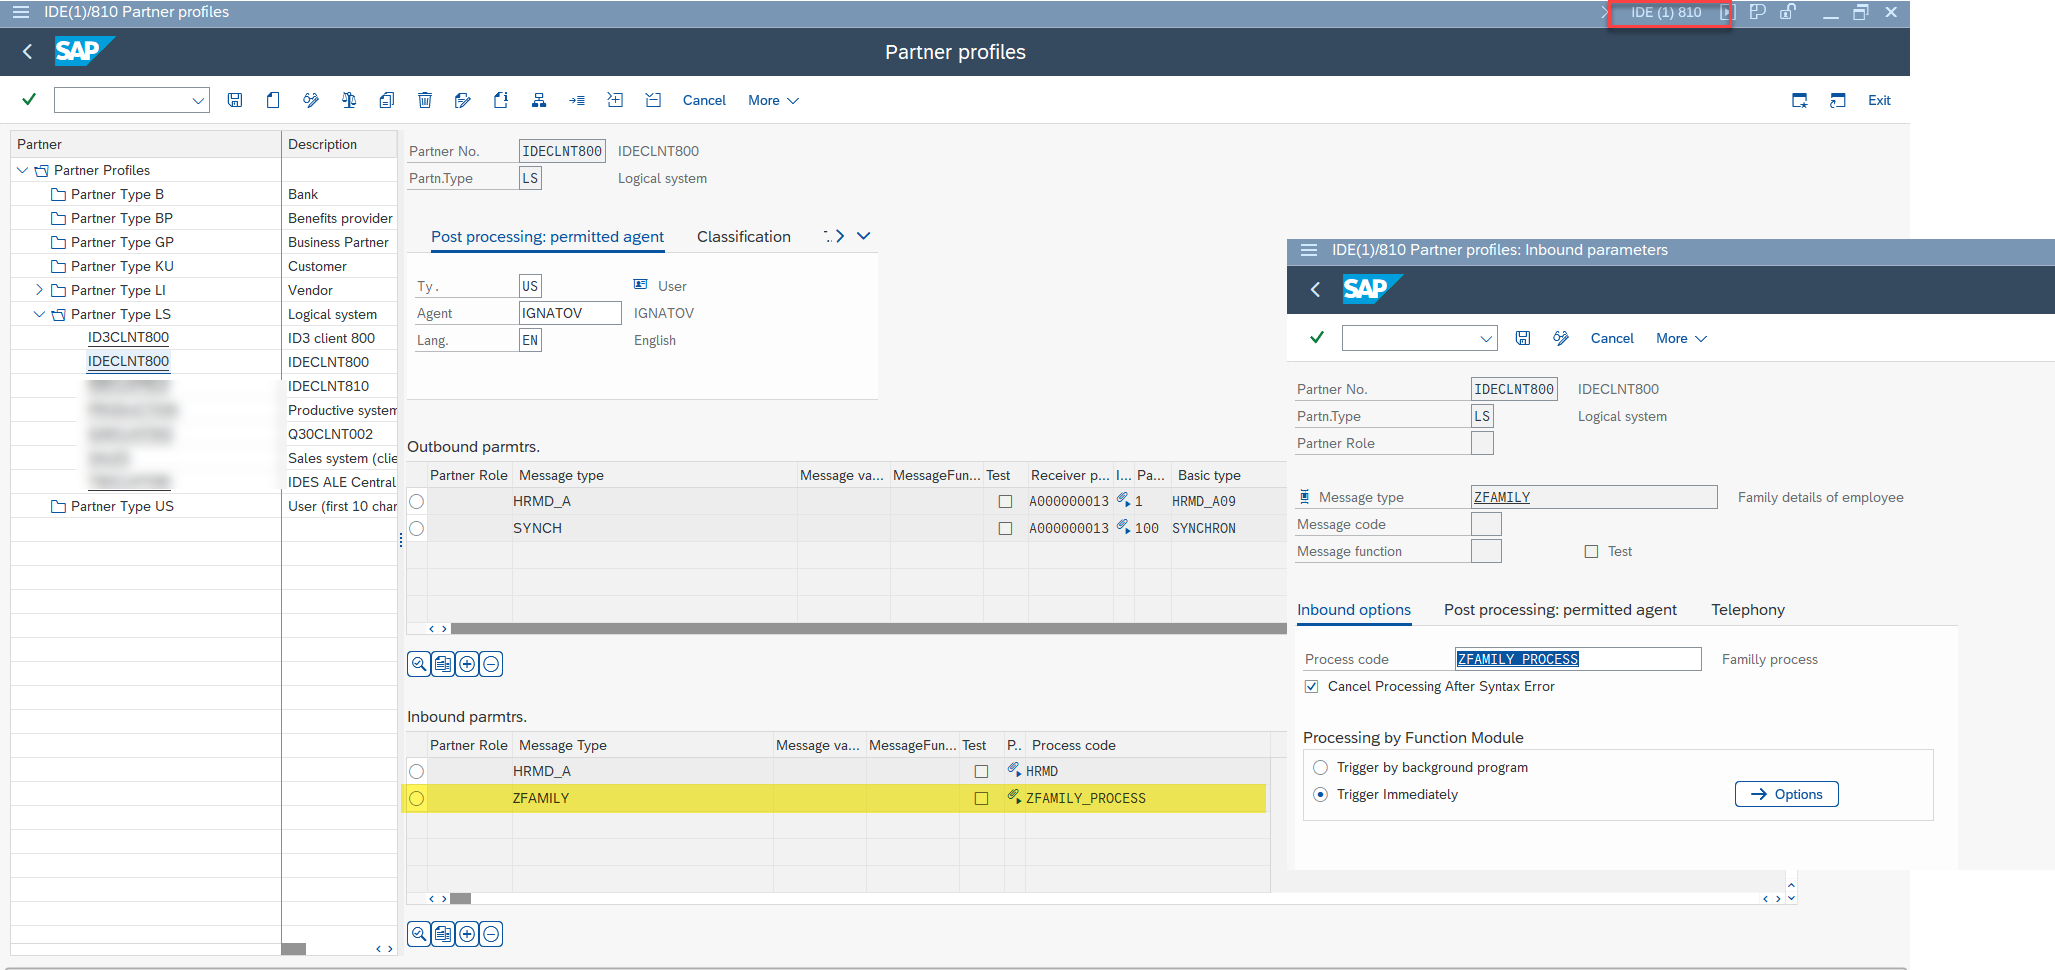
N.B. Please note: these changes are made in the system receiving the Idoc. In my case, that’s client 810.
Step 10. Testing
Case #1. Verifying that the Idoc is formed and sent to the correct system
The following video shows the process of filling the new Idoc’s segment, selecting the recipient system, and sending it. Segment population is done via transaction WE19.
You can view the Idoc’s status using transaction WE05.
Case #2. Verifying that the Idoc was sent to the recipient system
The next video demonstrates how to find the generated Idoc. At this point, it’s important that the new Idoc simply appears in the incoming list.
Case #3. Verifying that the recipient system has a personnel number for which a new infotype record will be created
The next video shows how to check whether the receiving system has a personnel number with missing data in the target infotype used for demonstration.
Case #4. Resending an Idoc from the sending system with data for saving in the recipient system
The video confirms that the recipient system is still missing the required data in the employee infotype. These data should appear after the Idoc is processed.
Perfect! As seen in the video, the data wasn’t successfully processed because I forgot to unlock the personnel number in transaction PA30. This means we're on the right track. To fix this, I will reprocess the incoming Idoc.
See: Как повторно выполнить отправку idoc? Часть 1
See: Как повторно выполнить отправку idoc. Часть 2
Case #5. Generating an Idoc with other data to be saved in the recipient system
The next video shows the generation of another Idoc with data that should be saved in the recipient system for the same personnel number.
Thank you for your patience. Spring must be somewhere nearby. As always, with love, ignatov.