Creating a Web Application Using the SAPUI5 Framework (5)
Creating a Web Application Using the SAPUI5 Framework (5)
Another classic example in the process of building an application with the SAPUI5 framework, this time related to formatting data used within the model.
See the post: Creating a Web Application Using the SAPUI5 Framework (1)
See the post: Creating a Web Application Using the SAPUI5 Framework (2)
See the post: Creating a Web Application Using the SAPUI5 Framework (3)
See the post: Creating a Web Application Using the SAPUI5 Framework (4)
What is meant by data formatting?
Formatting essentially means transforming data from one form into another. For example, your model might contain values (e.g., numeric codes) that aren’t very user-friendly, and you’d like to present them in a more "human-readable" format that can be properly interpreted.
See: Formatting, Parsing, and Validating Data
Extending the Data Model
In this application, I’m updating the employee model by adding a field for the employee’s employment status.
sap.ui.define([
    "sap/ui/model/json/JSONModel",
    "sap/ui/Device"
], function(JSONModel, Device) {
    "use strict";
    return {

        createDeviceModel: function() {
            var oModel = new JSONModel(Device);
            oModel.setDefaultBindingMode("OneWay");
            return oModel;
        },

        createEmployeeModel: function () {
            var oData = [
                {
                    "emplId": 0,
                    "emplName": "James",
                    "emplLName": "Lauren",
                    "emplBDay": "01/01/2000",
                    "emplPhoneNum": "+12345",
                    "emplWorkPlace": "A01",
                    "emplDepartment": "HR Department",
                    "emplAddres": "London, Street 1",
                    "emplStatus": 3
                },
                {
                    "emplId": 1,
                    "emplName": "John",
                    "emplLName": "Schiphol",
                    "emplBDay": "01/01/2001",
                    "emplPhoneNum": "+12346",
                    "emplWorkPlace": "C02",
                    "emplDepartment": "IT Department",
                    "emplAddres": "Bruges, Street 2",
                    "emplStatus": 3
                },
                {
                    "emplId": 2,
                    "emplName": "Sandy",
                    "emplLName": "Reed",
                    "emplBDay": "01/01/2002",
                    "emplPhoneNum": "+12348",
                    "emplWorkPlace": "B841",
                    "emplDepartment": "PR Department",
                    "emplAddres": "Geneva, Street 3",
                    "emplStatus": 3
                },
                {
                    "emplId": 3,
                    "emplName": "Iggy",
                    "emplLName": "Pop",
                    "emplBDay": "01/01/2004",
                    "emplPhoneNum": "+166668",
                    "emplWorkPlace": "A83",
                    "emplDepartment": "Logistic Department",
                    "emplAddres": "Miami, Street 3",
                    "emplStatus": 2
                },
                {
                    "emplId": 4,
                    "emplName": "Lou",
                    "emplLName": "Reed",
                    "emplBDay": "01/01/2003",
                    "emplPhoneNum": "+882348",
                    "emplWorkPlace": "Q773",
                    "emplDepartment": "Press Department",
                    "emplAddres": "New York, Street 4",
                    "emplStatus": 0
                }
                ];
                var oModel = new JSONModel(oData);
                return oModel;
        }

    };
});
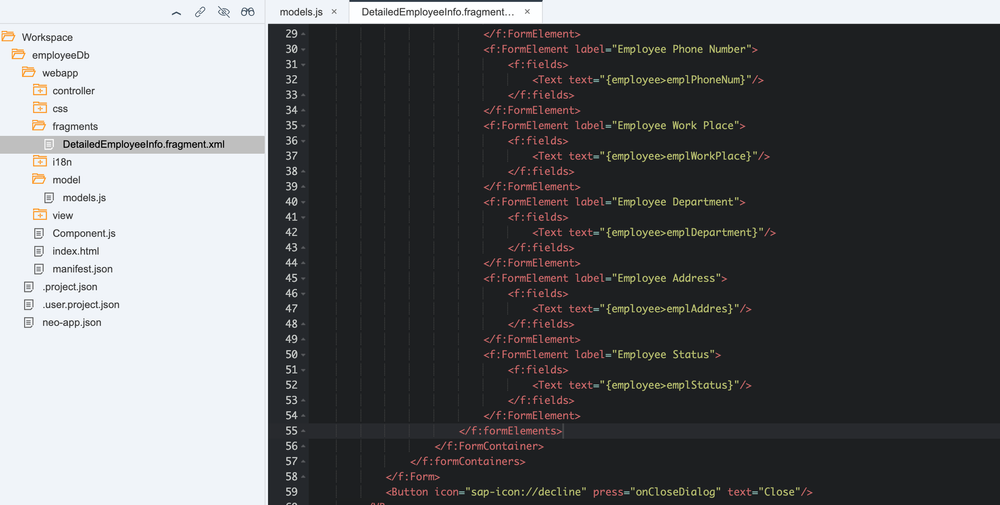
Adding a New Field to the Fragment
Additional employee details in my app are displayed through a fragment. A new field is added to this fragment:
<f:FormElement label="Employee Status">
<f:fields>
<Text text="{employee>emplStatus}"/>
</f:fields>
</f:FormElement>
Checking:
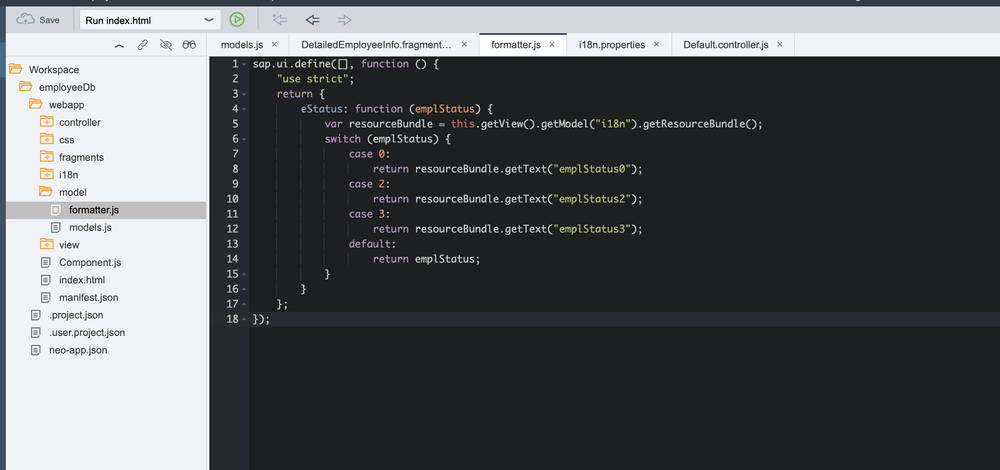
Creating a Formatter
In the same location as the data model, I create a file named formatter.js, which contains the function for converting the raw model data.
sap.ui.define([], function () {
    "use strict";
    return {
        eStatus: function (emplStatus) {
            var resourceBundle = this.getView().getModel("i18n").getResourceBundle();
            switch (emplStatus) {
                case 0:
                    return resourceBundle.getText("emplStatus0");
                case 2:
                    return resourceBundle.getText("emplStatus2");
                case 3:
                    return resourceBundle.getText("emplStatus3");
                default:
                    return emplStatus;
            }
        }
    };

});
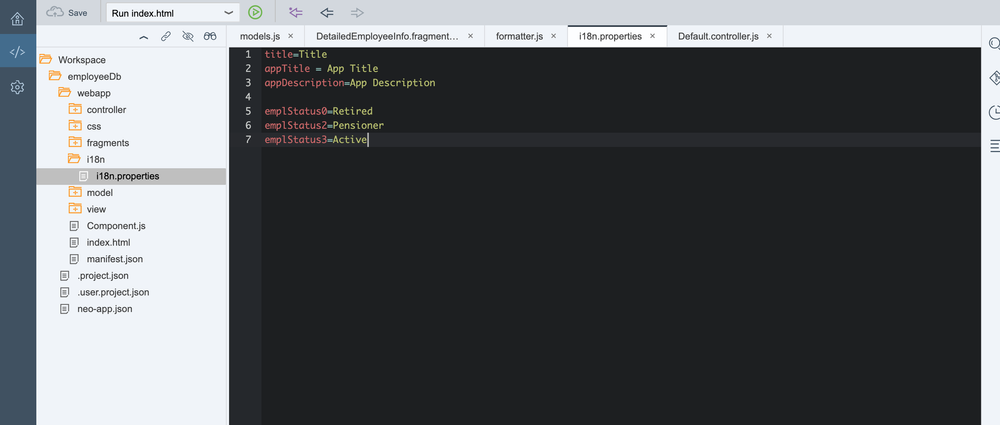
See: ResourceBundle
See: Internationalization and localization
Relevant entries are added to the i18n.properties file (under the i18n folder in the SAP Web IDE project structure).
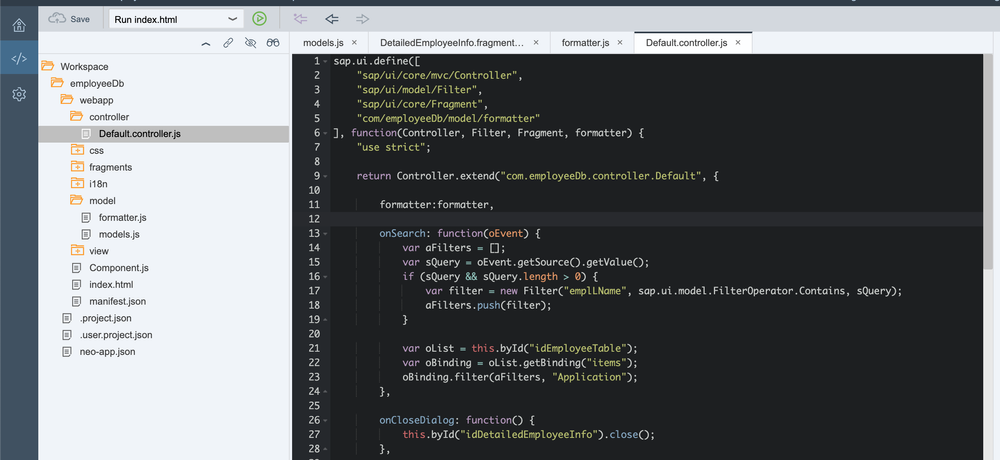
Loading the Formatter in the Controller
The formatter is imported into the application controller:
sap.ui.define([
    "sap/ui/core/mvc/Controller",
    "sap/ui/model/Filter",
    "sap/ui/core/Fragment",
    "com/employeeDb/model/formatter"
], function(Controller, Filter, Fragment, formatter) {
    "use strict";

    return Controller.extend("com.employeeDb.controller.Default", {

        formatter:formatter,

        onSearch: function(oEvent) {
            var aFilters = [];
            var sQuery = oEvent.getSource().getValue();
            if (sQuery && sQuery.length > 0) {
                var filter = new Filter("emplLName", sap.ui.model.FilterOperator.Contains, sQuery);
                aFilters.push(filter);
            }

            var oList = this.byId("idEmployeeTable");
            var oBinding = oList.getBinding("items");
            oBinding.filter(aFilters, "Application");
        },

        onCloseDialog: function() {
            this.byId("idDetailedEmployeeInfo").close();
        },

        onOpenDialog: function(oEvent) {

            var oView = this.getView();

            var oSelectedItem = oEvent.getSource();
            var oContext = oSelectedItem.getBindingContext("employee");
            var sPath = oContext.getPath();

            var oDialog2 = this.byId("idDetailedEmployeeInfo");
            if (!oDialog2) {

                Fragment.load({
                    id: oView.getId(),
                    name: "com.employeeDb.fragments.DetailedEmployeeInfo",
                    controller: this
                }).then(function(oDialog) {

                    oView.addDependent(oDialog);

                    oDialog.bindElement({
                        path: sPath,
                        model: "employee"
                    });

                    oDialog.open();

                });
            } else {
                oDialog2.bindElement({
                    path: sPath,
                    model: "employee"
                });
                oDialog2.open();
            }
        }

    });
});
Calling the Formatter in the Fragment
To display the emplStatus using the formatter, update the fragment field accordingly:
<f:FormElement label="Employee Status">
<f:fields>
<Text text="{ path: 'employee>emplStatus', formatter: '.formatter.eStatus' }"/>
</f:fields>
</f:FormElement>
Checking: